DEATH STRANDING

DEATH STRANDING

30 ratings
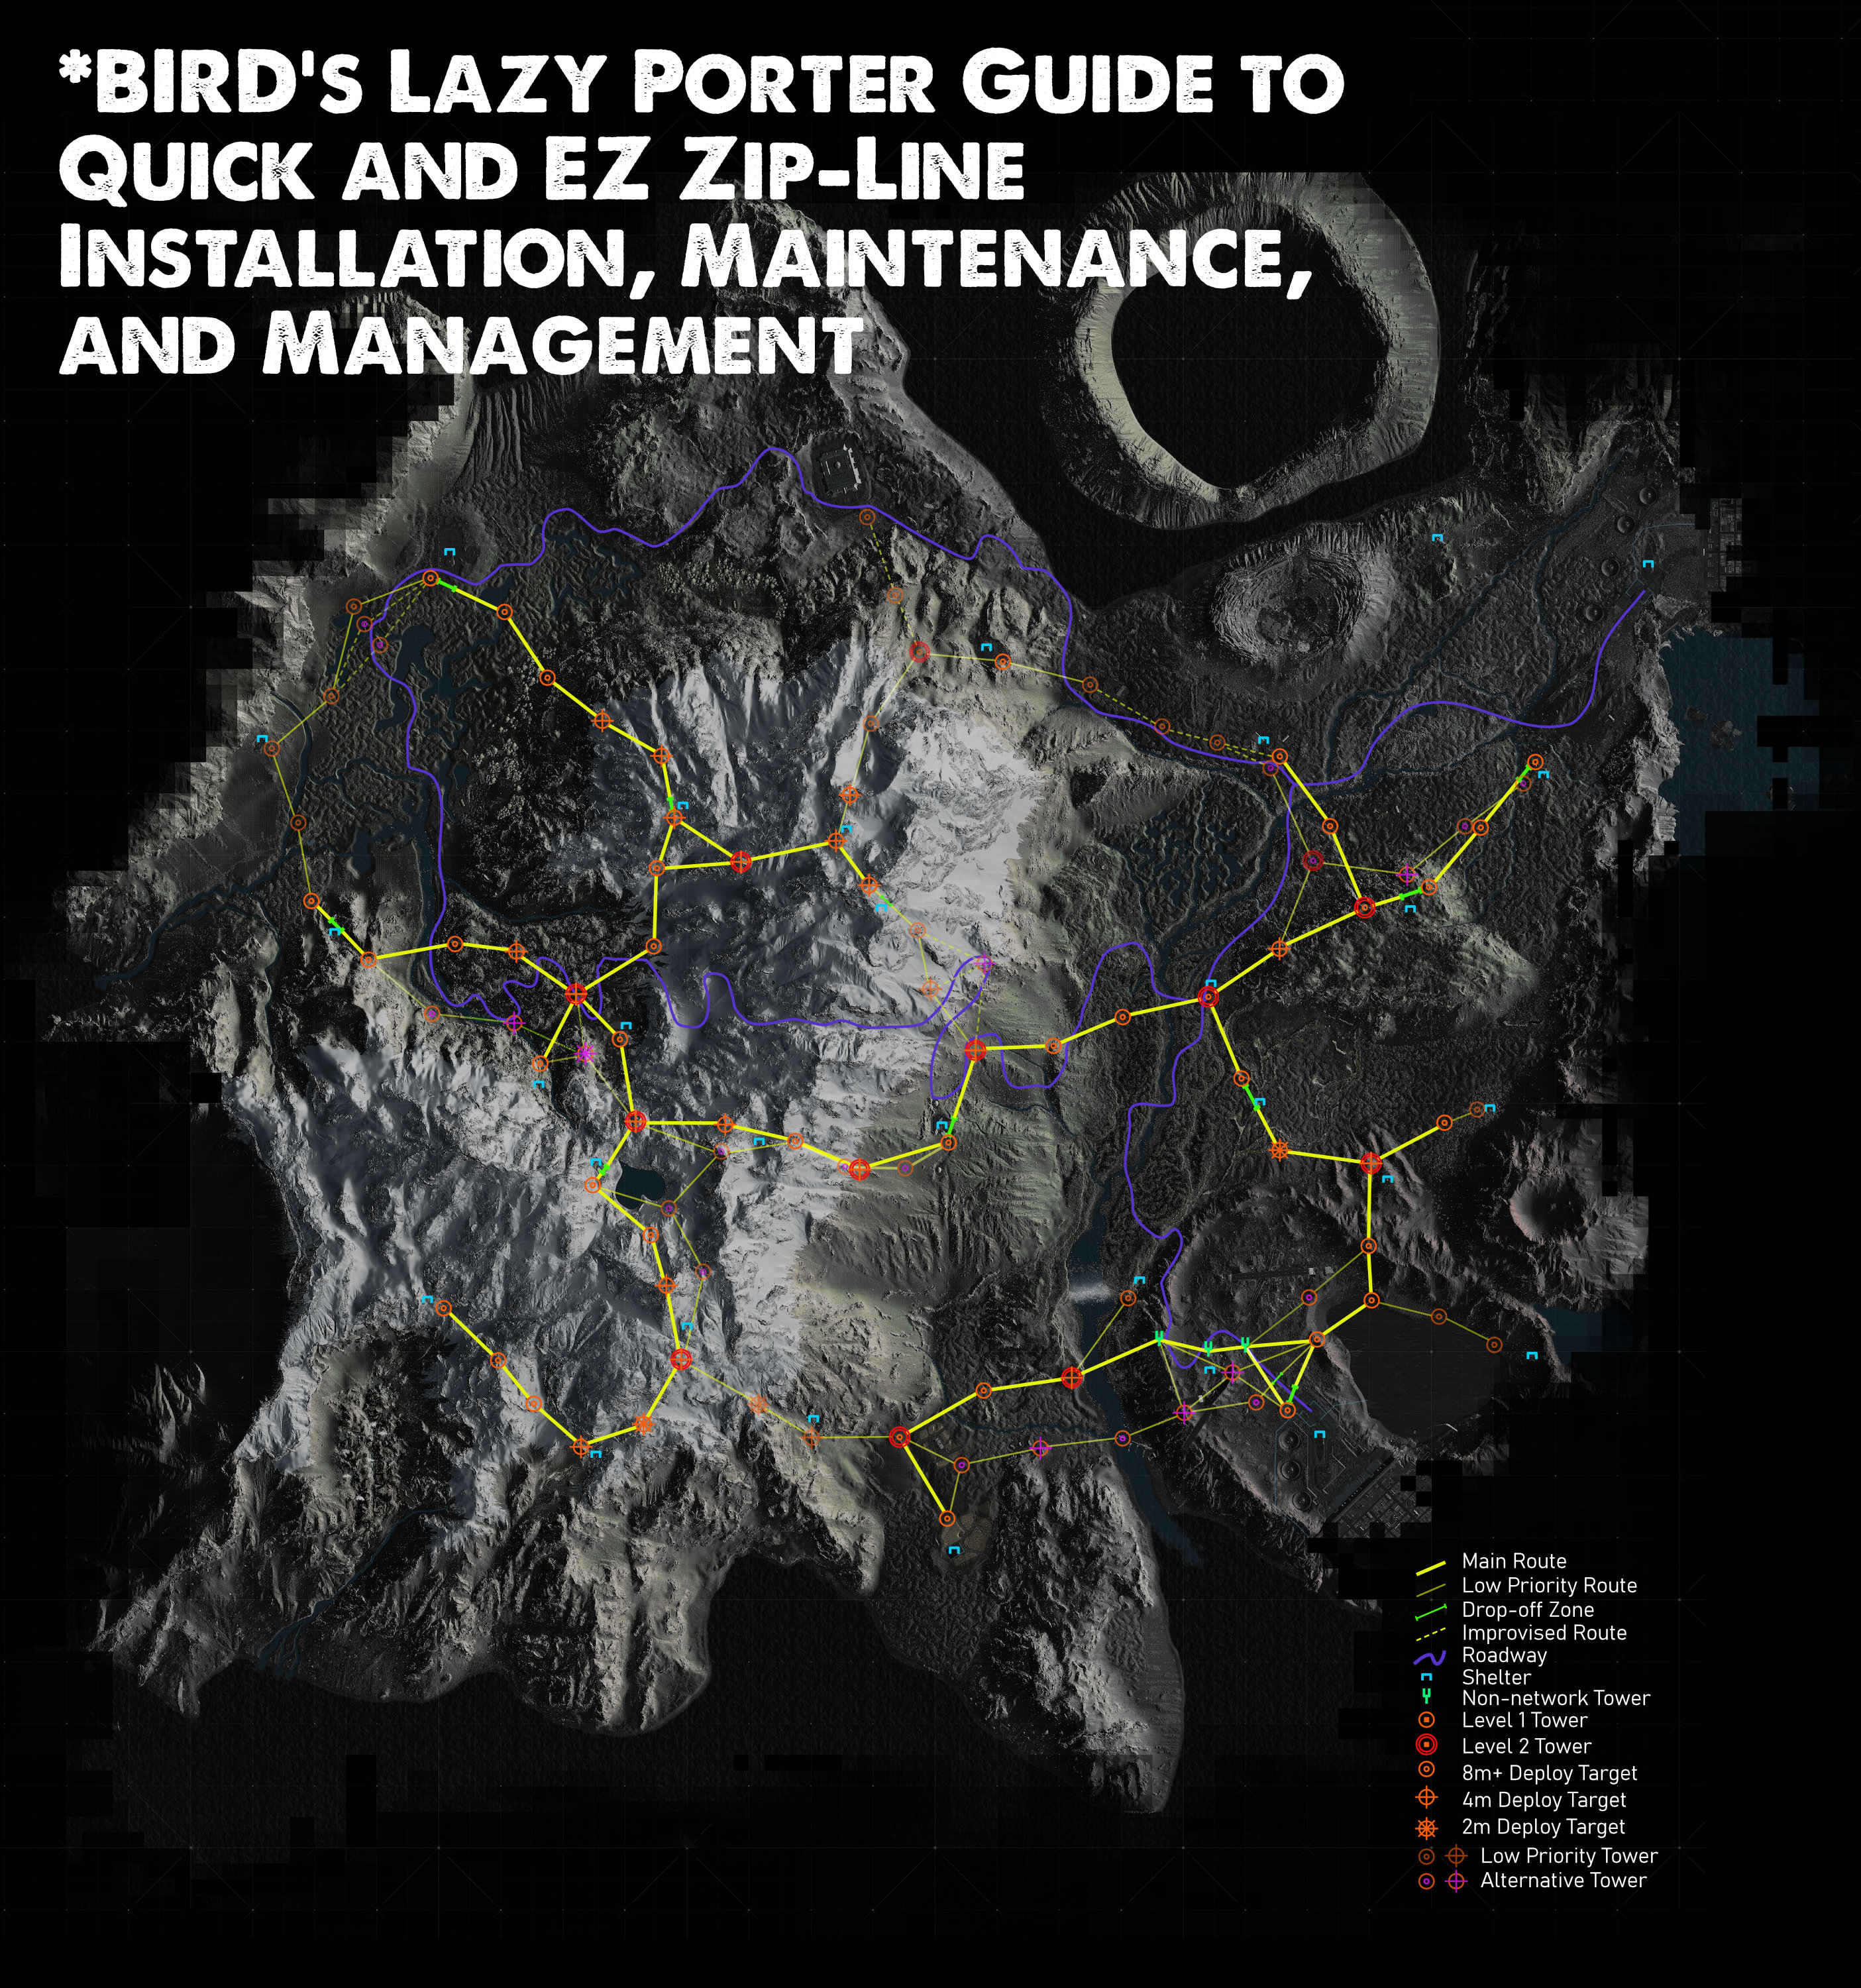
The Lazy Porter Guide to Quick and EZ Zip-Line Installation, Maintenance, and Management - With Map!
By *Bird
A thorough guide of where to build ziplines for a quick and efficient travel network, that uses as few upgraded towers as possible, as much direct routing as possible, and prioritizes routes for ease of use during the intended course of the story, while being very spoiler-lite.
   
Award
Favorite
Favorited
Unfavorite
Introduction
"I wasn't always cargo
I was once kind of my own
I guess I'll pack up my mind
It took so much effort
Not to make an effort
Oh, what a flawless design"
- Modest Mouse, Florida

Ironically, this guide was born out of an intention of lazy efficiency, with a focus on making as few extra trips for upgrading towers as possible, or even worse, repositioning them after they've been built to better use the wider range. During the process of making this guide, that was far from the case.

As many will probably notice, carrying a single PCC module to set up a LV.1 zip-line is much easier than carrying the 72kg additional materials to upgrade it to LV.2. Using this to our advantage, we can set up a zip-line network during regular meandering pedestrian delivery-making, as the map opens up to us, and then have the network nearly intact when shelters join the UCA later. There are some LV.2 towers, generally, at junction points where the extra range has the most effect on neighboring towers, but also at locations to which it's easiest to carry the extra materials. The other large consideration here is a network that's most convenient for delivery-making, and advancing the story, and frequent traveling to destinations, with a little less focus on being as closely integrated with each shelter's doorstep.

Without a doubt, Lord Vampair and his legendary first continuous route deserve oodles and oodles of credit and commendations, without which this guide wouldn't have been possible. His is still the most efficient for overall chiral bandwidth usage, and travel to all shelters, but is a little difficult to coordinate until late into the late game.
Video
Special Considerations
The first few issues that will make building this route difficult from the beginning are these:
  1. You don't have the zip-line construction technology unlocked
  2. You don't have the chiral network expanded to a territory
  3. You don't have enough chiral bandwidth
Most of these problems will be solved while you naturally progress through the game, but the design of this zip-line network takes that into account. If you are following this map from early game, ignore almost everything that is "low priority" until after the nearby Prepper has joined the UCA, and only if you'd really like that bit of the route for convenience. After you unlock the zip-line tech, you should do the best you can to build out the lines to these specs. At some key locations, the region won't be online yet, but do your best to lay down a zip-line, so that later it's easy to zip back to it, dismantle, and relocate the structure. If chiral bandwidth is an issue, either do more deliveries to increase your bandwidth, or use your cufflink map to remotely dismantle towers in far off locations you aren't traveling to often. If you are playing online, a lot of these locations benefit from using other porter's towers without using your own chiral bandwidth.

I'll describe later some of the details of the alternative routes and tower placement, but the first obvious oddity is that there is no route directly to Lake Knot City. This is because it's slow, inconvenient, and using a vehicle on the road is always better. I tend to leave a vehicle near the closest Prepper and just use that for the occasional delivery back to base. (Or with Peter Englert's House; just drive from the Craftsman) The likelihood that the roadway from the early game is built and well used is why some of the eastern route is the way it is. It's simply easier to drive to the destination, rather than incorporate it into the zip-line network.

Some other general helpful notes:
  • The 2m Deploy Target towers have a location placement that is very very precise. If you don't put it in the exact correct spot, the route might not work. These towers should usually be placed first since they have such a large influence on the position of the neighboring towers.
  • The 4m Deploy Target towers are less precise, and can usually be adjusted to account for obstacles or other Towers being slightly out of range, etc.
  • The 8m Deploy Target towers are extremely forgiving. They often could be put in an entirely different location, and still have the network work, even if it'd just mean more distance traveled.
  • Using one floating carrier to follow you on the zip-lines is a great way to make deliveries.
  • You can't have two carriers following you on the zip-lines.
  • Using the cufflink map, and setting Markers for a quick distance measurement is a great way to see if you're near the 300m range limit.
  • The green "drop-off zones" are areas particularly tuned, so that while the tower might not be right next to a shelter, dropping off the zip-line early gets you a bit closer to the target.
  • The alternate routes have various benefits, but near SKC, using Mama's zip-lines might be the better option. However, if they deteriorate, then you'll have a better option instead of recreate it.
  • Usually, upgrading a tower is better than repairing it, but that's not an issue until late game.
  • When dismounting a remote tower, rotate around and face the direction you want to stand next. Clicking in the wrong direction could send you falling down a cliff.
Location Notes
These location notes are not exhaustive and tend to focus on the trickiest locations where a graphic representation might help get the tower standing in the right spot. I will try to keep these notes as spoiler-free as possible, and use acronyms and notation for the locations that will be unusual, but it should be easy to follow once you visit that location. Most screenshots have an indication of nearby tower and it's distance, so that you can understand how important the distance is. I'll only be cherry picking some of the best images here, but maybe if you need some more, you can look through my Steam profile's images.

The most important thing is building the central continuous route from the En to the M (like in the video) is highest priority once you unlock the Zip-line tech. The sections in the mountain will save a lot of time and energy later.

The most outrageous exception to this network routing, is the several branches around the WNMKS because when you can't build them they would be useful, but when you can build them, they aren't particularly useful. The "improvised" routing is such, because it's distance and terrain don't really allow for an even spacing of the towers, so almost any reasonable placement of a few towers will work out. If you do build them, try upgrading them like Vampair did. The other thing being, that this shelter isn't used very often, and it's probably just as practical to commandeer a vehicle for any missions involving this section.

There's also a small conflict with the towers between the WS and the FP; if you build the roads here, you will likely need to be precise with the second tower, or add another LV.2 tower nearby to circumvent the asphalt that's now blocking your way through the sky.

The numbers under each image are coordinates you can see with the cufflink map. It's a little difficult to see, but there is a coordinate in the top right of the screen that can be used for precise locating.

DCSLKC > WS Tower 3
(148.95, 191.80)

R > MKC Tower 2
(-1077.00, -65.47)

MKC Tower
(-1137.63, 235.12)
handy chiral bridge!

MKC > M Tower 1
(-1292.15, 409.75)

MKC > M Tower 3
(-1021.06, 871.30)

M Tower
(-939.91, 1028.96)
very tricky positioning! look at the rock's texture!

M > S Tower 1
(-690.02, 864.28)

M > DCNMKC Tower 1
(-983.40, 1246.83)

M > DCNMKC Tower 2
(-1202.34, 1384.10)

M > DCNMKC Tower 3
(-1396.42, 1522.39)
tarzan!

Cos > JD Tower 1
(1117.96, 89.90)
very tricky positioning! look at the rock's texture!

JD Tower
(1578.11, -217.16)

HL > G Tower 1
(-1029.32, -150.18)

HL > G Tower 2
(-965.39, -678.75)

G Tower
(-908.51, -925.24)

G > VP Tower
(-675.55, -1065.55)

VP Tower
(-444.75, -1210.59)
handy chiral bridge!

The rest of the zip-line towers are either nearly identical with Lord Vampair's route, or they are so unspecific, and easy to place, that with a little careful navigation and scouting, they can be placed so they work with the rest of the network.
19 Comments
Puph 26 Feb @ 7:26pm 
This is really hard to follow. Would be easier if every zipline had a name and coordinates.

Thanks though.
*Bird  [author] 18 Oct, 2023 @ 10:31am 
Hi, sorry, I've been away and busy.
@Jori - The text says the exact location for the "bigger targets" is not so precise or important. You have some wiggle room.
@Jackson - It's sort of the same issue. The locations at the end are either the exact same as Lord Vampair's network, or have substantial wiggle room while still being viable.
ChunkieXL 2 Sep, 2023 @ 2:38pm 
No pics or video footage of the Paleontologist / Evo devo areas despite some of the tower placement needing to be so precise? Pretty frustrating. The map you've attached demands precision yet is super zoomed out and the icons so big that you really have to trial and error to get the right fit
joridiculous 14 Aug, 2023 @ 6:44am 
Good guide. But what do you mean with 2m, 4m, 8m Deploy targets?
Eleanor Shellstrop 8 Jun, 2023 @ 5:15pm 
I don't really know the customs around posting guides and stuff on Steam, but I'm sure it would be better in any case to have yours at both place, unless you are in very bad terms with sir Vampair.

Apologies for the extra work though.

And again, thank YOU, you made me see the game in a completely different way, and your guide was a very good read. I am using both the map and the video to find the precise locations.
*Bird  [author] 8 Jun, 2023 @ 1:55pm 
Thanks Eleanor, I didn't really see the two version were different communities, and considered doing it all over again might be kinda of spammy. But now I see there's a lot of spammy guides anyhow, so whatever. I'll just try to copy and paste everything over to the other community space over the weekend. Kinda strange, and kinda frustrating.
Eleanor Shellstrop 7 Jun, 2023 @ 9:11am 
Man, you should post this in the Director's Cut guide section, it makes no sense for it to be here.
There is almost no visibility, if you did not have posted the link in the comments from the Vampair's guide, I would never have found it.

There is no steam page for the original version anymore, nobody can see this normally, you have to really search for it. Even google have a hard time finding it. I have to navigate through my Steam community history to get back here, and I can't like, I can't favorite, award or whatever.

Really, think about it man, this great guide should be known.

P.S. Yes, I started some zip routes, and it's great ! (kinda miss the trike though)
Eleanor Shellstrop 5 Jun, 2023 @ 7:05pm 
I've been, so far, doing everything with the transporter trike, except for the few mandatory "have to walk" missions (I'm well into chapter 6) and I never had any trouble. You can really go almost anywhere with that toy. And well, I never considered using the massive amount of ressources and logistics required to do this zip line thing.

But reading this guide and watching the video made me change my mind.
I will try a couple routes right away and see how it goes. It looks like a lot of fun after all !
(also seeing you moving around showed me there are quite a few upgrades yet to look forward to)

Nice job !

And cheers to LordVampair for the essentials !
*Bird  [author] 18 May, 2023 @ 10:02am 
@Alias, yes, if anything, it works better than it would have in standard edition.
Alias 8 May, 2023 @ 6:49am 
Is this applicable for the Director's cut?