Team Fortress 2

Team Fortress 2

438 ratings
Medic: Advanced to Expert Tips and High-Level Competitive Strategy
By edgar
Learn how to be the best Medic player you can be. Read about strategies from top-level competitive play and learn to apply them to your matches. Guide is extensive, up-to-date and reflects all the current knowledge and stats of weapons in 2020+.
It is a very long guide, so I do not recommend trying to take everything in in one go.

Never die, always be healing!
Never let the enemy see you!
Climb to the peaks of the medic class!

Geared more towards Casual / Prolander / Highlander: not so much for six-on-six. I do not see myself as qualified enough to give advice on some of the nuances of 6s.
8
31
6
8
13
8
   
Award
Favorite
Favorited
Unfavorite
Introductory Details
''Vhy, hello!''The Medic travels at 107% base movement speed (320 hammer units per second, 'hu/s'), the same speed as the Spy, where base speed '100%' is 300 hu/s.¹
  • 1 hu = 1.905x10⁻² m. Medic runs at an impressive
    6.1 meters per second.²

  • Medic's self-regeneration rate is an object of intrigue. Scaling similarly to the Medi Gun, he self-heals at a rate of 3HP/s (Health Points per second) up to as much as 15HP/s dependant on weapons and battlefield activity.³ The mechanisms and visualisation for which is found in this guide.

Class Aims and Applicability
Medic, on paper, plays the role of support. He is dubbed by the community to be a generalist class, meaning he is applicable in almost any situation. A team with a medic will almost certainly beat a team without one.
  • As a medic, one's overarching objective is to:
    1. Keep your teammates up and fighting for as long as possible.
    2. Neutralise the effectiveness of the enemy team's Übercharge.
    3. When attacking: push your team through RED's grip of a choke point or control point.
    4. When defending: repel BLU's attempts to gain territory.

The trouble begins with the realisation that the entirety of the enemy team wants to kill you. The question is, how you will deal with them? Learn how to check all of the boxes, in one life, and with Uber to spare, no less!
Basic Settings
Firstly: I recommend raw mouse input.
Navigate to TF2 in your Steam library; right-click, click on 'properties'. Under 'General', click set launch options. Add:
-noforcemaccel -noforcemspd
for raw mouse input. Click okay. These may be used in tandem with whatever other commands you choose to apply here.

Main menu; Options;  MouseMain menu > Options > Mouse
Uncheck "Mouse filter".
Check "Raw input".
Uncheck "Mouse acceleration".

Know that, here, to find your current mouse sensitivity, look at the number in the top-right of this options menu, 'X.XX'. Mine here is '3.46', for example.

Options
Options > Multiplayer > Advanced
Check "MEDIC: Medigun continues healing without holding down fire button".
Check "MEDIC: Display a marker over the player you are healing".
Check "MEDIC: Injured teammates automatically call out".
My personal autocall percentage is 88: It serves well to indicate where every teammate currently fighting in the frontlines is located. Note that these four options may also be found under 'Advanced Options' as well.

Check "Use the team status display in the HUD".
Apparently, not everybody uses this. It is incredibly helpful, for you will see when specific enemy classes are defeated and when they respawn without having to hold tab to see the obtrusive scoreboard. I cannot recommend this enough: it is so helpful for knowing when sightlines are safe, and when counting Ubers (see section 'counting Ubers').
Team status in HUDCheck "Remember active weapon between lives".
Check "Remember 'previous weapon' between lives".

Options > Video > Advanced
Slide "Field of View" all the way to maximum (90). This is VITAL.

HUD
My personal favourite HUD to use is criticalflaw's FlawHUD[huds.tf] due to the central location of the Uber meter and how easy to notice it is. While the stock TF2 HUD is a marvel, I dislike how the Uber meter is squirrelled away in the corner.
Ultimately your HUD won't change your gameplay per se, but sometimes it's nice to freshen things up.
(Direct GitHub link[github.com])

Binds
I strongly encourage use of specific binds and simple scripts to enhance the skill ceiling and what the class is capable of. I have moved these to the end of the guide. They will give you a direct advantage over medics without them.

All of the included binds in this guide, et cetera, and perfectly 'legal' and whitelisted by ETF2L. There is absolutely no risk in using any of these. They're all simple console commands intended by Valve for use in servers running both sv_pure 1 and sv_cheats 0.
Attitude Is Everything!
Your attitude and approach will be hugely determining factors in how well you do.
  • Stay humble and always be learning.

  • 'Remember the Zen': stay patient with both your team and the enemy team at all times. The best medic player will be able to make lightning-quick decisions in the most stressful of scenarios. When humans become stressed (for example, if a match is going poorly) their critical thinking and situational judgement will fall below top-standard as a result. Be aware of this and learn to focus.

  • Be kind! There is a lot going on within a person's head. The moment you lose your patience with somebody is the moment you lose their respect. Be courteous, for even if somebody is being nasty to you, they still hold a level of respect for you, even if they don't consciously realise it. This level of respect for you will be lost if you lose your composure.

  • Take time to reflect on how you have been playing the class recently. Is it making you happy? Do you need to take a break?
    You will make your best plays when you are in your best mood.
  • Remember to say 'thank-you!' The best way to earn your team's respect is to give it out yourself.

  • With every death: ask yourself, 'Could I have healed more efficiently? How could I have avoided this death? Do I need to fall back sooner?' For example. Review your placement and strategy.

  • If you meet another keen medic player, why not say hello? You may each learn something from one another by sharing experiences. A chance encounter should never be wasted.

  • Don't ever get greedy! This goes for assists, strange stats, Ubersaw swings, points and so on.
    • If someone needs help up front, don't sit on the cart for points. Not only are you exposed in the open, you could be helping people stay in the fight.

  • The best medic gives heals to everyone. Even the clueless players.

  • Don't use strange secondary weapons in comp unless they are already Hale's Own (max. rank). They may level up and let the enemy know what weapon you hold where it had previously been a secret. This only really applies to Medi Guns as you're always going to be using the crossbow / Ubersaw in competitive anyway.
    • For example: a sneak crit attack may be ruined by a server-wide broadcast of "hey! the enemy medic's Kritzkrieg just levelled up!".
Bonus: Strange Medi Guns only awards 'Ubers deployed' numbers if you actively use on a patient. Knowing this, don't intentionally hold out until you can connect to a player before using, if you are using to save yourself.
Equally so, if somebody needs Medi Gun healing while you and another teammate are getting kills, don't heal the teammate getting kills for any longer than you need to. Don't be greedy for strange stats! You'll end up making stupid plays. I say this from a personal learning experience.

Bonus bonus: When somebody else picks up your strange weapon, whatever they do will not increase your weapon's stats. If there's a visible stat clock, it will update in real time with whatever the owner does with it. Killing or assisting against a Dead Ringer feigned death increases killstreaks but doesn't count towards strange stats. 'Strange part: allied healing done' does not ever count overheal.
Your Relationship With Your Team
General Approach and Strategy

  • Don't be afraid to ask your teammates to change class - just remember to say please and thank-you!
    • You'd be surprised how often people comply with what you ask when you're kind.

  • COMMUNICATE and ADDRESS your intentions to your team! Voice chat and my team message binds are heavily recommended, as they are specific and not able to be interpreted by the enemy, unlike character voice commands.
    • Know that there exists a thin line between being an effective caller and being a bossy stranger: people will respond poorly to having orders barked at them, and they will respond positively to helpful, clear, short and encouraging suggestions. Generally: don't say anything unless you need to. Constant blathering will turn quickly to white noise.

  • Aim to keep every fighter around you overhealed. This gives each and every player on your team a passive advantage over their enemy. It is not possible to keep everybody fully overhealed at all times. Therefore, PRIORITISE: a key fighter may die because you were busy overhealing someone, without crit heals, behind the lines, for example.

  • If you are feeling incredibly bold with full health.. you may block some damage for your heal patient.
    • Generally this is a poor idea. Not only are you possibly exposing yourself to a sightline but you risk getting hit by more than what you could anticipate.
    • an example application of this would be if your friend is covered with jarate. You may block some incoming damage whilst healing them to save them. Healing a patient under the effect of jarate, milk or gas passer gas expedites the removal process. See section 'healing strategy' for details about 'effective health' and how it is different from absolute health, as it applies to this situation.

  • Do not half commit to healing. If you decide to heal a pyro running away, for example, do not give up half way and try to roam around to find another player.
    • Call for 'Medic!' to alert them of your presence. Unless, of course, your other teammates are right next to you.

  • In the incredibly rare situation where you may use the Ubersaw's Spinal Tap taunt, remember to mask what Medic says with the Masking Uber binds. The taunt may be used to stun invulnerable players. It won't kill them, but it will grant you just 50% Uber after stunning them if the saw removal connects. This principle applies to disguised spies, but it will kill in addition to stunning.
    • Know that, as a team, if you plan to stun the enemy during a charge, the Holiday Punch on the Heavy is simply better. I'm not sure whether I can be confident in recommending this for a competitive scenario.

  • UPON RESPAWN: Generally, don't walk out on your own. Not only are you putting yourself out there without defence, you are potentially wasting time in which you could be building Uber. Use your voice and ask for somebody to pick you up. This is only necessary if there is nobody respawning soon.
    • If somebody spawned just before you, evaluate whether you could be with somebody quicker by either A) waiting for the next spawn or B) catching up to the player who just left spawn; obviously you won't catch a scout, though. Asking recently departed teammates to pick you up is preferable.
    • Usually, if there is nobody spawning in the next 6 seconds or so, I choose to leave spawn to meet my team.
...
Approach and Strategy with Specific Classes

Class
Co-op Strategy
Scout
  • Heal the Scout to get to places quickly. If he can aim, he is the most deadly class when given a full buff, or even a charge. Know that focusing healing on him perhaps isn't the best idea, as even with a full buff he still dies quickly against multiple enemies.
Soldier
  • Always buff your friendly soldiers! A full buff will allow them to blast jump into the enemy freely and stay alive for loner: perhaps those extra points of health you give him over another player will enable him the time to drop the enemy medic. If you wish to focus healing onto a soldier, the stock rocket launcher is his best bet. It is effective against sentries and suffers no splash radius or damage penalty.
    • While he is nearly top-priority for healing and a full buff, there are better classes to focus healing on, such like demoman or heavy.
  • If your soldier uses a banner, be sure to give him higher heal priority for the duration of the buff. More info in section 'healing order'.
  • If your soldier friend has the Cow Mangler 5000 equipped: don't use the Kritzkrieg charge on him. This weapon is incapable of full crits; crits will always be filtered down to only mini-crits.
    • Note that, every other Weta Workshop weapon (Righteous Bison / Pomson 6000, Eureka Effect / Phlogistinator, Manmelter, Third Degree) can be granted full crits with the Kritzkrieg, however.
Pyro
  • Overhealing your pyro friends is very important. They, of all classes, will need to get right up into your enemies' faces. He along with the heavy will be tanking most of the damage on the frontlines.
    • A surprise attack from a phlogistonator pyro and an Uber medic either from a flank or from around a corner will devastate the unprepared team, although, after once or twice, the enemy medic will wisen up and counter your efforts. Pyro's priority after a push is to escort you out safely; this is reason enough alone for you to grant him a full buff whenever you can.
Demo
  • Your friendly demoman serves as the drive of your team. Before you begin healing, recognise how important he is to not only you but your team as a whole... but only while he is ALIVE.
    • Demoman not only boasts the greatest attack potential but also fantastic area denial.
  • With a Kritzkrieg charge, the demo may kill an entire enemy team, and with an Ubercharge he may easily destroy sentry nests.
Heavy
  • The greatest class to focus healing onto when holding a choke. His constant fire and large health pool grant him both the defence and the offence required to repel enemies at close to medium ranges.
    • Know the method of most effectively healing just one patient, keeping a necessary balance between restoring health and building Uber. I have listed more details pertaining to focused healing in section 'healing strategy'.
Engi
  • Much like the spy, grant him situational healing and a bolt should he require it. A full overheal could be given if the courageous engineer tries to run into battle with Frontier Justice crits.
Medic
  • ALWAYS keep your medic colleagues buffed; twice the healing, twice the team's potential. Never heal the same person with two Medi Gun beams to avoid 'stacking'. Don't heal the same person before a push: you don't want to both deploy invuln on the same patient at the same time. Oops! Instead, bolt your colleague's patient if they are under heavy fire.
    • STACKING: will be explained in greater detail in section 'Uber planning'.
    • Coordinate with him: work your Uber with his Uber. Communicate.
    • Know of the power that is the 'Krüber'! A kritz and an invuln on the same player can devastate an entire team if played smart. The übercharge glow hides the critical glow at first glance. Refer to section 'Uber planning' for detailed analysis of the steps before a push: apply this to a double-medic situation.
Sniper
  • Grant your sniper friends a full buff whenever you can. Heal them if they are burning and extinguish them, so they can aim in peace. Granting them a full buff will allow them to survive a quick-scope and counter-snipe more effectively, in turn granting you the freedom the walk though now-unoccupied sightlines to heal and support.. until the enemy sniper respawns.
  • If a sniper with a Razorback gets overheal, it is an immediate sign of an enemy spy. One should be bolting newly encountered patients anyway for reasons besides just spy-checking.
Spy
  • Only ever heal him if there is nobody else to heal. Give him a buff before he ventures to do his work, as doing so takes only a second. If he needs healing, a quick bolt will almost always grant him full health again.
    • If he is out of cover and disguised... DON'T heal him. While the overheal particles will match the team of that which he is disguised as, an enemy medic healing somebody on your team is a dead giveaway of a spy. Don't blow his cover! If he really needs over-healing he'll come to you, out of sight of the enemy.
  • You cannot beam heal a Spy while he is invisible, but you can heal him with the crossbow regardless of invisibility. This saves time from him not having to decloak to receive healing. His disguise, however, does not affect any healing he receives.
Medic with Medic Strategy: Further Detail
This section only applies to casual mode.

There is a world of potential strategies to be found in compounding two Medic charges on the same patient. While, for example, Ubering two separate people for two separate medics is effective in its own right, the two medics may Uber the same person for some incredible effects.
Three medics on the same person is generally the point where it becomes superfluous. Three Ubercharges for three individuals is practically objectively better than three Ubercharges on one person.


Ubercharge + Ubercharge
    To be applied in succession to one another. Two Ubers at the same time on the same person is a waste of an Uber. Grant somebody a 16s long invulnerability period!

Ubercharge + Kritzkrieg
    Also known as the 'Krüber'. 8s of guaranteed crits and invuln on the same person. The critical glow is at first glance masked by the invuln glow, allowing your patient, your colleague and you to gain the (sort of) element of surprise.

Ubercharge + Quick-Fix
    The Quick-Fix's charge, the Megaheal, will grant its patient immunity to movement-impairing effects, suck like knockback (force-a-nature, airblasts, sentry fire et cetera) and slowing effects such as the Natascha.
    • This creates a patient both invulnerable and impossible to knock back.
    It is tricky to plan with strangers, but the result is incredibly effective and rarely seen. Especially useful against some serious Engi-based turtling firepower.


Kritzkrieg + Kritzkrieg
    Again, to be used in succession to one another. Two simultaneous crit charges on the same person is a waste of a charge. 16s of guaranteed critical hits! Especially useful with classes that need the time to reload like Demoman and Soldier. Heavy will run out of ammo before the 16s are up, so perhaps it is best saved for power classes aside from him.

Kritzkrieg + Quick-Fix
    8s of guaranteed crits with immunity to knockback. Perhaps less useful than the Uber + Megaheal. Maybe it finds its use against a team consisting entirely of pyros.


Quick-Fix + Quick-Fix
    Grants the patient effective invulnerability and knockback immunity. Can be prepared in 4s less time than a regular Uber. The only downsides are that not only does it take an extra medic player to perform, but your patient can still be insta-killed by backstabs and headshots. Realistically, to actually use this 4s sooner than an Uber, you would need two players helping the two medics to build in spawn. I'm not sure personally whether this is preferable to a regular invuln but it is an existing strategy nonetheless.


Vaccinator Combinations
  • Two vaccinator medics for one person is effectively the same as just one medic on the same person. Although, you could grant him all three resistance types for longer, in theory.
  • Vaccinator + Megaheal. Not much different at all from two Megaheals, which in turn isn't much different from a regular Ubercharge.
  • Vaccinator + Ubercharge. Utterly useless. Waste of vaccinator charges. Case closed, Columbo.
    If you're scrambling for a health pack, deploying a resistance on an Ubered teammate (or any teammate nearby) might just save you.
  • Vaccinator + Kritzkrieg. Very effective and very inexpensive. If you are running the vaccinator and a fellow medic uses kritz, you would be doing the whole team a massive favour by granting them both apt resistances. Creates a powerful force that is very difficult to kill for 8s. Can be used more often than a Krüber.
    Vaccinator charges are relatively dispensable, and kritz, unlike Uber, should be used sooner rather than later, creating a hybrid much more aggresive than trying to coordinate a Krüber.
Your Relationship With the Enemy Team
General Approach and Strategy

The object here is to interact with the enemy team as little as possible. With the exception of counting the enemy Medic's Uber and considering his charges and patients when he 'pops Uber' (and in self-defence, should things go south), you should have effectively no direct relationship with the enemy players.
The less you interact with the enemy team, the fewer the chances they'll have to kill you.

My strongest piece of advice here is simply: to play all the other classes! Truly getting into the enemy's head is easier if you have your own experience of what you'd do in the same situation to fall back on.
I cannot stress enough how valuable this knowledge of experience is.
If you really hate a class so much as to never play them, watch class players on Youtube, instead, and take some mental notes of their repeating placements and general strategies.

For example: Play sniper on pl_badwater. You will gain an extended appreciation of which nooks and crannies a sniper attacking first point can see and which are safe to hide in instead, and so on and so forth.

Approach and Strategy AGAINST Specific Classes

Class
Counter-Strategy
Scout
  • The biggest threat to the careful medic's life. As mentioned in section 'surfing', he will look to get the drop on you through flank manoeuvers. Unlike the sniper, who you can dodge by avoiding sightlines like the plague, the scout can catch up to you anywhere on the map. The syringe guns are better for killing angsty scouts than the crusader's crossbow. Lead your targets with syringes! Oftentimes the crossbow will be more desirable overall, however. The best way to deal with a scout is to alternate between 1 melee swing and 1 Crosbow bolt, whilst strafing, and moving in an irregular and unpredictable fashion.
  • See a trail from a Bonk scout run off around the corner? Don't follow them! They may be trying to lead you and your buddies to your deaths. Don't let the Ubersaw tempt you- not that you'd be able to catch him anyway.
Soldier
  • You shouldn't generally see the enemy soldier that much, unless he's trying to 'bomb' you. 'Bombing' is the process of a soldier or demo making a suicide jump to kill you. Often carried out after your team has successfully killed the enemy medic, to even out the charge situation in their favour. Know when to expect bombs, listen to your team's calls, and know when to back the heck out to cover.
Pyro
  • Be aware that some adventurous pyros may try out the Third Degree. Some of the more courageous will try and smack your patient a few times with it, killing you without even touching you. All damage dealt with the Third Degree is applied to anybody connected via heal beam. If you spot a pyro running to melee your patient with it: switch immediately to the crossbow and give them burst healing instead of gradual Medi Gun healing. Just two swings of the Third Degree will leave you within an inch of your life. There are more 'meta' weapons than the Third Degree, hence why we never really see this tried. Still, you'll need to be aware to counter this.
  • STAY AWAY FROM PYROS! Anti-pyro advice boils down to this simple mantra. Afterburn is not too much to worry about if you have a health pack or dispenser handy.
Demo
  • Like the soldier, the demoman will often try and bomb. Once again, listen to your team, anticipate when a bomb may be coming, and back off to cover. Should he corner you: try and get up close! He can't shoot without risk of self-injury this way. Never try and surf direct grenades. The gained momentum is relatively poor and you will be left with a tiny amount of health left, assuming you survive the blast. Bait him to fire some grenades, dodge them, and surf away when they explode. One sticky is quite easy to surf from.
    • Grenades detonate ~2.0s after being fired. Iron Bomber grenades explode in about 1.5s. The Loose Cannon has a fuse time of 1.0s, starting as soon as the demo holds down mouse 1, as indicated by a soft sizzling noise and a glow. Apply these stats to get the best crouch-jump over his grenades in order to fly away.
  • For Demoknights: stay around corners! Apply the theory points for staying hidden! A charging demoknight will one-shot you, simple as that. When swinging his sword, jump! Jump onto elevation if it is available. You will fly far away and (with the exception of the Scotsman's Skullcutter) you won't have to worry about sustaining a melee crit.
Heavy
  • Anti-heavy strategy is rather simple: just stay away from him! As the slowest class (even slower when trying to kill you with his minigun) he's not exactly going to chase you very far. Minigun bullets are quite easy to surf from, although know that he'll kill you quickly with them. Should your buddy die when fighting him, just run away. Unless you are certain he has 95% of his health chipped away or so, and that you can finish him with a single bolting. If ever the enemy heavy flanks you, either your team has no grip of the flanks whatsoever, or your placement is in dire need of a review.
...
Class
Counter-Strategy
Engi
  • Fear the Eureka Effect. NEVER walk over an enemy teleporter. In the heat of battle you won't always be able to distinguish an entrance from an exit, even when it is active; assume it is an exit. By running over an exit you run the risk of being telefragged. Not even an Ubercharge will save you from a telefrag kill. You never know when the astute Engineer is lurking around the corner with his Eureka effect, waiting for you to step over his teleporter exit.
  • Know when to kite enemy sentry guns' fire. Save your patient from pestilent knockback.
    • In addition to kiting fire, you may also jump on top of the sentry gun and walk in circles above it, never allowing it to fire. Not only is this never really necessary, but you will also need to ensure that the only nearby enemy is the engineer himself.. for you never, ever jump during an invuln push, for the risk of being knocked back to Mars. I don't recommend this strategy at all, but it exists, nonetheless.
  • Be wary of the Pomson 6000. Know what the projectile looks like; avoid it like the plague. At close to mid range, touching the projectile will instantly sap 10% of your Uber. I don't need to explain why this is terrible. When you are currently using a charge, the Pomson will not drain any units, in essence, it'll only drain Uber when Uber is not being used.
    • The wise engineer will do this to you while you are focusing on trying to coordinate a push, catching your team off-guard just before a charge.
Medic
  • Ah yes, the 'pièce de résistance' of gamesense as a medic: repelling and neutralising the effect of the enemy's medic. "Counting" the enemy medic's Uber gets its own section in this guide. Sure enough, this guy by himself poses effectively no threat to you. With a charge and some friends, however, he will turn the tides of an entire game.
    • Should you find yourself in the peculiar situation where it's just medic vs medic, and you have no escape, consider killing yourself! You can't afford to gamble on a melee fight and end up giving the enemy team a 50% Uber advantage, on top of the Uber he'll possibly gain during your respawn time. I personally am not wanting to risk an Ubersaw duel myself, but this isn't to say it's always a bad idea just to give it a spin.
  • Fighting an Ubercharge, too, gets its own section beyond this one. There is a lot to say!
  • Generally speaking: stay away from him. You are an easy target for him to farm Uber from, especially if you happen to be near him during his charge. Keep your distance! You should be far, far away from each other anyway.
Sniper
  • Treat the sniper's sightlines as though they are environmental hazards. If you step into the death zone before he is killed, you will die.
    • Having said this, know that he may watch only one sightline at a time. Broadly speaking, the higher you go in competitive, the quicker he will 'rotate' to watch you. With this in mind, it is not too much of an extension to assume that he is always watching you. Communicate with your team to know where he is at all times. Above all else, however, you ALWAYS stay out of active sightlines.
      There is no greater prize for a sniper in competitive than for him to make you drop your Uber.
  • What if you must dodge a headshot? Sometimes, we will have no choice, no matter how much you avoid him.
    • My greatest advice here: play sniper! Learn the rhythm at which a sniper will try for quick-scopes. Once you hear the sharp 'boom' of the rifle going off, and see him begin to reload, know that you have just under a second of free movement before you must begin again your strafe-and-dodge fest where he'll be after your head once more. Bait him into shots: be evil, be unpredictable. This dodging rhythm / ability is an indispensable tool.
Spy
  • The sound of a de-cloak and the sounds of a spy getting his knife out are both distinct and surprisingly loud. Always have your volume up. Should you hear either of these dead giveaways, be on hyper-alert. Call for 'spy!'. Kick up a fuss and let your teammates know!
    • If you have ants in your pants and your head on a swivel, if you stare at him and keep your distance, chances are he won't go for you. He'll try and bag one of your unaware teammates instead. If you can spare not healing for a second or two, and if the spy is truly dead-set on one of your friends, you may try and kill him with your melee from behind. A risky idea, but if you cannot afford to lose the spy's target, you may just save their life. Preventative medicine! Having said this, however....
  • Never waste time chasing cloaked spies with your melee weapon out. The time you spend aggressively chasing spies could have been spent healing damage and building Uber, while the enemy medic continues to do so.
    • Suppose you see a spy turn invisible. You take out your ubersaw and try to kill him. For every second since he turned invisible, the area in which he could be grows. For the sake of argument: the spy moves at 320 hu/s. He could have ran directly out in any direction at 360°. Therefore, every second, the area he could be in grows by a maximum of π*(320hu)². That's 120m²! You can only cover 6.1 meters in that one second, in any direction. Not very likely that you'll catch him.
      • I recognise that this doesn't take into account many factors such like how not every terrain is 360° open, the spy doesn't turn invisible immediately, and player tracking. The point is to illustrate the folly of pursuing cloaked spies as a medic, when you have better things to do.
  • Know the common decloak spots for spies. When their spy is alive and out, known and called as 'spy time', never have your back to any of these popular decloak areas.
    • For example, the cliffs to the far left of BLU's first spawn on pl_upward. It is a common medic hold where spies can decloak on the rocks above you and kill you for free.
'Counting' Übers
    As a medic, it is up to you (In conjunction with the spy, in Highlander) to keep tabs on what charge percentage the enemy medic has.
    (With this knowledge available, people consider the Solemn Vow to be a downgrade with its -10% slower firing speed. It allows you to see health and Uber percentage, in addition to an enemy player's name, just like a spy.)

'Counting' Übers is the practice of knowing what Uber percentage the enemy has.
  • Has the enemy medic died? Take note. His charge meter has reset, so upon his respawn you must begin mentally timing again. Let your team know when they have or nearly have Uber.
    As a medic, the general aim is to always have a higher percentage than the enemy, giving you what is known as 'Uber advantage'.
    • The natural flow of battle will see you as a player have higher Uber, lower Uber and equal Uber at different times as compared to the enemy.
    • Ask your team to let you know if they ever get hit by a Vita-Saw or an Ubersaw. If the enemy medic hits your teammates:
      -With an Ubersaw, they will have 25% extra Uber for every hit.
      -With a Vita-Saw, for every hit, he will retain 15% of his held charge at death upon respawn, up to a maximum of 60% (four hits). Know how much charge he has when he dies; does he drop Uber? Does he die after charging? Apply this percentage multiplicatively to his percentage upon death .
While it may be tempting to use in as soon as you have a charge, the concept of deterrence is very prevalent in competitive plays. Use Uber only as and when you need to.

  • NOT masking your Uber call will make it easier for the enemy. Feigning your Uber may throw them off, if they aren't paying enough attention.
    • When against an enemy medic: be aware that he may be using deceptive binds to throw you off.
      Trust none of what you hear, half of what you see and only trust fully what you can prove.
    • If you hear "I'm charged!" take it with a pinch of salt. Don't mention it to your team.
    • Don't try to look for Medi Gun crackles. It is generally discreet and you have better things to focus on.
    • Inform your team about enemy Uber status based solely on your counting intuition. The best medic will not be deceived.

Work in conjunction with your spy to verify what Medi Gun the enemy medic is using upon his spawn / respawn.
There is a practice of renaming your Medi Guns in order to obfuscate the enemy, going so far as to have multiple named Medi Guns to switch between to confuse the enemy. In reality, this is frivolous. Not only does it take lots of time to switch and work around binds but it costs real-world money to obtain numerous name tags.
    Why is this pointless? The spy should have HUD world models on. With this, you can literally see what whomever you're disguised as holds in his hands, regardless of whatever his weapons are named.

Here we are, basic Medi Gun timings.
Medi Gun / Charge Type
Minimum Time Required to Build a Full Charge (s)
Stock Medi Gun (Ubercharge)
40.0
Kritzkrieg (Kritzkrieg)
32.0
Quick-Fix (Megaheal)
36.0
Vaccinator (Vaccinator)
24.0
Note that 1 individual bar takes a minimum of 6s to fill.
  • Always assume that a charge will be built in the minimum required time. In active battle it is close to impossible to pull off without losing a second, but you don't want to be 'caught short', so to speak.
  • Where either it is the start of the match, or you and the enemy medic have died at the same time: your own charge percentage will give you a rough guide as to what percentage the enemy currently deals with. Even if they have switched to Kritz, for example, your stock gauge will still indicate their charge meter. Stock gains 2.5% in 1.0s, Kritz gains about 3.1% in 1.0s.
    80% of stock indicates 100% of kritz, on paper.
How to Stay Alive
  • The best medic will never drop Uber.

  • The best medic aims for zero deaths.
    • Why? On average, you will have a charge ready at least every minute and distribute uninterrupted healing to your entire team, leaving little to no gap for the enemy to push through, with or without uber. Whatever Uber they deploy will meet your counter-Uber.

Know that most weapons can one-shot point blank you when your health reaches 100. The same goes for your patient. I refer to this threshold as the 'danger zone' later in this guide.

Survivability is key.

  • Strafe, crouch and jump to try and avoid all oncoming damage.
    • If ever you watch the most experienced medics, you will see how erratic and unpredictable their movements are. Casual is a good place to start with this: try and learn what players will do to attack you, learn how all the different classes react to your presence!
    • Learn these enemy movements, and learn to react accordingly; don't move the way they expect you to do. Have weird yet fluid movements. Unfortunately there is little one can do to improve these movements aside from practice and experience!

  • If you are blasted whilst holding W or S you will be sent straight up, allowing pretty much any enemy to finish you for free. While approaching to counter this is tricky, you must try to limit your movements to strafes when you think you may be bounced.

  • Do not fight unless you absolutely have to: in essence, do no fight unless you have no other option.

  • Is your buddy fighting a single opponent? Run behind the enemy if they haven't noticed you! As always keep in mind positioning. You don't want to be caught with your pants down so to speak.

    Do not melee fight spies.
    • You run the risk of being trickstabbed. Backpedal, and fire your primary at them. Perhaps sneak one melee swing in, but no more, for they will plan a trickstab on your next swing.

  • If a teammate arrives part way through you fighting for your life, run behind them, at let them deal with the enemy.

  • If you get cut off from your team and the enemy medic is bum-rushing you into a corner with an ubersaw, consider denying him by using your killbind. It is not worth it to gamble on a fight and end up giving the enemy team a 50% uber advantage.

  • The enemy will focus damage onto the capture point or payload cart: stay away from it, and heal your teammates from relatively afar. Just make sure you aren't totally isolated: if a scout or a pyro flanks you, you are going to die.

    You are most vulnerable to backstabs and headshots when aiming your crossbow.
    • Unlike Medi Gun healing, you are required to look and aim at your target. Be aware of this.

  • Assume that the enemy team A) Has a sniper, and B) that their sniper is very good, and aware of you. Ergo, ALWAYS stay out of sightlines. Unless you have invuln. Only when the enemy sniper(s) is/are dead may you cross sightlines.

    Always use height advantage wherever possible.
    • It is harder to hit something on the platform above you than it would be if it were on your level.

  • You do not need to have proverbial ants in your pants 24/7. If you have safe cover, use it. Just remember to pay close attention to your surroundings, as always.
    • This cover may include...
      hiding inside an engineer's dispenser!
      As, when perfectly inside it, all damage (even blast and fire) will be absorbed by the dispenser. You yourself will not take damage until AFTER the dispenser is potentially destroyed. Just remember to have the engineer's continued consent to do so throughout!
    • If no cover is available, seek cover behind your teammates. No damage in this game penetrates, with the exception of a fully charged Machina shot. Even so, why should you be standing in a sightline?

    ADDITIONAL USE OF THE SPAWN-SWITCHER BIND:
  • This bind is not only useful for switching spawns and / or Medi Guns, but also for the following..
    • If you are fleeing into spawn, under heavy fire (or ON fire) with low HP, you may press the spawn switcher button to instantly respawn, full health, all your Uber kept, into safety. The only requirement is that you have your foot sufficiently in the spawn door when you press the button. Timing is key, here, as with a lot of medic things.
    • This may just save you from being killed by a rocket or afterburn before reaching the resupply cabinet.
  • ...
    • Kritzkrieg's 'Oktoberfest!' taunt will grant you a burst of 11hp, not including passive self-heal. Back up to a wall should push comes to shove and you must use this to survive. Handy knowledge, if not incredibly situational.

      It takes little to reduce the Medic's health below the threshold where most weapons will one-shot him at point blank: this threshold, ~100HP, is the 'danger zone'.
      • Hence the importance of keeping friendly medics overhealed at all times.

      • Stay as far back from the front lines as possible, and as far back from potential flank exits too. The healing leash is long, and you...
        must always have an escape route in mind
        if either you are flanked or your patient is overwhelmed.

    • When fleeing, RUN BACKWARDS, facing the enemy team so that you may easily judge when to surf oncoming damage, and as not to receive potential backburner crits from Pyros.
      • Where the are no sources from which to surf: Turn your back and RUN. you will outrun most classes with your 7% forward-running speed bonus. Enough to outrun a flamethrower! Just be sure that it isn't a backburner you're running from; a 4% speed reduction from pyro's speed is a worthy sacrifice in order to not be killed in two seconds by critical flames.

      Know how fast you are! Judge whether to backpedal, or to turn your back!
      Where base class speed is 100% (300hu/s).
      From the Official Team Fortress Wiki:
      In-Game Class
      Regular Speed (%)
      Regular Speed (hu/s)
      Backwards Speed (%)
      Backwards Speed (hu/s)
      Stock Medic
      107
      320
      96
      288
      Medic Wielding the Overdose at Full Charge
      128
      384
      115
      346
      Stock Scout
      133
      400
      120
      360
      Figures to zero decimal places.

      What can we learn from these data? In addition to what we have established about backpedalling, pyros and crits, we may also appreciate what the Overdose can do for you in a pinch. Backpedal safely from anyone with it. Only scouts can outrun you, by a relatively small margin, even.

    • As a medic, you have the luxury of looking access to 360 degrees of your surroundings whenever you aren't trying to aim the crossbow.
      Exploit this as much as possible.
      • Know the location of as many teammates as possible, all potential escape routes, flank routes and threats.

    • Dress for Success! Do they have a sniper? If so, perhaps consider NOT dressing like a Christmas tree, replete with shiny particles.

    • If you're hiding around a corner, stay away from the edge. Splash damage can reach you, and as established in section 'staying hidden' your Medi beam can curve around corners, giving your position away.
        This may invite the astute soldier or demoman to bomb you, as they can predict almost exactly where you are. If healing somebody around a corner when holding a choke, be prepared to dodge and hop- keep an eye out for the skies especially. You can ninja-dodge a market gardener, for example. Deny him his drop and have him killed, unsuccessful in his mission.

    • If you're facing the enemy, don't be backed up against a wall. Again, splash damage will catch up to you. While backing up to walls is desirable protection from spies and backburners, for example, you should only do so when the wall is not facing the enemy team.

    • Generally speaking, moving around unnecessarily = death. When moving up to find a new hold, consider taking the routes which you can pre-emptively see most of. Don't blindly walk around corners. Also, don't get yourself stuck in corners that can only be escaped from by crossing sightlines.
      The ideal cover has a safe retreat, no overhang where enemies can come from, and is at a different elevation than your heal target, preferably higher if it isn't in a sightline (which it shouldn't be!).
    Situational Awareness
      Situational awareness is what separates the good medics from the great medics.

    Situational awareness, as it pertains to the medic in TF2 is the ability to acutely judge one's surroundings and to make appropriate adjustments to play-style and positioning accordingly.

    It links in very closely with the process of learning how not to die, surfing and if/when you should use charge to save yourself. Surfing is covered below, and the general method of how to die less is covered above. Raw experience is the best teacher for positioning and game sense. It will come the more you keep trying and when you're enjoying what you're doing.

    Use all of your available senses!
      We're only limited to sound and vision in this case.

    Audio cues:
    • Make sure your volume is nice and loud. Not disruptively loud, obviously.
      Examples in-game of auditory cues:
    1. The loud roaring of heavy's minigun being revved up. Each minigun has a unique spin-up sound! Is it a Natascha? Will you need to keep in mind the slowing effects when fleeing? And so on.
    2. The deep bellow of the Iron Bomber being fired. You will do well to notice that each unique weapon has unique sounds. As always I recommend trying out all the weapons for every class, so you know what all the sounds mean. Is there a 'thunk' noise instead of a sharp 'click' when the enemy demo fires? He must be holding a Loose Cannon. To surf from him you'll need to consider the 1.0s fuse time from when his cannon started sizzling.
    3. Do you hear a pyro screaming around the corner? Maybe run the hell away, because that's a sure sound he's about to blitz in with the phlog. Side note: this shout, too, as with heavy's nomming can be masked. Always be careful going around corners, for more reasons than just this!
    4. Do you hear a lone nom-nomming? Perhaps you could go in a farm an Ubersaw hit or two. Know that, for a successful Spinal Tap against a nomming heavy, you must begin the procedure as soon as the heavy begins eating. It takes ~2.5s to stun with the tap, and the Heavy will be nomming for ~4.0s. On this note: don't try and spinal tap a phlog pyro taunting. It's not going to work in time.
    5. Is there a nearby enemy medic shouting "Medic!" out of the blue? Perhaps this means that he has a charge to mask that has escaped your notice.

    Visual cues:
    • Pay attention to 100% of what is on your screen, and in your immediate area, not just what's right in front of you.
      1. Gain as much information from your surroundings and experience as you possibly can.
      2. Look at the killfeed!
      3. Look at the bodies on the ground!
        • What weapons are in the killfeed? By what manner have your teammates died;
          is there a Spycicle statue, or maybe there's a lone weapon without a body? This must mean there's a spy with Your Eternal Reward around.
        • Is there a lone burning body of a teammate? There must be a Flare Gun pyro. Does this mean the enemy pyro is charging his Phlog?
        And so on.
      4. Observe the bullet spread upon the walls of a choke point!
        • Is there a single bullet hole? There could be a sniper watching that choke. Even more telling is the bright dot, although this one needs no explanation.
        • Is there a roughly square shaped spread of bullets? Must be a shotgun of some kind.
        • Is there an uneven mess of bullet holes? Perhaps this indicates a heavy and his Minigun are around the corner.
        • Is there a huntsman arrow or a crossbow bolt sticking out of the wall? Watch out for flying insta-kill projectiles.
        • Is there a black blast effect on the wall? This means that a soldier or a demo is focusing the choke point. A very black blast effect indicates a sticky trap has gone off there.

    • Look at what's lying on the floor. Sandman ball? Guillotine? There must be a trick-sy scout around the corner. Tell your team to watch the flanks!
    • One of the most important visual cues: Sticky traps.
      • Know the map!
        Know which props could hide stickies inside. Not only will knowing the map like the back of your hand help you identify potential sticky trap locations and sightlines, but you will also know where to gain make an escape route and where the health packs are.

    • If using an Ubercharge, or even in general, STAY AWAY from environmental hazards. The smart pyro will take advantage of this and blast you to your death, even during an invuln.

    Ultimately, the best way to gain gamesense is to keep playing the game, no matter your class. To expedite the process, make a conscious effort to evaluate your surroundings from time to time, when it is safe to do so. Playing Engineer is a good choice, for you will (generally speaking) have more time to deeply acknowledge your surroundings when your buildings are all up.

    If push comes to shove, and you are being chased solo around tight corners and corridors through which you cannot surf:
    use Spy-like techniques to trickstab, cornerstab, outsmart and subvert your enemy's expectations with your Ubersaw! Maybe even consider using tr_walkway to practise this.
    SURFING: Riding Damage Like a Wave!
    Using momentum gained from damage sources to propell yourself up and away from danger.
    • In practice, it is identical to blast jumping.. c-taps included. Only you aren't the one firing rockets at your feet. The perfect surf from a rocket or sticky, compounded with practised air-strafes will allow you to fly away like a bird!
      • Know that, if you jump from directly above a blast, most of your velocity will be vertical.
      • The further to the edge of the blast radius you surf from, the more the gained velocity will be horizontal.
      • As such, try to strike a balance between not going so high you'll die of fall damage, and getting enough airtime to ensure a proper flying escape.
      • Know the skybox of the map you're playing! For example, cp_dustbowl has a notoriously low skybox. If you play on this map, angle your blast surfs to be less vertical as not to be stopped dead by the skybox.

        Practise obtaining this balance by blast-jumping as soldier or demo. Apply this understanding in further practice against a single soldier or demo bot, in offline play mode. It'll work you wonders! Instructions for controlling offline bots can be found on this TF2 Wiki article.

    • Surfing from hitscan sources is considerably more challenging. Generally you and the enemy will be along a horizontal plane, meaning that any momentum you gain from the enemy's attacks will be purely horizontal.

    • When surfing away from multiple potential damage sources, backpedal and crouch jump. I personally pivot on the 'A' key whilst doing this, in order to airstrafe in either direction should / when I get given momentum.

    • You can surf from any damage (except fire), including melee swings!
      Momentum gained from sustaining a melee swing is shockingly large.
      • Fly away from demoknights! If you have some elevation to stand on, such like a prop, you will find it easier to soar up and away.

    • Scouts are quite the problem here: they may often flank you and catch you off-guard, exploiting an instance where your team may not have been paying attention.
      • Scout's scattergun is particularly challenging to surf from as he (if he is smart) will want to shoot down at you utilising his double jump, sending you no further than the floor where you stand.
      • Your options are either A) surf on their damage to safety or B) Kill them, before they kill you. The best way to deal with a scout is to alternate between 1 melee swing and 1 Crosbow bolt, whilst strafing, and moving in an irregular and unpredictable fashion. In total, 1 bolt and 2 melee hits will kill an unbuffed scout. Lesser scouts are not such a problem to dispatch, but for a stronger scout player your best bet is to try and surf to the other side of your teammates.

    Fun fact: if you actually manage to have a spy backstab you while you're invulnerable, you can be sent flying to Mars.

    Practice makes Perfect!
    My strongest piece of advice here is to practise! Practice soldier jumping and practice demo jumping, to get a finer understanding of how to gain the most momentum from each classes' jumping tools. At the guide's end I have linked a series of maps made by happs on some of which you can practise medic surfing and air-strafes.


    Let's suppose you pull off an incredible blast jump replete with full-control air-strafes. The initial blast and prior damage has left you with very little health left, as is often the case. How will you deal with landing? Is it possible to avoid fall damage? In some situations... yes! It is!

      Landing on a steep enough slope from an angle will negate fall damage.
      The slope can't be acute enough to be walked up and it can't be obtuse enough to be considered a wall.
    • You will be able to identify these slopes in prior practice if you can jump up to them or fall onto them, and use strafes to remain airborne for a little while.

    • A good example of a slope which can be used to negate fall damage is a side of the canyon, underneath the final control point of cp_dustbowl's third phase.

    • These slopes are plentiful in natural, outdoorsy maps like cp_dustbowl or the start of pl_badwater, and very rare in unnatural maps, like the insides of buildings, or maps with strong industrial themes like cp_well.

    This works by reducing your velocity to near zero (in a very short frame of time) through surfing these slopes. You can't do this on a walkable surface, as there's no way to dampen your velocity as opposed to instantly changing it to zero upon impact.

    Landing in deep enough water will also negate fall damage.
    Staying Hidden and Reverse Psychology: How Not to Be Seen
    The best medic is invisible to the enemy team.
    "MASKING ÜBER"
    The practice of silencing the medic's loud shout that he is "fully charged!".
      On average, voice commands 'jeers' and 'positive' are medic's most quiet voicelines. Apply the script listed in section 'scripts' to use these voice lines for the most obfuscatory plays.
      • Why do I recommend against using 'MEDIC!' to mask Uber? Applying simple reverse psychology.. should an experienced medic player hear the enemy medic, an equally competent player, call for MEDIC! out of the blue in the frontlines, it is a good indicator that perhaps he has something to hide, perhaps not.
      • In the same vein, I strongly discourage use of the same one voiceline to mask Uber, for example 'good shot!'. It is loud, repetitive (and hence predictable), and liable to be figured out by the enemy.
    All that remains to be hidden, here, is the low crackling of the Medi Gun when a charge is full. Note that the Ubersaw and the Vitasaw also indicate roughly what Uber percentage you have. Avoid holding your melee out unless you are fighting for your survival.

    I can imagine few situations where not having your Medi Gun out and healing before a charge is preferable, but this is important to remember nonetheless. Using the 'Uber on Mouse 2 regardless of weapon' bind is helpful for the situation where you are alone and have a charge ready; this way you can hide your Uber until / if you need to pop to save yourself. Have your crossbow out at all times unless you are actively using your secondary to heal.
      In addition to hiding Uber if you have it, you are also hiding which Medi Gun you are using / have recently switched to.
      BONUS: If you and your patient are planning a sneak attack. Look directly at your patient. When you are healing with your Medi Gun and as you turn, your bright glowy heal beam bends. Depending on how close to the corner you are (avoid staying next to corners anyway: splash damage will reach you), your heal beam will bend around the corner and give your position away!

    Masking Medic's battle-cries when a charge is used. Not strictly needed or helpful in most situations, but it is a good habit to get into. Say the Ubercharge is a sneak attack, or you and your patient are hiding around a corner before Uber is used. You will gain a precious extra second where the enemy isn't fleeing you from the surprise attack.
    Especially so for the Kritzkrieg! It's relatively harder to spot a kritz charge at a distance than it is to spot an invuln. Hearing a medic shout "Get them!" is easy, no matter where you are.


    "FEIGNING ÜBER"
    Wrongfully shouting "I'm charged!" to manipulate the enemy team.
      Feign a lack of prudence to the enemy team! If they are not 'counting' your charge percentage, this may make them believe that you have an invuln ready. Lull them into a false sense of security that you won't be masking your Ubers!
      • How will this help? The enemy team may try to force a pick against you (which you in turn can now pre-empt), resulting in your team being prepared to kill an over-zealous demo, or a kamikaze spy, ultimately giving you greater numbers and the advantage in a stalemate situation.
      • Alternatively, feigning Uber may make the unprepared team back off, in the expectation that your team will commence an invuln push. Thereby granting your team some potential free territory.
    However, know the dangers of overusing this practice. I cannot stress this next part enough. Doing this frequently, say, more than once per match will be a dead giveaway. The enemy team may recognise this as a fake call, very much in the fashion of 'the boy who cried wolf'. If this strategy is figured out, it will lose its effectiveness immediately.

    DURING SETUP TIME:
    Overheal lasts for 15s flat across all classes (more info in the lower sections). Knowing this, it is not needed to heal anybody in preround until past the last 15s. Any healing, including overheal, grants you 1 point per 600 HP. Pre-round points is a DEAD GIVEAWAY that your team has a medic. 'Crit heals' (more info in the lower sections) will allow you to fully overheal at least the majority of your team in under 15s.
    It is generally 'safer' to overheal in these last 15 seconds, as, during the last 5 seconds of setup time (when you may end up accumulate a score from this strategy), people will not be paying attention to the scoreboard. They'll be thinking about what they'll do when the spawn gates open.
      On defence: giving the demoman a crit charge before switching back to stock is a very smart strategy. This will unfortunately grant you points regardless, so consider doing this more if you aren't starting the game on defence (practically nobody is going to notice one player's score going from, say, 42 to 43, for example). Know that doing this when you start a game on defence will alert the savvy enemy that perhaps there is a crit sticky trap, should the medic have a few points at the start. I see little value in grinding points to pretend that you have a sticky trap when you do not, instead of actually laying one.

    Important Info Regarding the Medi-Gun Switcher Binds
    Make sure your loadout slots look identical; make sure they have the same cosmetics if you wear any! I don't recommend not using the Ubersaw in competitive, but this is a good opportunity to switch melee weapon as well, should you desire. The vita-saw can work quite well with the Kritzkrieg, for example. Not ensuring loadouts appear identical will allow the enemy to logically assume that you have indeed switched Medi guns, and so they may anticipate your crit charge for example.
      Conversely, needlessly switching your cosmetic loadouts may trick the enemy into assuming you have a different charge type out. This is frivolous in practice, however, as not only can the enemy spy verify what Medi Gun you hold if a change is observed, but the enemy team may not even notice for the time and effort you spend to appear differently.


    Further information on the importance of not being seen: https://www.youtube.com/watch?v=C-M2hs3sXGo
    Selecting a Primary Weapon
    BlutsaugerBlutsauger
    • Will reduce all self-healing by a flat -2 HP per second, whether you have it out or not and regardless of
      scaling rates. This is surprisingly crippling.

    • Isn't just for use in self-defence. Wait for opportunities to burst-fire syringes towards the enemy in order to
      restore some health on the fly.

    • Restores up to 3HP per landed syringe, where 3HP is awarded at point blank.


    OverdoseOverdose
    • Suffers a -15% Damage penalty, resulting in 1 less
      point of base damage
      per syringe (9 instead of 10).
      Not the end of the world.

    • Shines truly when backing off from a fight: as
      described in section 'how to stay alive', the maximum speed boost gained from passive use of this is +20%. Backpedal and still outrun pyros!
      • Grants a speed bonus of +2% for every 10% of
        charge
        the medic gains.

    Know that, due to the damage-distance ramp you will only suffer from the damage penalty at point blank. Knowing this, utilise this weapon's movement speed buff to ensure at least some distance between you and your victim pursuer to get the most out of it without suffering a downside. You shouldn't be up in your enemy's face, anyway, as you'll almost certainly get one-shot by power classes if your HP is below ~110.


    CrossbowCrusader's Crossbow
    • Heals 75 points of health, scaling up to 150 points
      with greater distance.

    • Deals 38 damage per bolt, scaling up (by the same mechanism as healing) to 75 damage with greater
      distance
      .

    • Recognise the distinct noises made by both healing a teammate and damaging an enemy: a soft 'med-pack-use noise' and a sharp 'THWACK' respectively. Indispensable for spy checking new patients.

    • When bolts are reflected by pyros, they lose their friendly healing property; they will instead heal enemies, but not disguised enemy spies.

    • Uber gained per bolt is subject to scaling, similar to the mechanics of crit heals. See below section for analysis. Healing done with the bolt is independent of scaling effects.


    So which do we use?
    Short answer: the crossbow.
    In a competitive scenario, not using the crossbow is basically griefing.

    Long answer, however....
    Every syringe gun bar the crossbow is designed for self-defence. The crossbow is designed to work in synergy with the Medi Gun, and to enhance the healing effort of the Medi Gun. Medic's other primaries are unable to do this.
    Using the crossbow releases the overall skill cap for the medic. It releases the cap on how much you can heal your team and help them to not die, and in turn it releases your team to apply more pressure on the enemy by staying alive for longer.

    In the casual scenario, however, don't be afraid to switch off to use the Overdose or even the Blutsauger for some cheeky battle-medic action. I personally think the Overdose is superior to the Blutsauger for general medic utility, but should there be many pyros on the enemy team, the Blutsauger might just save you where the Overdose could not.
    Crusader's Crossbow - Further Strategy and Statistics
    • You cannot heal at true point blank, as the bolt spawns a certain distance in front of you.
      • Note that the Bolt will shoot from whichever side of the screen the crossbow is on (right by default).
        Angle your point blank shots to compensate.

    • Always aim bolts at the target's centre of mass (upper-body): if they jump it'll still hit.

    • You cannot heal an Ubered teammate with the crossbow. You CAN heal a friendly Bonked scout or an invisible spy with the crossbow, however.

    • If a player is strafing in a fixed pattern, aim your bolt at their mean (average) position. This grants you the greatest likelihood of successful healing.

    • Aiming at a distant buddy? You do not need to shoot as soon as you get your crossbow out. You are less likely to miss if you take a moment to assess where a distant teammate is headed with both clear communications and a moment to breathe.

    • If you spot an enemy sniper who is not looking at you, consider shooting a bolt at them. They make for relatively easy targets and by doing so they will either die or be made to retreat. This does not mean that you are a counter-sniper. Don't expose yourself unless you need to.

    • Don't bolt a patient unless either:
      1. Your hands are full,
      2. Your rate of healing with the medi gun is not greater than the damage your patient is sustaining,
      3. They are simply out of medi gun range, or
      4. If they are a soldier or demoman looking to blast jump.
      Find my flow chart of this process in section 'healing strategy'. Review it at your leisure!
      These micro-assessments will become second nature with experience.

    • While the HUD will not indicate when you have healed a patient for less than 75 (due to their health being made full by your bolt), the Uber percent you gain will however be reduced accordingly.

    • Know that when your crossbow is crit charged, only its damage output is affected.

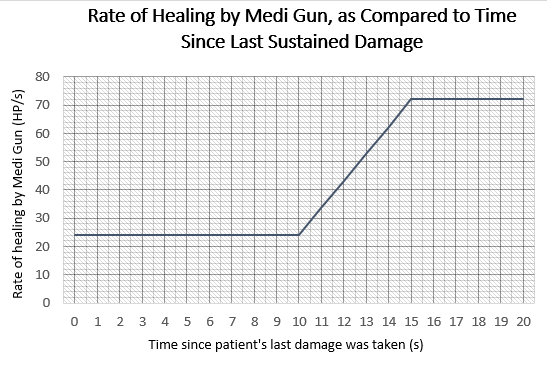
    Ubercharge gain rate is reduced by one third if patient has been damaged within the last 10s. It scales back to normal between 10 to 15 seconds. This is to counter the chaos that was building ubers in <20s with the crossbow after the Tough Break update.

    This means that 1 bolt will generally grant 1% to 3% of ubercharge. When they've not been recently damaged, bolting a patient grants a whopping 4% up to 9% charge.
    See below for a detailed analysis of how Uber building works with the Crossbow.

    Graph to show how Uber is gained per bolt


    Time since last Damage (s)
    Uber gained from successful bolt at max. range (%)
    Uber gained from successful bolt at min. range (%)
    0
    4.0
    1.0
    1
    4.0
    1.0
    2
    4.0
    1.0
    3
    4.0
    1.0
    4
    4.0
    1.0
    5
    4.0
    1.0
    6
    4.0
    1.0
    7
    4.0
    1.0
    8
    4.0
    1.0
    9
    4.0
    1.0
    10
    4.0
    1.0
    11
    5.0*
    1.6*
    12
    6.0*
    2.2*
    13
    7.0*
    2.8*
    14
    8.0*
    3.4*
    15
    9.0
    4.0
    16
    9.0
    4.0
    17
    9.0
    4.0
    18
    9.0
    4.0
    19
    9.0
    4.0
    20
    9.0
    4.0

    *Note that here, all points of data up to and before 10s, and at 15s and beyond are certain. Data between these points are interpolated; linear scaling is assumed. This TF2 Blog post by Robin Walker confirms the 'crit heal' ramp is linear, hence my assumption here.
    Also note that all decimal values are rounded to integers in-game.
    Selecting a Melee Weapon
    ÜbersawThe Übersaw here is the best choice. Below is my justification of this, and my evaluation of the potential value of switching your melee choice. 95% of situations or so will see the Übersaw as the best melee for the competitive medic.

    • On hit: 25% Ubercharge gained.
    • -20% firing speed.

    The only other saw that might be effectively used in comp is the Amputator, for its passive regenerative properties. However, by not using the Ubersaw you put yourself at a passive disadvantage to the enemy medic, who will almost certainly be using it himself. If he is not, then you are missing out on an opportunity to have a passive advantage over the enemy.

    While using your melee isn't exactly priority one for the medic, there will be situations where you must fight off a spy by yourself to survive, for example, in King of the Hill. These situations will almost certainly happen to either competing medic at one point during an entire match, especially so on smaller maps.

    The Ubersaw does not gain Uber from enemy spies disguised as a teammate of yours or cloaked spies. It does not grant Uber when triggering a Spy's deadringer. It does not grant Uber from swinging at Ubered enemies. It DOES gain Uber from scouts under the effects of Bonk. Keep this in mind- they won't be trying to dodge you!

    Generally speaking, if one is in a situation where they actively suffer from the 20% slower swing speed when playing seriously, one should reconsider their medic strategies. Ergo, the downside of this saw as compared to stock is negligible.


    What About the Solemn Vow?

    • -10% firing speed.
    • Allows you to see enemy health (and Uber percentages on enemy medics!) in addition to enemy names.
    As a competitive medic, you have the ability to know the enemy medic's Ubercharge percentage with just a little apt application of gamesense and attention (section 'counting Ubers'). Knowing this, this weapon is literally worse than stock, even if it is a cool statuette of a handsome dude.

    Not only is this the case, but with the Solemn Vow you actually have to look at the enemy medic to see his percentage. Therein lies the problem with its special feature.
    • Using it for its intended purpose requires you to stand around like a lemming, trying to gloss the enemy lines to attempt to find the enemy medic. I should not have to explain the multitude of reasons as to why this is a horrible idea, but I may as well humour you!
      • You expose yourself to sightlines.
      • You spend your precious attention trying to find and focus on the medic, then reading his percent at regular intervals. This attention needs to be spent assessing risk, delivering triage, aiming your crossbow, and so on, instead of asking a sniper to kill you out in the open!
    Ah, but about that enemy health count you can see. Good 'comms' (team communications) will tell you and your teammates all you need to know. Teammates can see how much damage they're doing. They don't need you to tell them. Even so, if they did need to know how much health someone has, the spy can do that, without healing, without a medic's responsibilities and all while invisible, to boot.

    You can theoretically use this to decide whether to finish off your patient's target after they've possibly died... thus putting yourself in unneeded danger by not backing off as soon as you should.


    What about the Vita-Saw?

    • -10 maximum Health on wearer.
    • Collect an organ on every hit!
      One organ grants retention of 15% of whatever your charge is when you die. Caps at 60%.

    In my opinion, this has the potential to synergise rather well with the Kritzkrieg, as an aggressive push without invuln can end up in the clumsy medic dying before the charge runs dry. This is a little counter-intuitive, as the whole object of improving as a medic revolves around NOT dying, especially during and after charges.

    I discourage the use of this saw, as unlike how the Ubersaw potentially brings forward unneeded aggression, the vita-saw cannot function without aggression every life as medic. The culture of direct fighting and dying is almost necessitated.
    This is a big, big no-no. Never fight unless you have to! The Ubersaw leading the less conscientious medics into unneeded battles is bad enough.
    Never get greedy.
    The practice of fighting alongside your team instead of healing them should be left to laid-back casual games, as you will get yourself (and by extent your team) killed. As if the -10 max HP isn't damaging enough to your survivability!


    What about the Amputator?

    In my opinion this is the only option which holds a candle to the Ubersaw in competitive play. Although, as I have already stated, using this, while improving your survivability, will put you at a passive disadvantage one way or another.

    • -20% damage penalty.
    • When active (when held out), +3HP gained per second.
    • On Alt-Fire / taunt: deploy the lovely 'Medicating Melody' taunt.

    First and fore-mostly: when using the Amputator, you will not be able to kill scouts and spies with two melee swings (65*2 > 125, 52*2 < 125).
    This may not sound significant at first, but in the heat of a solo-battle against either of the two classes who will be trying to kill you without your team noticing, it makes all the difference. You will need on average a whopping 50% extra effort, time and possibly luck in order to win the fight for your life.
    You will be less likely to kill your assailant with the -20% damage on swing stat. This is important.

    In casual mode, the Amputator may be used in good synergy with the Blutsauger, as this bonesaw's buff supersedes this syringe gun's penalty.

    The lovely 'Medicating Melody'
    Heals teammates across its 4.2s duration for 105 HP, scaling up to 315 HP by an identical mechanism to the Medi Gun's crit-heals.
    • I, personally, do not advise the use of this saw outside of a laid-back environment due to how vulnerable it makes you.
    • If you do use this taunt, back yourself up to a wall as to avoid getting backstabbed, but doing so will reduce its effective area to only 180 degrees in front of you, and a little bit around the corner if applicable (again inadvisable, as seeing a medicating melody work around a corner is a dead giveaway that you are a sitting duck, viable to be killed by splash damage).
    Know that Medicating Melody is the only way to literally heal several people simultaneously: anyone who gets a kill while under this taunt's effect will grant you an assist in the same manner as if you were healing them with the Medi Gun.


    Self-Heal Mechanics, Visualised
    Equipping the Amputator will add a passive, flat +3HP regained per second, regardless of scaling effects, but only if you have it out.

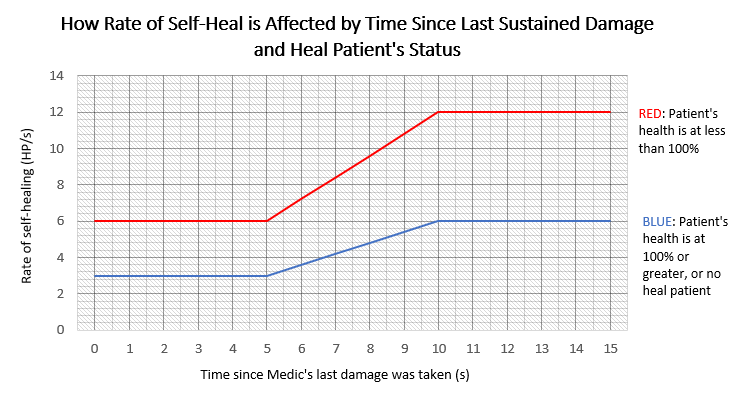
    Medic self heals at a base of 3 health per second, scaling linearly up to 6 health per second when not damaged for 10s. When the medic's patient is below 100% health, medic's self-heal rate is DOUBLED such that it scales from 6 health to 12 health per second.

    Graph to show Medic's self-heal ramp


    Time since last damage (s)
    Rate of Self-Healing, whilst healing a patient below 100% health (HP/s)
    Rate of Self-Healing Otherwise (HP/s)
    0
    6.0
    3.0
    1
    6.0
    3.0
    2
    6.0
    3.0
    3
    6.0
    3.0
    4
    6.0
    3.0
    5
    6.0
    3.0
    6
    7.2*
    3.6*
    7
    8.4*
    4.2*
    8
    9.6*
    4.8*
    9
    10.8*
    5.4*
    10
    12.0
    6.0
    11
    12.0
    6.0
    12
    12.0
    6.0
    13
    12.0
    6.0
    14
    12.0
    6.0
    15
    12.0
    6.0

    *Note that here, all points of data up to and before 10s, and at 15s and beyond are certain. Data between these points are interpolated; linear scaling is assumed. This TF2 Blog post by Robin Walker confirms the 'crit heal' ramp is linear, hence my assumption here.
    Also note that all decimal values are rounded to integers in-game.

    What can we learn from this set of data?
    • When you're injured and in danger, heal people below 100% health! Regenerate twice as fast.
    • Avoid stray damage sources which can't be surfed from when fleeing: by doing so, you'll sooner regenerate more health per second.
    • As a patient, if your medic is burning... hurt yourself! He'll be thankful, and he'll not be dead.
    Heal Order: In Spawn, In Battle; In Casual, In Highlander
    When 'frozen' at the start of a round (and when your team walks to mid):

    E.g. King of the Hill 'KotH'
    • Your blast-jumping classes deserve a full buff before they leave spawn.

    • Sniper deserves a full buff, as with it he will survive a quick-scope shot from the enemy sniper, giving him the upper hand.

    • Healing the scout as you leave spawn is, I find, the best, as you are able to get to the front lines as soon as possible this way.

      • One should aim to make sure the other classes are fully buffed between these times.

    During setup time, wherever it applies:

    E.g. Payload, Attack / Defence
    • Aim to have every member of your team at full buff before spawn gates open.
      • This is nearly impossible in practice with 1 medic due to people scattering and hurting themselves, but "if you chase perfection you often catch excellence".

    Note that heal order at the beggining of a round is a very specific, rigid meta. This gives way to a fluid and adaptable strategy during the heat of a mid-fight, for example.
    Jumping when frozen at spawn will allow you to select your priority targets with ease! Sometimes known as 'jump-healing'.


    Heal order: casual mode

    Above is the heal order in casual. Click on the image to read the text explanations.


    Heal order: highlander / prolander

    Above is the heal order in Highlander and Prolander. Click on the image to read the text explanations.


    In addition to regular heal order, 'situational' heal order should be applied, taking into account burning, bleeding, combat stress or how nearly dead the teammate is.

    When I refer to 'combat stress' I mean the average amount of damage the patient is currently sustaining, and the damage you anticipate them to take in the following moments.

    See section 'healing strategy and efficiency' for further details about dealing with 'combat stresses'.

    Example application:
    Low-health burning / bleeding > High combat stress > Somebody with 'crit heals' > Medium combat stress > Burning / bleeding > Low to no Combat stress, where...

    High combat stress = a patient who needs bolts at the fastest intervals possible.
    Medium combat stress = a patient who needs occasional bolts to boost their HP out of the danger zone.
    Little to no combat stress = a patient who needs no more than beam healing at a choke.
    Generally, 'combat stresses' only apply to the combo / power classes, as a scout (for example) isn't exactly going to be standing holding a choke point. A heavy on defence is a perfect example of where combat stresses apply.

    Know that healing a patient under the effects of liquid (mad milk, gas passer, jarate) speeds up the removal process. This means that somebody made wet is given a higher healing priority. Not only does healing them make removal faster, but the enemy will focus someone covered in a liquid: ergo, their healing priority increases twofold.

    Generally speaking, heal people fighting around you to full health before you begin overhealing the same people around you.

    Remember: OVERHEAL ORDER
    ...should be slightly weighted over other orders to the better player(s) of your team. For example, in higher divisions we will see the scouts receive more overheal as compared to how much they may receive in lower divisions. Let's say, in casual, if your soldier is clueless and your demo is a veteran, the demo should be given greater overheal priority than the soldier. THIS DOES NOT MEAN DISCRIMINATE against the weaker players. The best medic heals everyone, and keeps everyone alive.


    Something else that may affect heal order.
    Has your soldier used a banner? From when he first sounds it to when it runs out, he should be given a slightly higher priority for healing. Why?

    • The Buff Banner will reduce the effective health of the enemy while it is activated, as it grants nearby teammates mini-crits for its duration. Remember, having higher 'numbers' (the difference in teammates alive between the opposing teams) than the enemy team is important for coordinating pushes.
    • The Concheror when active will increase your team's offensive and defensive mobility. It will raise the effective health of all teammates near the soldier using this banner, as health is restored for all nearby teammates on hit.
    • The Battalion's Backup can render an enemy KritzKrieg charge literally useless, perhaps saving you from having to use your invuln. It negates the effects of enemy crits, provides a 50% resistance from sentry damage and a 35% damage resistance from all other sources when activated, raising the effective health of your team considerably, especially so when attacking a nest.

    If coordinated beautifully, these effects could ruin the charge of the enemy or indeed save your charge from having to be used: but only if the soldier is kept alive for the duration of his banner usage. This is why, when a banner is activated, the soldier earns a higher healing priority.
    'Crit Heals'
    • If the target was damaged less than 10s ago.. they will be healed at a base of 24 health per second.
    • From 10s to 15s, the rate increases linearly from 24 to a maximum of 72 health per second.
    • If patient has not received damage in the last 15s or greater, they will be healed at 72 health per second. This was introduced after beta-play testing showed that it was quicker to fight, die, respawn, than to fall back and wait to be healed to full health.

    When out of combat, and in safety:
    Heal your teammates closer to full overheal before your injured teammates. In 1 or 2 seconds they will be in perfect shape to pressure the enemy. If you heal the injured people first, the other teammates are not able to go and hold the line as quickly as they might have been.
      Note that this strategy is only applicable when there is NO DANGER, i.e. all involved teammates have crit heals.

    Graph to represent the crit heal ramp


    Time since last Damage (s)
    Rate of Healing (HP/s)
    0
    24.0
    1
    24.0
    2
    24.0
    3
    24.0
    4
    24.0
    5
    24.0
    6
    24.0
    7
    24.0
    8
    24.0
    9
    24.0
    10
    24.0
    11
    33.6
    12
    43.2
    13
    52.8
    14
    62.4
    15
    72.0
    16
    72.0
    17
    72.0
    18
    72.0
    19
    72.0
    20
    72.0

    Note that all decimal values are rounded to integers in-game.
    Healing Strategy and Efficiency
    General Healing Strategy
    • Dropped Medi Guns will lose charge at a rate of 10 units per second. It's only really worth picking up a dropped Medi Gun if..
      • you react lightning-quickly.
      • The dropped charge is at least about 20% higher than yours for stock or kritz. Don't bother picking up a Quick-Fix or Vaccinator unless you're already using the corresponding gun, and if the dropped charge is a huge margin higher than yours.
      • You are aware that, if you're swappping charge type, you can't go back until after you're dead or if you can safely pick up your old gun once you've used off the new charge.
      ONLY pick it up if you can spare the time and if it is safe to retrieve it from the floor!

    • Healing through walls works for just under 1.0s.

    • The stock Medi Gun's connect range is 450hu. Disconnect range is 540hu. You have a little bit of 'wiggle room' after connecting. Exploit this: stand as far away from harm as possible!

    • When chasing a heal patient who is just out of Medi beam reach: do not waste effort trying to precisely track them with your crosshair. It is equally as effective to effortlessly jiggle your cursor over their body until the beam connects. You don't need to waste the little attention this requires, when this could be applied more effectively elsewhere.

    • Always be healing somebody wherever possible! Don't be healing someone who already has full overheal, unless there is absolutely nobody else to heal!

    • Your heal beam can bend around corners. If your patient is slightly obscured by a wall when rolling out, for example, move your cursor over an unobscured area of their body (or some distance to the left or right of them as it applies to the situation) to keep an uninterrupted heal beam. The grace period is about 1.0s for how long you can heal through walls. If you fail to keep an unobstructed connection, you will lose healing and Uber building for a small moment. If they are a scout, they may well run out of range because you stopped healing them for a split second, thus greatly delaying your arrival to the fight. Every little bit of health and Uber counts!

    • Know that in TF2, momentum is retained when you are airborne. For example, if you are sped up when you run and jump, but lose the effect part way through the jump, you will not slow down mid-air, but rather when you land. You can touch a scout with the heal beam, jump, and switch back to your original target for some sneaky speed-boost action.

    • During the last 15s of setup time: Aim to have everybody 50% overhealed before the 10s mark or so, instead of trying to full-buff your teammates one by one: doing so makes it easier to aim for and maintain the perfect situation of having everybody at full buff before spawn gates open.

    • Having any Medi Gun be granted a crit charge doesn't change the weapons' stats at all; it does absolutely nothing. For example, using a Kritzkrieg on a Medic won't make him heal with 'crit heals' or anything silly like that.

      Little known fact... When your patient is being burnt by a flames, healing rate is reduced by 50%.


    Flow chart on how to approach healing a newly encountered patient.

    Flow chart to determine whether you bolt a patient or not
    Know that, if a patient in combat is only missing less than 25 health, don't use your crossbow on them. Beam them instead, to get them to overheal quicker. It's easy to get too cavalier with the crossbow and end up making unnecessary boltings, thus sacrificing efficiency.

    ...
    • There may be times where healing just one person is for the best.
      • The greatest example of this being successfully applied is a friendly heavy holding a choke.

    • Alternate between a bolt shot and direct Medi beam healing when the time comes to focus healing on just one person.

        The greater the combat stress your patient is under, the more frequently you should shoot a bolt at them.
      • To perform this as fast as possible when your patient is under the greatest stresses, we must take into account the times it takes to shoot, switch, reload.
        • Shooting a bolt takes 0.1s.
        • Switching to and from your crossbow will take 0.5s each, combining to take up 1.0s total.
        • The interval at which bolts can be fired due to reload speed is about 1.6s.
        • The crossbow reloads automatically, equipped or no.
        • 0.5s to spare? Sounds like we can exploit this!

    We have 1.6s in which we may sneak in extra heals. Switching to and from the crossbow and firing takes up 1.1s. We therefore have 0.5s to play with.
    In these precious 0.5 seconds, heal the patient with the Medi Gun for an extra 12HP before switching back to bolt them. Doesn't sound like much, but 12HP may just save them to hold that choke a little longer.
    User mishael1 has a brilliant graphic from his guide to illustrate this theory (Unfortunately some of the guide has since been outdated by Jungle Inferno and further balance changes, but the specific image pertaining to 'healing rhythms', they have dubbed it, still holds perfectly true).

    This 0.5s period of Medi Gun beam healing may be extended, by a factor inversely proportionate to the combat stress the patient is under. The greater the stress, the less time you spend 'beaming' them, where the minumum beam time period 'T' = 0.5s.
    • Know that the crossbow grants very little Uber in combat as compared to the Medi Gun, so aim to moderate how much you bolt your patients: only bolt them if they need it!
    • So: use your game-sense and experience to both keep your patient alive and gain as much Uber as possible by the end of the scenario. Know that you can be a little more cavalier with your bolts if you already have full Uber: just don't waste time bolting somebody in combat for any less than 30 or so health, as it'd be more efficient to beam heal them and get them to overheal quicker.
    • If their health drops to the 'danger zone', consider them to be under the greatest combat stress, so treat them as such, until their health is stable at 200HP or higher under beam healing.
      Combat Stress Level
      Average Health under Beam Healing (HP Units)
      GREATEST STRESS
      HP < 100
      MEDIUM STRESS
      100 ≤ HP < 200
      LITTLE TO NO STRESS
      HP ≥ 200


    Know the difference between effective health and absolute health.
    Effective health: how much damage the enemy will need to deal in order to kill a patient under your care.

    For example, when Ubercharged, a parient's effective health is infinite. When a stock solider is completely on his own, his effective health would be the same as his absolute health, 200.

    Let's say we are healing a stock, otherwise unassisted heavy under greatest combat stress. In addition to his base 300 Health, our fastest possible healing efforts would yield 75 Health per bolt at point blank plus 12 health restored while our crossbow reloads. That's +87HP per 1.6s passed. Suppose we considered him under greatest stress for 8.0s, he will have 300HP + (87HP*5.0s), resulting in a whopping effective health of 735HP in those 8.0s of holding a choke, excluding overheal.

    Effective health is subject to the time you spend healing someone. The enemy must deliver that damage value to your patient in the same time period for which you are healing to kill them; they can obviously still be killed if their absolute health value is deducted all at once (e.g. a bunch of crit stickies in a trap).

      Shooting an enemy doused with mad milk will raise your effective health.
      Being covered with jarate or gas passer gas will reduce your effective health.
      Therefore, teammates covered in any of these three liquids are raised higher in the healing hierarchy.
      They enemy will prioritise shooting at people doused in liquids.

    Absolute health: Their current HP. Absolute health must be drained all at once, or drained in increments faster than healing to defeat a patient. A healthy stock heavy without overheal, regardless of what's going on around him, has an absolute health of 300HP.
    Using an Übercharge and Formation
    Know the health of every member of the 'combo' (Heavy, Demo, Medic and the Soldier if he's there) as they join you in an invuln push. This usually consists of you, your patient and your 'sweeper', a power class at the front of the push to support the invulned teammate.

    • On attacking: the demoman makes for a great Uber patient, as he can viciously throw stickies (a.k.a. sticks, bombs) and chase down fleeing foes with grenades (a.k.a. pills, pipes). The Soldier or the Scout will make for an effective sweeper. As your Ubered patient does his work, know the health of your sweeper. I personally keep my crosshair over the sweeper, so I can monitor his health and flash him, should his health fall to dangerous standards. If you commence a push with all your combo overhealed, I consider the 'danger zone' at which I should flash somebody to be around the 50% health standard for most classes, and 33% for the Heavy (basically, just below 100HP).

    • On defending: the same principles apply. A good patient for Uber on defence is the Heavy, with the demoman as sweeper. Mechanically speaking, the Scout is the best Uber patient as his DPS and chasing potential is unmatched, but players are human, with human aim.
      It goes without saying that you should flash somebody if they're about to be struck by something that will kill them, like a crit rocket, if the enemy medic has used kritz, or to work your way flashing everyone, one by one, that a phlogistonator pyro is looking to kill. Know to flash one person at a time if you value having Ubers last more than a couple of seconds... unless the situation is dire, like a phlog pyro blitzing 'round a tight corner.
      • An invulnerable Pyro is indispensable in Uber denial. Consider giving your pyro a solo-Uber if he is able to airblast. Know that environmental hazards will kill an Ubered player as well. Example application: Uber the Pyro when counter-Ubering on pl_upward's third point, defence. Off the cliff they'll go....

      Outside of an Ubercharge, the basic principle of having a 'sweeper' to protect you is very effective. He will control the ground between you and your main patient, ensuring that you will not suffer from a flank attack. The scout's agility and versatility makes him the ideal 'sweeper'.

    Also note: if you absolutely cannot afford to lose a key member of your team before a push, you may use Uber on them to prevent the enemy spy getting a backstab kill on them... if you notice too late for anyone to act to prevent the kill. Just know that the spy wants you to use early, to give his medic the advantage.

    General strategy is continued in section 'Übercharge planning'.

    In Casual:
    Look at what weapon your Uber candidates are wielding.
    Broadly speaking this applies everywhere, but in competitive scenarios, you aren't exactly going to have a power class select an off-meta or sub-optimal weapon (most wildly different guns are banned in highlander, anyway).
      Example: Let's say there are two equally skilled candidate Heavies. One wields the stock minigun, one wields the Huo-Long Heater. You should Uber the Heavy with using stock, as he will be able to shoot for longer without running out of ammo as fast if you are planning an aggressive Uber. If you are defending a solitary choke, Uber the Huo-Long Heavy, as he will be able to deny the choke more effectively with his ring of fire.
      Some weapons are more compatible with eight seconds of focused aggression than others. Examples of this are such weapons like the stock rocket launcher compared to the Liberty Launcher, the Scottish Resistance compared to the stock sticky launcher, the Natascha compared to the stock minigun, or indeed the stock rocket launcher with Kritz as compared to the Cow Mangler with Kritz. If there is an appropriate choice given the situation where powerful candidates are of equal skill, gravitate towards the weapons more capable of destruction. Be familiar with the stats of all of the weapons used by your team.
    This TF2 Wiki page provides all the basic weapon stats you'll need.
    Fighting an Übercharge
    Most of this info is covered in section 'Ubercharge planning'.
    The hardest counter to an Ubercharge is another Ubercharge. As I have stressed above, the classes which should be given invulnerability changes dependant on whether you are attacking or defending.

    The simplest use of an Uber against an enemy Uber: get in their way! Most truly effective in tighter corridor maps such like cp_steel or the flanks of pl_borneo's first point. Unless they are a pyro capable of airblast, generally an offensive Uber patient will have no way of pushing you away. In wider open maps however, not only can they enemy walk around you (albeit with difficulty if you're a master-strafer) but the demoman could blast you away with some stickies.

      You can also use your invuln to block crits, including a spy's backstab, or other melee swings (just not a holiday punch!).

    Pyro is indispensable against enemy charges. He can reflect back explosives and projectiles (even more useful against a Kritzkrieg charge- kill the medic and his krit patient.). He can blast them away, delaying them until their invulnerability wears off, or even blasting them off cliffs or into pits.

    Always aim to deploy invuln later than the enemy does. Do not sacrifice lives for this goal, however. If a key member of the combo needs an Ubercharge instead of just a bolt when up against Uber, use it on them. Use when either your- or your pocket patient's- health reaches the danger zone. Numbers (number of alive teammates) are key!
    'Flashing' and Drain Rates
    Stock Medi Gun'Flashing' means splitting invuln on teammates as not to 'DROP' them (a.k.a. letting them die).

    Generally speaking, flashing is a waste on the Kritzkrieg and the Quick-Fix:
    • Effects do not linger on the previously healed patient
      as they do with Ubercharge.
    • You lose charge at a faster rate (additional 50% drain rate for the 1.0s they *would be* flashed for) all the same.
    • With regular charge, Uber lingers for 1.0s after you switch from a target.

    Uber drain is calculated by the game continuously throughout a charge.
    Based on how many players are made invulnerable because of YOUR uber, it applies a percentage increase on your drain rate per server tick.
    • You can flash multiple people at the same time, but for every active flash, Uber drain rate increases by 50% of the base drain rate.
    i.e. 1 invulned player = 100% drain rate, 2 players = 150% drain rate, 3 players = 200% drain rate etc. In other words, you lose 0.5 seconds of Uber by flashing just one person. A three-person Ubercharge lasts for a measly 4.0s. Hence the importance of selectively flashing only when you need to.
    Note that:
    drain is 12.5 units/s when active.
    For every player that is flashed in a solo Uber, 6.25 units are drained (50% of 1 second's worth is added).
    So: 18.75% loss in 1.0s when 2 people have invuln,
    25.0% loss in 1.0s for three, and so on....

    IMPORTANT: infinite flashes!?

    My favourite mechanic to practice when playing medic: the golden zone of free, infinite flashes!
    When you hit 0% you are granted 1.0s of free flash for you and your patient. Knowing this, if you flash another patient when Uber is between 0% and 5%, the second patient is granted 1.0s flash in addition to your first patient's 8.0s long Uber.
    So: 7.0s of 1-person Uber, 1.0s of multi-person Uber. This works for as many people as you can flash in these vital 0.4s.
    In practice, any more than having three free invulned teammates in the last 0.5s is near impossible, but we can sure as hell try!

    Just be very careful that you don't accidently flash an enemy spy during this phase. It is an easy mistake to make.

    While strictly speaking the golden zone is between 0% and 6.25%, it is not feasible for a human to begin flashing at precisely the 6.25% mark. The in-game counter is shown to 0 decimal places and as such there is a ±0.50 uber unit uncertainty, meaning to accidentally flash at 6.5 units of Uber left is to lose up to 0.4s of invuln (as 1 uber unit drains in 0.08s) on your main patient. For brevity, convenience and reduction of risk, we say to begin flashing when 0.5% of Uber remains.

    It's relatively rare to see this performed outside of high-level competitive, but oh boy is it satisfying to pull off on multiple people.

    It's important to flash a blast-jumper as they jump. The greatest medic could coordinate this free flash with soldier and demo blast-jumping into the enemy, for some seriously smart plays.

    Bonus: Having said flashing with kritz wastes charge, it is still worth doing after, say, having a demo fire off a few crit stickies, then switching to kritz a scout for example.
    Medi Gun: Übercharge planning and Build Rates
    Stock Medi GunAlways watch your patient's ammo count!
    When you're about to 'pop' charge, never leave it any later than when your health or your patient's health drops into the 'danger zone' (100HP or less).
    • STACKING (multiple heal beams on same target) will half the build rate of charge.

    • Maps that have setup time will grant 3x build rate during setup time. This is applied in addition to other build rate affecting variables.

    • When (nearly) fully overhealed, build rate halves (142.5% is the threshold).

    • You are most vulnerable to snipers and spies before and after an invuln push: before, you are naturally
      more focused on what is going on in front of your patient as opposed to swivelling to check for spies and watching potential sightlines. Once invuln is finished, BE OUT OF SIGHTLINES and again have 360 degree vision.
      Spies look to pick you and your patient off when invuln ends.
      Use careful application of subversive and unpredictable strafes, should your invuln end before you reach safe cover. Try to sharply move the hitbox of your head as well- just know that by doing so you compromise your situational awareness.

    • Make sure the enemy pyro(s) is/are dead before commencing a push. If they pay attention they can negate your charge by airblasting you and your buddy away, or even off a cliff.
      • One strategy to bear in mind, should the enemy pyro not be dead when you Uber in: run to him, and tank his airblasts, so your buddy won't be knocked back and may work in peace.

    • You do not need to be right next to your Uber patient. Stay as far away as possible... Unless you are charging to destroy a sentry nest, in which case you should kite the sentry gun's fire. Retreat as soon as the gun is down.

    • If you stand in front of a firing enemy whilst ubered, you will absorb the damage from their weapon. You can act as a shield for buildings or teammates, for example, while exchanging Uber with the enemy team. Block crits, including backstabs!

    • NEVER jump during an Ubercharge, unless you are looking to surf damage in order to escape.

    • Remember to cleverly utilise flashing in order to save a key member of your team / combo, for example, flashing the demoman to save him from death during a Heavy Uber, or flashing the soldier to negate blast jump damage. Do not flash too much or your Uber will be ineffectively short (see section 'drain rates').

    • If there is an enemy sniper or demoman around a choke point, consider using invuln early as to avoid you and/or your patient getting killed by headshot or sticky trap. This takes effect also at the start of a round! If you suspect a stickytrap outside of spawn, Uber out. It is better to have a shorter effective Uber than to have no Uber at all because you died.
      • Heaving said this, however, don't use your invuln as soon as the gates open in any other scenario. By doing so, you are not only potentially wasting it, but also giving the enemy medic a complete, 100% advantage.
      • About that sticky trap outside of spawn.... Let's say your gates have just opened, you're attacking on pl_borneo. Maybe ask your scout to 'scout out' for a spawn trap. The enemy demo will be forced to detonate on the scout (or else his stickies are getting destroyed anyway) thereby saving your combo from either getting blown up or being forced to use.

        Just know that, in this specific example, the enemy sniper or spy may get the hint that you're planning a push from that specific spawn exit, if the demo tells his team.

    • Aim to 'Uber in' with more than just you and your patient. A great push consists of the whole 'combo' (demoman, heavy, soldier, medic) pushing in together, with the invulnerable patient leading, or you leading if there is a sentry.

    • Do not abandon your buddy as soon as your charge begins to wear off. Support them from as far back as possible, using crossbow bolts if need be. Do NOT however put yourself under any unneeded risks. It is their responsibility to fall back sensibly: clear team communications are paramount. Once again, remember: Always be out of sightlines as the Uber wears off.

    • Know that when invulned or when using Megaheal, you cannot cap the point or push the cart.
      If every enemy has been defeated and there is no longer any danger, switch to your crossbow so that you aren't blocking your patient's cap time with Uber. This may make all the difference, as new enemies may spawn in the two seconds of cap time lost due to your Uber stopping your team from capping.
    ...
    Uber is more use than just a pushing tool!
    'Uber exchanges' Will take place where both teams have a charge ready. The objective before this is trying to get the enemy team to use invuln first. Ergo, a readied Ubercharge is both an asset for deterrence and for denying / commencing pushes.
    • Be warned: do not die trying to hold out on using a charge. Some exchanges you win and some you will lose. We may only give ourselves the best possible chance of coming out on top through clever team-play and astute application of the 'staying alive' section.

    Here's a specific example: is the enemy demo laying a bunch of stickies below your Uber patient? Bait him into an early detonation by switching your weapons! He'll see the flash and think your patient's invuln is ending. This is very tricky / risky: don't actually let your patient lose invuln- just have him flashing for 1.0s before reconnecting the beam.

    Speaking of exchanges..
    the wisest medic will be able to withhold an Uber in spite of an enemy Uber in some situations,
    granted that these two conditions are being met:
    1. You manage to avoid the danger of death. Strafe! Jump! Crouch! Keep your health above 100!
    2. You are able to heal all the damage the enemy is dealing to your friends.
    Hence the importance of overheal!
    An Ubercharge into an enemy without their own charge ready can be a game-changer; you will keep and hold the advantage. When you face a medic capable of this, the Quick-Fix becomes even less of an appealing choice for Prolander and Highlander.

    • With the Ubersaw, you may gamble the 1.5s of Uber it takes to switch to and swing your saw on, say, an irritating airblasting pyro for 25% Uber back. They probably won't expect it! Just ensure your Uber buddy is okay to lose invuln for 0.5s. Maybe try this just before your Uber wears off. They'll be shocked to see that you still have invuln, and will still be trying to flame you instead of blast you away.
        Developing this concept further has the potential for devastating plays. Before I go in for a cheeky Ubersaw swing, I carry out the following risk assessment:
        1. Are there many enemies? If so, consider not doing this. You'll die.
        2. Are the health bars of you and your patient out of the danger zone? It's simply too risky for both of you, if not.
        3. Can your patient afford losing invuln for 0.5s? This goes hand-in-hand with points 1 and 2. If they can't afford to lose Uber it's because they're too injured or there are too many damage sources. OR: If there's a prowling spy or sniper looking to one-shot your patient. Situational awareness!
          • If the beam disconnects: they'll have flash Uber for 1.0s. The time it takes to switch from and to your Medi Gun is 1.0s altogether. Swinging your Ubersaw to connect a hit takes about 0.5s: this is the time in which your buddy will be vulnerable.

        4. Has your potential Ubersaw target noticed you / is he targeting you? If yes to either, don't do it. Complete the risk assessment for another target, or abandon the idea for this time.

        DON'T DO THIS if your Uber is close to running dry, in essence only try this if your Uber percent is above 25 or so. If you try and miss when below this threshold, you will not switch back to your Medi Gun in time. Neither you nor your patient will get flash. You'll probably pay for this miss with your life, or with the life of your patient.

          By the time your Uber gets this low, you should be looking to back out to safety soon anyway, and planning how best to support your patient from safety, if possible. Never get greedy!

        Know that you can do this more than once per Uber. DO NOT go for more than one swing per switch: you are leaving yourself and your patient vulnerable for too long. If you miss, just accept it, and settle with what Uber you have left for now. There's rarely enough time to try again after missing in a single Uber.

        Before every time you try the switch 'n' swing, re-run my risk assessment here.

        For every successful 'run', you are granted 25% Uber restored, although by the time you've switched back, you'll have lost 6.25, meaning that you actually gain up to 19% (1.5s) for every successful swing attempt.

        Be warned, however: do not get overconfident. Do not try this all the time. The perfect opportunity for this presents itself very rarely.
        Try practising the switch 'n' swing on tr_walkway!

    • Important: when using a charge, a sly enemy heavy may try and make you laugh with the holiday punch, rendering you useless and your patient vulnerable. Try to maintain your distance from enemy heavies, especially so if they switch to their melee.
        The same goes for the Huntsman's skewer taunt, the Ubersaw's spinal tap taunt and the Gunslinger's organ grinder taunt. These will all have the same effect on you and your patient.
    Kritzkrieg: Profile and Applicability
    Kritzkrieg
    • +25% Ubercharge rate.
    • Provides 8.0s of guaranteed critical hits upon charge.
    Its 'Oktoberfest!' taunt will grant you a burst of 11HP, not including passive self-heal. Back up to a wall should push comes to shove and you must use this to survive.

    Note that Kritz negates damage dropoff, so a heavy charged with kritz will do lethal damage at mid- to long-range.

    The beam range is a little shorter than stock's. It is reduced by 4%: essentially negligible in gameplpay. This beam can be identified by yellow fleeting particulates along its direction of healing.

    Fun Fact: the main body component of this Medi Gun contains jarate, hence the 'golden' glow and the kritz.

    Applicability
    • Base charge rate is 32.0s. Use this to your advantage. Kritz the demoman or the soldier in order to drop the enemy Medic up to 8.0s before he is able to use his invuln. This gives you a grand advantage at the very start of the match.
      • If you manage to wipe the entire team, more or less, consider possibly picking up the fallen Medi Gun. You'll have a complete charge advantage by the time the enemy respawns, and the enemy won't expect you to suddenly have Uber without going to spawn (if it's stock)! Read up on my strategy notes about dropped Medi Guns in section 'healing strategy' before attempting this, however. It can be dangerous or wasteful dependant on the scenario. Just know that you'll be back on Kritz when you respawn unless you remember to switch off of it. Remember to liaise with your team! They may want you to stay with Kritz for keeping up the aggression and momentum, if the fallen Medi Gun is stock, for example.

    • If both you and the enemy medic die, consider using this on respawn if you trust you demo and the rest of your combo to drop their medic before 40 seconds pass.

    • Most commonly used on King of the Hill due to everybody's greater mutual proximity.

    • Know that you must switch aggressively from passive / conservative to active and belligerent before and after having kritz. It is not advisable to hold onto a krit charge for too long, as, unlike with stock, you have no invuln trump card should you be ambushed.

    • Holding onto a krit charge isn't such strong deterrence as a regular Ubercharge, because you can always be killed and you will drop it whether you panic-use it or not. Aim to use it sooner rather than later, most importantly before the enemy can retaliate with Uber.

    • Note that a surprise attack can still get the enemy medic to die even if he has 100% charge. See section 'how not to be seen'.
    Vaccinator: Profile and Applicability
    Vaccinator
    • +67% Ubercharge rate: 6.0s to build one bar, 24.0s to fully charge.
    • -67% Overheal accumulation rate
    • -33% Ubercharge rate when healing overhealed
      patients (4.2%/s reduced to 2.8%/s).

    • Provides a 10% resistance to the selected damage
      type to patient and healer, only when the beam is connected to somebody.
    • On charge: the selected resistance is raised to 75% for 2.5s. One Bar (25% Uber) is consumed immediately:
      the patient will retain this resistance even if the connection is severed.
      • The healer will retain this resistance too for 2.5s, regardless of what's happening to the patient. Switching away from the Vaccinator will terminate all resistance charges you've activated on yourself.
      • Each resistance charge negates criticals of the selected damage type ONLY: panic charging bullets against a Phlogistonator will not negate the crits, for example.
    The beam range is a little shorter than stock's. It is reduced by 4%: essentially negligible in gameplpay. This beam can be identified by yellow fleeting particulates along its direction of healing.

    As charge is consumed immediately upon use, an enemy Pomson 6000 will always drain Uber.

    Fun Fact: The big ol' pot at the base of the viewmodel resembles a coffee pot, because it was. The Vaccinator was submitted to the workshop under the name 'The Hot Coffee' and sported a warm, yellow-brown hue instead of the team colour seen in the final product.

    Applicability
    • Medic will shout 'I'm charged!' when the first and fourth (last) charges are filled. Not really worth masking this, as it's pretty obvious when someone is using the vaccinator, and you don't exactly have much to hide.

    • If you are burning with crits and use fire resist after you have been ignited, the crit fire damage will still be applied. Charge fire resistance pre-emptively.

    • If there are two medics on a team, one with Uber, the other generally shouldn't run the Vaccinator. This is as you will be reducing their build rate by mitigating the damage your team sustains. At first glance this seems desirable, but the quicker a team builds an Uber, the quicker the end to a stalemate. Not only is this the case, but if there's one charge combo which doesn't work, it's invuln + vaccinator.

    • Bullet resist is the largest category. If in doubt, keep it on bullet resistance.
      • Projectiles count as bullet damage.

    • There is no defence against melee damage and in turn melee criticals, even though melee counts as hitscan like bullets.

      Learn the pattern through which the damage types cycle:
      BULLET, BLAST, FIRE, BULLET, BLAST, FIRE, BULLET.
      This is key to using the Vaccinator effectively.

    • Know that you can superimpose a charge resistance of 75% with 10% passive resistance of a different damage type. The shrewd medic will be able to judge the proportions of oncoming damage from multiple sources and apply best the 75% buff(s) with which 10% resistance to hold passively.
      • For example: your patient faces a soldier, a demoman, and a pyro, you have 1 charge. You use Blast resist on your patient and quickly switch to passive fire resist.
      • Fighting a level three gun with one charge: charge bullet res. Switch passive resistance to blast.

    • Know that a friendly bullet resistance (either passive res or charged res) will NOT affect the amount of health a friendly bolt restores from any friendly medic.

    • Know that, when burning, the flame resistance charge's effect will be reduced by 20%. This is not additive stacking: the effect is applied multiplicatively to reduce resistance from 75% to 60%.

      Infinite charges?
      It is best advised to deploy a resistance onto someone whom you are not actively healing: there is a mechanic where if damage received (by you or one of your patients) is of the same type of that which is being resisted, your rate of Uber gain is increased (CLARITY NEEDED - BY WHAT FACTOR?).
      Knowing this, to maximise Uber gain rate: deploying three charges on nearby teammates, and healing another with passive resistance (all while each of you receives the damage type being resisted against) will grant you an insane rate of Uber build; aiming for this hypothetical perfect situation will grant you a near-infinite supply of resistance charges to utilise.
    But is it viable in competitive?

    Unfortunately, not really.

    Much like Megaheal, these resistances do not match up to an Ubercharge. Acute use and lightning-quick decision making may negate an enemy krit charge, however... It is best used while trying to flee, keeping all of your teammates up.
      While it stands to reason that the Vaccinator could work as a counter to the kritzkrieg, remember that overheal accumulation is crippled. Your team will be at a disadvantage against an enemy team whilst you have ubiquitously lower overheals.
    Quick-Fix: Profile and Applicability
    Quick-Fix
    • +40% heal rate
    • +10% Ubercharge rate
    • -50% Max Overheal
    • Mirror blast jumps and shield charges
    • Ubercharge is the 'Megaheal': It raises the rate of healing up by 200% up to 300% (dependant on the same mechanism by which 'crit heals' work) for 8.0s.
    Megaheal is best used in groups, although splitting the charge over multiple people will drain it very quickly (see section 'drain rates').

    The quick-Fix will retain the maximum overheal from a friendly medic's stock medi gun.

    The beam range is a little shorter than stock's. It is reduced by 4%: essentially negligible in gameplay. This beam can be identified by yellow fleeting particulates along its direction of healing.

    Fun fact number 1: the main body component of this Medi Gun is the beaker of a blender, reminiscient of the themes present in 'Meet the Medic: Outtakes'.
    Fun Fact number 2: After its first use, this prototype Medi Gun's Ubercharge mechanism shorted out. This explains the dissonance between the functionality seen in 'Meet the Medic' and in the gameplay.

    Appplicability
    • Using this puts you at a disadvantage at the start of a fight, as the enemy team will have 150% health, your team will only have 125%.

    • Effective at destroying Level 1 or 2 sentry guns due to its knock-back removal. It also inhibits slowing effects. Level threes, however, will overwhelm you and your patient during a Megaheal.

    • While yes, it does grant a faster rate of healing, Megaheal simply does not match up to invulnerability or guaranteed criticals, either defending from them or attacking against them. I can think of few situations where the Quick-Fix is an optimum match choice outside of laid-back gameplay. You and your charge patient will be dead if the enemy combo uses crits on their demo, which will be ready 4.0s sooner anyway!

    • Taming the unusable unstable beast that is Megaheal: Use it extra-pre-emptively! Know that, unlike an Ubercharge, deploying Uber will not save your patient from insta-death like backstabs, crits, headshots etc.
        Megaheal is a poor deterrent to the enemy team, as compared to invuln. It charges faster, too, and due to a glitch where Uber build rate is not halved when the patient cannot gain any more overheal (see section 'bugs') you will gain a charge practically every 36 seconds. As such, you may be very cavalier with the Megaheal, using as and when you see fit, at choke points, when threatened, and so forth. To hold onto this Medi Gun's charge for a long period of time is to not recognise its potential. It is, for this reason, best played very aggressively.

    • You and your patient can be backstabbed, headshot and killed by crits easily while using this. Getting a charge 4.0s faster than stock isn't a good enough reason to use this, where the crossbow can be used to provide rapid healing anyway.

    Medic Ferrying:
    healing a blast jumping class and being brought immediately to the front lines.
    It is not worth losing Uber just for this, especially so if you have a proactive engineer on your team.
    WHEN YOU ANTICIPATE A JUMP: Don't ever hold 'W' or 'S'. Your momentum and strafing ability will be slashed hugely. An inexperienced medic being ferried will not be able to properly follow their patient after any more than one jump as they will be holding 'W'.
      Instead, move only using sidesteps when you anticipate a jump. Alternate sidesteps between 'A' and 'D' to move forward, in order to maintain 360 degree awareness.

    The only time I could recommend this is if you want to not use the crusader's crossbow in a relaxed casual game with the boys (or girls), or if the enemy team in casual doesn't have a medic.

    Having said all of these things however... Suppose you respawn with an absolute 30s left in the match. This means that the match will not last longer than 30s. Not enough time for even a Kritzkrieg charge to be used. You may panic-switch to the Quick-Fix to give your team an extra bit of healing.
    That may well make the difference, pushing the payload or scrambling to cap last (in cp_steel, for example) in overtime.
    I don't recommend panic-switching to the Quick-Fix in KotH, however, unless both teams have effectively zero cap time left to win: doing so to cap when you need to hold for another minute puts you in an awkward position when you do cap the point. "What now?"
      The concept of 'panic-switching' Medi Guns to an off-meta choice is a little counter-intuitive. Know to be 100% sure before you do this: only do it in the situations where you are positive your team won't have the time to potentially accumulate a regular type of charge. Doesn't being '100% sure' kind of defy the definition of a 'panic switch'?
    Just remember to switch off of it at the start of the next round, as per the situation.
    General Play-style and Positioning, as Determined by Game Mode
    King of the Hill 'KotH'

    You will need to be more aggressive here, otherwise you won't be able to put up a good enough fight to hold off the enemy team from rolling your friends.
    King of the Hill is hell for medics. Due to everyone's proximity to each other, it takes little for the enemy scout to flank and kill you, and it takes little effort for the enemy soldier to jump up and bomb you. Your survivability will be hugely impacted by the skill difference between your team and the enemy team. Where your ability to stay alive is always affected by how well your team can keep the enemy team at bay in other modes, this relationship is amped up to ten in KotH because of how relatively easy you are to reach. As such, it is vitally important for all of your strength classes to stay alive and protect each other, and to protect you. For this, air-tight formation and coherent strategy are paramount.
    A lot of the times you die in KotH, there's not an awful lot you could have done about it. You can die less with some careful application of this guide's content, however.
    Having said this, you should always aim for zero deaths, no matter the game mode.

    Generally, when hiding in a safe zone, the engineer will place his dispenser in a location that facilitates your use of it as a shield. If the soldier comes bombing over you, your team will have more time to get rid of him before he is successful in killing you, due to the dispenser tanking splash damage before you. You never cross sightlines or stray far from your hidey pocket to Medi beam somebody: that is what you use your crossbow for.

    Keep an eye on how many of your team are alive as compared to the enemy: generally speaking the greater numbers you have as compared to the enemy is proportional to how aggressive your positioning is allowed to be. Don't come out of your hidey-hole cover unless the enemy sniper is dead, or your whole combo is looking to push. Remember: generally, use Uber early if there is any risk of headshot or sticky trap kills!

    koth_coalplant
    Here is a very common map in Highlander, koth_coalplant. I have circled on the image two equally viable hold spaces. I shall refer to them, from left to right, as A and B, respectively.
    A: My personal preference is to mainly hold here, as it is not directly next to a potential flank route. We can see that the slanted roof above this hold allows you to continue healing a patient who has jumped up there, in addition to providing greater visibility of when a potential bomb may be coming. Both of these benefits aren't as available in hold B, due to the roof being slanted up towards us, instead of being slanted up away from us.
    B: Hold B is situated next to a tunnel, which leads below the control point through to the enemy's side of the map. Holding here will allow a teammate to quickly go from being overhealed to attempting to flank the enemy, without needing to cross a sightline and sustain damage. This hold has greater cover due to the brick wall and barrel, but therefore suffers from reduced visibility.

    In practice, it is sometimes best to rotate your team from side A of the map to the other, upon respawn, so that less fire will be focused constantly on your team, and to support a flank attack, for example, should you choose the Kritzkrieg. It is important, I find, to rotate back to hold A once the flank attack is completed.
    Look out for all the potentially viable hold spots in every map you play. It is important to rotate often in King of the Hill, or the enemy team will be able to predict you, and intercept your plan with a bomber, or even a phlogistonator suicide-run.


    Payload

    The conservative playstyle will serve your team the best here.
    Where KotH is hell for medics, payload is pretty much heaven: you can practice all manners of different things I've listed in this guide. Not dying once in all of a payload map is a realistic goal here, in contrast.
    Know which areas of the map are safe to stay in, with safe retreats and the least sightline exposure. Don't ever come out into the open unless your whole combo is pushing to take or retake ground (only when the enemy sniper is dead).

    Attacking:
    As the cart is pushed further, you and your team moves progressively through areas of cover to be held down. If the enemy has an Uber advantage or Ubers are equal, your team will have to either try and force or even kill their medic, or you will have to outlast their charge when they use it. The basic principle of gaining ground and holding it is very similar to the way in which you hold ground from cover on defence.
    ...
    Defending:
    You stay in your area of cover, keeping as many teammates up and fighting as possible, until the time comes where you are overwhelmed: retreat back to the next safe hold, where hopefully your engineer will have set up in advance. Surfing works wonders on Payload defence. NEVER leave it too late to fall back. The best medic will be able to defend an entire payload map in one life. Sometimes you will be caught off-guard and be killed by something you did not expect:
    learn from your mistakes, think about how you could have avoided that specific death, and apply your solutions to your next attempt.
    This mantra is key to becoming a better medic.
    You use your charges if you need to repel an enemy Uber. Generally, using invuln willy-nilly into the enemy will put you at an Uber disadvantage, where the enemy medic will see no invulnerable resistance to his own: use only as and when you need to. The enemy cannot push you past a choke when you have Uber when they don't (known as a 'dry push'). Having said this, sometimes you will be forced to use to survive. Again, consider the circumstances which lead to you being forced. Was it your placement? Did your team not watch the sky for jumpers? And so on.

    pl_badwater
    Here is the first point of pl_badwater. I shall refer to each of the three circled areas as A, B and C from left to right respectively. For the sake of argument I will evaluate the pros and cons of holding in each area.
    A: At a first glance it seems mechanically similar to C, but the highest wall is between you and the enemy spawn, instead of facing the side of the map. Due to the placement of this wall, you will not be able to see jumpers trying to bomb you out until it is too late. For this reason alone we shall seek an alternative, even if we have a clear shot of each of our teammates.
    B: Jumpers will not be able to get to you without flying over the entirety of your team including a sentry gun, and then have to land, taking further damage, before finding you. This already is a direct improvement, although you still wouldn't see them coming. We should again seek an alternative hold as here you cannot see any of your teammates to help, and you can't go anywhere or do anything!
    C:Here, we are able to see the entirety of our team, and are able to see any jumpers long before they get within our range. We can bolt whoever we need to. It is also next to a direct push route, where we can repel an enemy charge.

    C is the best place to hold in practice, after considering all of these reasons. A common strategy is to have the medic hide in hold B if the team anticipates a bombing run from the demo, soldier and pyro, rotating immediately back to C as soon as the bomb is over, to start distributing healing again.
    Evaluate all of your choices for cover, and select one at each stage of the map which provides a balance between protection, and team healing capabilities. Know that you can switch locations (when it is safe to do so) if you deem it most helpful.


    Attack / Defence

    Broadly speaking, both conservative and aggressive playstyles may shine here.
    Very much similar to the payload method. Pick and hold your ground from cover with your team. Not dying once in the linear maps of the map pool is an achievable goal. On the more convoluted maps like cp_steel, due to flanks and rapid rotations, actually achieving this goal is a little more difficult, in comparison, but still doable!


    Prerequisites for Using Config Files
    TF2 .cfg Files Location
    Above is the file location that this section is concerned with.

    For using the configs I have listed in this guide, you will need to observe the following instructions. If you are already familiar with installing binds and such then feel free to give this section a miss.

    1. You will need to create several .cfg files in the directory shown above to get started with using configs. If they already exist, skip to the next step. Create the following files in the .cfg format (if you are not able to copy and edit files in the .cfg format instead of .txt, you may need to 'run as administrator'. There are better guides out there than this one, for this specific issue!):

      • autoexec.cfg
      • reset.cfg

      • scout.cfg
      • soldier.cfg
      • pyro.cfg
      • demoman.cfg
      • heavyweapons.cfg
      • engineer.cfg
      • medic.cfg
      • sniper.cfg
      • spy.cfg

      Obviously this guide will only be relevant to the contents of the medic.cfg file out of the nine classes, but there is an important step relating to keeping all of your class configs 'compartmentalised', in other words, stopping them from overlapping and spilling out onto each other.


    2. At the very start of all nine class config files, write the following line of code:
      exec reset
      such that before any other instructions, your class config files look like this:

      demoman.cfgPictured here is obviously the start of my demo config.

      This ensures that, for every time that you select a class, the script 'reset' is run.


    3. Now for the contents of reset.cfg.
      My personal reset.cfg
      To the right is what my personal reset.cfg file looks like. The aim of this file is to revert to default any changes that any class config's contents have made. For example, all of my medic-specific binds are to be used with certain keys. These binds serve no use outside of the medic class, and even worse, may collide with other binds or default binds for other classes.

      Your reset.cfg file should be personal to you: know what keys are being used with what classes and make sure that they are set back to their default functions when you play a different class.

      When you are using these kinds of binds, the in-game options menu will show all affected keybinds as empty. Don't freak out, they're still working. Just don't try and re-fill them out, as it may collide with your config files.

      For example: Using the null-movement script for all classes means that you won't need to include WASD information in your reset.cfg file, as it never needs to be reset! It also means that your in-game movement keys will show up as unbound in the keyboard options.


    4. Now for the contents of autoexec.cfg.

      Use this config file for commands that you want to be universal: in other words, you use this file for scripts you want to have on all nine classes. it is executed upon starting up the game.

      Binds here won't need to be dealt with by the reset.cfg file.

      My personal autoexec.cfg contains net settings, graphic settings, and binds that work for all classes, such like the null movement script or the "Uber incoming!" team messages.


    Above all else, I strongly encourage you to experiment with binds, in order to reinforce your understanding of how they work beyond what I have listed here.

    I encourage you to load up 'itemtest' to test out and become familiar with my binds I have listed in this guide. 'itemtest' is a map that comes with TF2 by default. It's a modified version of cp_gorge's BLU spawnroom.
    Scripts to Run, and Which Binds Are Fun
    Copy and paste the following general scripts you want into your autoexec.cfg file,
    located in Steam > steamapps > common > Team Fortress 2 > tf > cfg.
    These will be turned on when you launch the game.

    I encourage you to replace certain keys which I use with whichever you feel may be more comfortable, where applicable. Visit This TF2 Wiki Page to see which keys can be bound and what the console recognises them as. I personally use the keypad for passive binds such as team messages and spawn binds, as it serves very much like your own personal control panel.

    🏥
    Null-Movement script
    Enables smoother strafing by eliminating frames in which you are standing still as a result of A and D being held simultaneously for a brief moment. A must-have for easier survivability against especially snipers and scouts. Allows you to freely tap dance around like a Vaudeville act.
    // Null movement script bind w +mfwd bind s +mback bind a +mleft bind d +mright alias +mfwd "-back;+forward;alias checkfwd +forward" alias +mback "-forward;+back;alias checkback +back" alias +mleft "-moveright;+moveleft;alias checkleft +moveleft" alias +mright "-moveleft;+moveright;alias checkright +moveright" alias -mfwd "-forward;checkback;alias checkfwd none" alias -mback "-back;checkfwd;alias checkback none" alias -mleft "-moveleft;checkright;alias checkleft none" alias -mright "-moveright;checkleft;alias checkright none" alias checkfwd none alias checkback none alias checkleft none alias checkright none alias none ""


    🏥
    Move spawnroom
    This simple bind enables you to switch your current spawn location. Know that itempreset 0 refers to loadout A; itempreset 1 refers to loadout B, et cetera. You must press the key twice to spawn with your current loadout. Pressing it once will swap your loadout, and pressing again will make you spawn with your previous loadout. Feel free to switch which presets are used in this code for your convenience.
    IMPORTANT: To retain your Übercharge you MUST have the very same Medi Gun equipped in both loadouts. It will not work if you interchange two different regular Medi Guns, for example. As such, it is only feasible to have this bind ready to serve ONE type of charge at a time; I recommend having this bind serve the Stock Uber.
    Example Application: You are pushed back to first spawn after BLU captures second on pl_upward. Instead of having to suicide or make a run for your team, use this bind to safely teleport from the first RED spawn to the next (last) spawn, keeping Uber. This may be used in tandem with obfuscatory cosmetic loadout switches explained in section 'Staying Hidden'.
    // Move spawns on double tap (KP 5) alias "movespawn_first" "load_itempreset 1; alias "movespawn_third" "movespawn_second"" alias "movespawn_second" "load_itempreset 0; alias "movespawn_third" "movespawn_first"" alias "movespawn_third" "movespawn_first" bind kp_5 "movespawn_third"


    🏥
    "Incoming enemy charge" team alerts
    Fairly self-explanatory. Customise this to print any helpful team chat any message you want. May be written to include voice commands.
    // Incoming Uber warning (KP 7) alias incominguber1 "say_team Enemy Uber incoming, watch it.; bind kp_home incominguber2" alias incominguber2 "say_team Incoming enemy Uber, look out.; bind kp_home incominguber1" bind kp_home incominguber1


    Copy and paste the following Medic-specific scripts you want into your medic.cfg file,
    located in Steam > steamapps > common > Team Fortress 2 > tf > cfg.
    If medic.cfg doesn't exist, create it. These will automatically be turned on when you pick the Medic class.

    For class-specific binds: you need to have a folder named reset.cfg. At the very start of ALL NINE CLASS .CFG FILES YOU NEED TO WRITE, BY ITSELF:
    exec reset
    This essentially keeps class-specific binds from spilling over into different classes' configs. More info at the end of this section and in the above section.

    🏥
    Deploy charge on mouse 2, regardless of current weapon
    Upon pressing mouse 2, no matter your situation, you will drop the intelligence if you are holding it and insta-switch to your Medi Gun. Hold it down for an extra second or so and you will deploy Uber if you have it. In all, you can go from any weapon to Uber in as little frames as mechanically possible. Useful for the weapon switch alone, let alone the Uber mechanic. I can't imagine playing without it myself.
    // Uber on MOUSE2 with any weapon out alias +charge "+attack2; slot2; dropitem; spec_prev; mouseweapon2" alias -charge "-attack2" bind mouse2 "+charge"
    'spec_prev' retains Mouse 2's default function when spectating.


    🏥
    More comfy Vaccinator resistance switching
    Self-explanatory.
    // Vaccinator switch with mouse wheel up bind mwheelup "+reload"
    ...
    🏥
    The coveted 'MEDIC RADAR' bind
    For as long as you hold down the bound button (mouse 4 for me) all your teammates within a fairly large radius will autocall medic, no matter their health, whether they are behind a wall or above you or wherever. Utterly crucial for when you get singled out and must seek a teammate. A sound will be triggered with the autocall as well. This can be very obnoxious in larger teams, so whilst it is possible to make your autocall 150 for a permanent 'radar', I would not recommend it unless you play 6v6... if you value your sense of hearing.
    // Medic radar (MOUSE 4) alias "autocall_default" "hud_medicautocallersthreshold "88"" alias "autocall_all" "hud_medicautocallersthreshold "150"" alias "+radar" "autocall_all" alias "-radar" "autocall_default" bind mouse4 "+radar"
    Replace
    88
    with whatever your autocall percentage is. 88 is my personal recommendation, for it serves well to indicate where every teammate currently fighting in the frontlines is located.


    🏥
    Masking Uber
    I explain both my choice of voicelines and advanced strategy in section 'staying hidden'. I feel these voicelines on rotation is the best possible / most efficient masking strategy.
    // Uber masking with mouse wheel down alias confuse_speech1 "voicemenu 2 4; bind mwheeldown confuse_speech2" alias confuse_speech2 "voicemenu 2 5; bind mwheeldown confuse_speech3" alias confuse_speech3 "voicemenu 2 4; bind mwheeldown confuse_speech4" alias confuse_speech4 "voicemenu 2 5; bind mwheeldown confuse_speech1" bind mwheeldown confuse_speech1


    🏥
    Feigning Uber
    This, too, is explained in great detail in section 'staying hidden'. You must read my thoughts there on use of both this and masking Uber before applying them.
    // Feigning Uber (KP 9) bind kp_pgup "voicemenu 1 7; say_team Uber feigned to enemy."


    🏥
    The ever-useful Medi Gun switching binds
    These are to be used in conjunction with one another. I have bound the Kritzkrieg to loadout preset D and the Medi Gun to preset C. Feel free to adjust which loadouts these binds use. Know that if you wish to use the spawn switching bind in addition, the equipped stock Medi Gun in preset C must be the same in both A and B, too. Happy switching!
    // Switch to Kritzkrieg (KP 3) alias equipkritz "load_itempreset 3; say_team Switching to Kritzkrieg." bind kp_pgdn equipkritz //Switch to stock Medi Gun (KP 2) alias equipstock "load_itempreset 2; say_team Switching to stock Medi Gun." bind kp_downarrow equipstock


    🏥
    Medic-specific Team instructions
    Unlike my Incoming Uber warning, this applies only to the medic class. Feel free to duplicate this to include whichever messages you feel to be most helpful to your friends.
    To be used if you don't want to / can't use your voice.
    // "Go! Go! Go!" (KP 8) alias moveout1 "say_team Move up, I'm going to charge you.; bind kp_uparrow moveout2" alias moveout2 "say_team Get ready, I'm about to charge you.; bind kp_uparrow moveout1" bind kp_uparrow moveout1


    🏥
    Lastly, crosshair switching scripts and ease of quickswitch
    For ease of aiming with the crossbow, with a quickswitch function written by MR SLIN to exclude the melee slot when using quickswitch.
    // Unique crosshair for Crossbow, and weapons 1 and 2 only with quickswitch alias weaponone "slot1;cl_crosshair_file crosshair2;cl_crosshair_scale 36;mouseweapon1" alias weapontwo "slot2;cl_crosshair_file crosshair5;cl_crosshair_scale 20;mouseweapon2;" alias weaponthree "slot3;cl_crosshair_file crosshair5;cl_crosshair_scale 20;mouseweapon3" bind 1 "weaponone" bind 2 "weapontwo" bind 3 "weaponthree" alias quickswitch1 "weapontwo" alias quickswitch2 "weaponone" alias mouseweapon1 "bind q quickswitch1" alias mouseweapon2 "bind q quickswitch2"
    IMPORTANT:
    Switch out my crosshairs for whichever you use personally. Included here are just size and style. I encourage you to include colour, too, should you wish to change colour upon switching weapons. This guide by 'Das Psycho' is fantastic for crosshair management.

    IMPORTANT:
    If you wish to use the Uber on Mouse 2 bind in conjunction with this: YOU MUST include crosshair information as well! Below are my crosshair settings for the Medi Gun and melee weapon. Switch this out for whatever crosshair you want.
    // Uber on MOUSE2 with any weapon out alias +charge "+attack2; slot2; dropitem; spec_prev; cl_crosshair_file crosshair5; cl_crosshair_scale 20; mouseweapon2" alias -charge "-attack2" bind mouse2 "+charge"


    🔧
    The reset.cfg necessary contents
    This, below, is my reset file. This is executed before anything else when a class is selected. You should mould it dependent on which of my scripts you have taken. If you have used all of them, then you will not need to edit it. Remember to correctly replace any keys that you have swapped out.
    unbind kp_uparrow unbind kp_pgup unbind kp_leftarrow unbind kp_downarrow unbind kp_pgdn unbind mwheelup unbind mwheeldown unbind mouse4 bind mouse1 "+attack" bind mouse2 "+attack2" bind mouse3 "+attack3" bind q "lastinv" bind 1 "slot1" bind 2 "slot2" bind 3 "slot3" bind 4 "slot4" bind 5 "slot5" cl_crosshair_file crosshair5
    Remember to replace 'cl_crosshair_file crosshair5' to whatever crosshair you want by default.
    Training Resources
    tr_medic[gamebanana.com] is a collection of training maps by happs[gamebanana.com].
    The pack contains 5 unique maps: agility, xbow, healing, dodgeball and spawn.
    • tr_medic_spawn only applies to the sixes competitive format. It contains bots which walk the rollout path of a typical 5cp map. My guide doesn't contain the rollout specific to the sixes format, but this map is included nonetheless.

    • tr_medic_xbow is brilliant for practising not only crossbow airshots, but landing hits on teammates scuttling around from high to low, near to far.
      My most played map of this pack!
      • In the 'airshot' portion of the map, a bot is launched repeatedly from a point, where you fully adjust the bot's velocity: speed, rotation, direction, horizontal force and vertical force. You can randomise each of these settings and the direction the bot launches from is randomised, too.
      • In the general practice area of the map, many bots will come from all direction towards a central pit, each taking a randomised general walk route each time. Along the perimeter you can practice healing teammates in a simulation of capping a point from afar, and from whatever altitude you desire.

    • tr_medic_healing is a great simulation of scattering teammates around you, who you must keep alive via a combination of bolts and beam healing. Their health is constantly drained, and the object is to pass the map without letting a single friend die. Each time you attempt it, bot walk patterns appear to be randomised. Brilliant to keep trying, to get a solid grasp of how heal order can be fluid in the middle of a battle.

    • tr_medic_agility is a set of sixteen or so obstacle courses, which you navigate whilst being shot at by rockets, using some of which to surf terrain. While it gets a little draconian by the end, it is still great for practising rocket surfing nonetheless.

    • tr_medic_dodgeball is a little obscure. Not quite sure of the benefit of smacking a little ball on the floor whilst getting shot at, but perhaps you can find some use out of it, and tell me below in the comments how.


    tr_walkway[gamebanana.com] is a popular map by washipato[gamebanana.com].
    I recommend using this to practice melee swings against pursuing foes, similar to practising trickstabs of many types, as I have mentioned in section 'situational awareness'. You may also find use in tr_walkway for practising the "switch 'n' swing" method against foes, as mentioned earlier.


    Offline surf practice, manipulating bots and using console commands
    While the training maps listed can be used to practise general blast surfing, they aren't a very good reflection of how to escape a single blast enemy in a battle.
    For this I recommend launching your own private server in a nice, spacious map, say, pl_badwater.
    1. Click on the 'launch sever' option from 'play game' in the main menu, and then select an appropriate map: any will do, just so long as it is sufficiently open.
    2. This TF2 Wiki page on bots has a list of all the console commands and explanations you'll need. The specific instructions on how to make a stationary, hostile soldier bot for surfing rockets from I will list further.
    3. Console commands:
        Activating the console: Options > Keyboard > Advanced: Check "Enable developer console". Click okay. See which button console is bound to: for me, it is " ` ".
      If you chose team RED:

    tf_bot_add 1 soldier blue expert Jim
    • This will spawn a BLU soldier 'Jim', on expert mode.
    sv_cheats 1
    tf_bot_keep_class_after_death 1
    bot_dontmove 1
    tf_weapon_criticals 0
    mp_autoteambalance 0
    mp_teams_unbalance_limit 0
    mp_disable_respawn_times 1
    mp_tournament 1; mp_tournament_restart
    bot_selectweaponslot 0
    • All these you must put into the console, one by one.
      This will spawn a completely immobile BLU soldier, constantly trying to shoot you with his rocket launcher when you get near him. The next command is very important, you need it to spawn Jim wherever you want him, so that you may actually practice surfing his rockets at specific map segments.
    • Join Jim's team temporarily. stand where you want him to be. Use command:
    tf_bot_warp_team_to_me
    • To warp him to your current position. Join back to team RED. this command only works on bots on the same team as you.

    Use "bot_refill" to restore Jim's ammo should it get low.

    Use "impulse 101" To restore your health; putting god mode on makes you immune to blasts, so don't use that one.

    Toggle "noclip" to get to places faster.

    BE WARNED: Practising surfs at specific points of a map, like pl_badwater, may make you hang around and wait for damage to surf, just like in practice. DON'T DO THIS. Don't be hanging around waiting to surf on something. Escape as soon as you need to: if there's damage available to surf, then that's a situational bonus. Don't get the enemy team's attention! Remember, the best medic is invisible to the enemy team.


    For forming a needed relationship with your weapons other than your secondary...
    Join a casual match, and go battle medic! Run around and go nuts. Remember, your battle-medic task from me as training is to aim to not die.
    This will give you a tighter grasp on such things like how enemies react to you, how to lead targets with your syringes, learning how syringes arc and travel, learning how to bait an enemy melee strike and in turn counter-strike, and so on!

    HOWEVER, be aware of yourself. Ensure that you do not develop any aggressive habits, here, that stick when you return to serious play. You must always, always leave aggression to your teammates when playing seriously. This is training to deepen your relationship with your tools of self-defence only, not how to steal your teammates' work, or how to lose their trust for you as a healer!


    Play Medic in MvM!
    MvM is great for learning to avoid damage and learning the ins and outs of retreating, surfing and not dying in a controlled yet realistic environment. The first couple of waves are the best for this, as you won't have many upgrades to diverge your medic experience too far from the base game.
    A great, FREE, challenging environment that you can play in with like-skilled individuals would be Potato's Custom MvM Servers[potato.tf].
    The tour hosted often rotates, but will always have upper-advanced to expert campaigns. At the time of writing, operation Titanium Tank: Reforged is hosted, from which you can earn an in-game medal for your efforts.


    These are the methods I personally 'train' with, aside from the obvious one: just playing the main game. If you feel you have sufficiently tempered your healing and not-dying skills, consider hopping into a lobby at TF2Centre[tf2center.com], to play casually in a real competitive scenario. Only if competitive TF2 is something that interests you! There is nothing wrong with only playing TF2 casually. Have fun!
    Closing: Sneaky Tricks, Bugs, MvM and More.
    Spooky haunted floors and a wall
    These specific floor materials enable passage of Medi beams (and blast damage, too) for whatever reason. Look out for these floors, as you will be able to freely heal through them, either from above or from below.
    ctf_2fortSeen here is outside of ctf_2fort's main spawnrooms. Another can be seen in ctf_doublecross. It is a walkway leading to the raised floor of the intel room, yet curiously, only present on BLU's side of the map. RED has a non-permeable wooden walkway instead.

    pl_enclosure stage 3One of these floors can be seen in pl_enclosure's third stage, above the penultimate point.

    pl_enclosure stage 3In the same stage there is actually a wall of the same material you can heal through, when defending the final capture point. Neat!

    cp_steelAnother can be seen in cp_steel, next to point C.

    mvm_mannhattanThis type of mesh flooring seen in mvm_mannhattan can also be freely healed through. Useful for reviving and subsequently buffing somebody with you having almost complete protection from the robots, while they walk their set path.

    If you spot one of these permeable-looking floors, remember that you can give a teammate some burst Medi Gun healing through them. In practice, it simply isn't feasible to try and 'exploit' this by pocketing someone through the floor. Not only are you separating yourself from your teammate's protection, but also restricting yourself to Medi Gun healing only.


    Anti-Spy identification bug
    If you heal an enemy spy with the vaccinator, sometimes (quite often) they will be permanently marked with the resistance icon, whether they are invisible or disguised. It stays on them until the round ends, regardless of whether they die. It vanishes if they change class. While the icon remains after you stop healing them, they don't retain any resistances given.


    False Burning Stats from the Meet your Match Update
    When your patient is being burnt by a flames... The Meet your Match patch notes claim healing is reduced by 25%. This is false. It is a 50% heal rate reduction from the Medi Gun when your patient is burning.


    Fists of Steel: Uber building bug
    The fists, when held out by the Heavy, reduce overheal capacity by 40%. As this new, smaller limit is less than 142.5% health, you can permanently get max Uber build rate when healing him at full overheal, so long as he holds his melee out (Unlike how you cannot get max Uber build rate from a healthy Razorback sniper, even though their health never passes 100% at full overheal.. the same idea goes for healing a Gloves of Running Urgently Heavy). The interesting bit comes next: for as long as your healing beam is unbroken, you can permanently get full Uber build rate, even after the heavy switches weapons. His max overheal will stay at 390, as if he were still holding his melee out. Just know that you have to click on him again to give him full overheal, with the reduced, normal Uber build rate at full health capacity.


    Quick-Fix Uber Build Rate Bug
    From my experience, this 'bug' has existed on/off from time to time throughout the weapon's history. When your patient's health has reached maximum Quick-Fix overheal (125% health) the build rate remains unaffected: the weapons still 'thinks' they don't have max overheal when really they do. As such you will build charges with this Medi Gun faster than you should be able to.


    Halloween: Server-Wide Curse Bugs
    • Merasmus' Ubercharge curse. if you heal anyone while this takes effect, they will immediately lose their Uber. Dont heal anybody who is in combat when the uber curse takes place.
    • If you are using Ubercharge while Merasmus' Uber curse wears off, you and your patient will lose Uber, even if your charge is still going! To counter this, immediately switch from- and back to- your Medi Gun when the curse stops: you will be vulnerable for 0.5s, but your patient will be flashed during this time. This is a mild inconvenience, at worst.
    • Switching off of the Medi Gun during the Uber curse removes your uber.
    Perplexingly, the 'Overheal' spell's Uber buff is not affected in any way by beam healing, unlike all the above instances.


    Halloween: spell quirks
    While using the 'Stealth' spell, using any form of attack removes cloak immediately. However, you are able to heal with the Medi Gun freely while invisible. You are allowed to use the 'Medicating Melody' taunt while invisible. You can use the 'Spinal Tap' taunt while invisible. Using Uber removes your invisibility immediately as intended.
    • Under normal circumstances you cannot beam heal invisible players including cloaked spies. However, if you are also cloaked using the Stealth spell, you can freely beam heal an invisible teammate, whether they are a cloaked Spy or simply using the Stealth spell too. Deploying Uber on them will immediately remove their cloak and your cloak.. meaning you can Uber in with a teammate out of thin air. Interesting.
    ...
    Miscellaneous Observations in MvM, and Some Bugs
    • Medics cannot heal through any other medic's shields from any direction: regardless of team.
      • This may be used against the medic bots to block their charges from their robo-patients in a pinch: the inherent danger and testicular fortitude required of attempting this strategy, however, needs no explanation. It isn't that helpful overall, weighing in how risky it is.

    • Be careful with the shield: fire passes through the shield, including dragon's fury projectiles. The Righteous Bison (soldier secondary) projectiles penetrate the shield. The Pomson 6000 (engineer primary) projectiles penetrate the shield. The liquid splashes from mad milk, jarate and the gas passer will all pass through the shield, where the containers themselves will not, however.
      • In community missions: projectiles (arrows and bolts) upgraded with penetration will penetrate the shield.

    • Mad Milk syringes - healing credited to this upgrade will help passively build your Uber.

    • For every time you revive somebody, successive revives will take longer, even in setup time. This tracker is only reset when the wave is defeated or failed... so don't revive people during setup time if they pull the 'ever-funny killbind' gag.
      • The actual increased requirement per revive is +5% of patient's total health to heal, starting from a base 50%; this keeps going up until you need to fully heal them in order to bring them back (after 10 revives). The ECG HUD icon weakens after 4 revives, and again to a flatline after 9 revives.

    • Exploitable Bug: Spamming primary fire at a teammate's revive hologram will actually bring them back slightly faster. This is due to the fact that, when you first click a revive marker, you are granted a brief but noticeable 'kick' of extra healing. Spamming these kicks grants a net effect overall.
      • NOTE: Doing so requires you to stare precisely at your target (thus crippling your survivability and awareness) and will not delay their natural respawn, unlike when you heal their hologram consistently.
      • Don't do it on friendly Scouts' corpses as they respawn naturally especially quickly - you may well screw it up and they'll be off to the spawnroom instead.
      • Only do this when there is nothing putting you in danger.
      • Most effective when reviving Heavies or Soldiers! I'm unsure if the degree to which it accelerates revives - I am only aware that it is quicker.
      • This 'kick' I mention also, naturally, gives your Uber build rate a kick too. (Slightly) more Uber per revive!

    • Bug: While it is helpful to use the shield to kill spies harassing the engineer, be aware that the engineer cannot heal buildings by wrench through your shield. The shield blocks wrench hit registration against friendly buildings for whatever reason. Aim to never have your shield between the engineer and his buildings when clearing out spies.


    Closing Note
    Thank you for taking time out of your busy day to read my guide. I have worked long and hard to make sure it is as accurate and true to the game as it can be. If you spot any mistakes please let me know, so that I may be able to rectify them. Got any suggestions not listed here? Leave them below in the comments! No matter how small they are, I will appreciate them. :)

    If you have found my guide useful or otherwise a pleasant read, consider liking it and adding it to your favourites.

    Much love, and happy healing. -Edgar
    Sources
    [1] Team Fortress 2 Mapper's Reference; Last accessed 10th Sep. 2020
    [2] Hammer Unit - Official TF2 Wiki; Last accessed 10th Sep. 2020
    [3] Medic - Official TF2 Wiki; Last accessed 10th Sep. 2020
    [4] MR SLIN: Setting up a Crosshair Switching Script; Last accessed 10th Sep. 2020
    [5] Classes - Official TF2 Wiki; Last accessed 14th Sep. 2020
    [6] Medi Gun - Official TF2 Wiki; Last accessed 16th Sep. 2020

    Weapon and Class icons are credited to the Official TF2 Wiki.
    96 Comments
    Apollyon 9 Nov @ 5:42am 
    yikes 0 mention of uber situation under uber counting
    edgar  [author] 6 Feb @ 2:52pm 
    very good point!
    WorldsLargestPlanet 6 Feb @ 11:59am 
    GREAT guide. In the uber planning section, you mention holiday punch heavies, you might like to add that the holiday punch crits cannot force you to taunt if you are airborne... so jumping constantly is a good way to negate that if you cannot avoid the holiday punch heavy for whatever reason.
    toast :] 28 Jan @ 5:34am 
    Thx!
    edgar  [author] 13 Jan @ 10:53am 
    awwwwe thankssssss!! :er_uwu:
    Nugget 11 Jan @ 2:37pm 
    I keep revisiting this guide from time to time and each time I'm amazed by how meticulous and thorough it is.
    Ken 18 Dec, 2023 @ 7:44am 
    Thanks Edgar. Seems like you're confirming what I've been running into.
    edgar  [author] 18 Dec, 2023 @ 5:51am 
    :nerd:
    60g creatine b> w/ 2k+ pure 18 Dec, 2023 @ 5:50am 
    just use voice chat and say it 4head
    edgar  [author] 18 Dec, 2023 @ 5:43am 
    Try this (haven't tested haha):

    // Uber on MOUSE2 with any weapon out
    alias +charge "+attack2; slot2; dropitem; spec_prev;dot;smallest;mouseweapon2;r_drawviewmodel 1"
    alias -charge "-attack2"
    bind mouse2 "+charge; say_team UBER POPPED"

    bear in mind though, that this will paste your message into chat whenever you press mouse2 as medic. Since I personally tap mouse2 to switch to my secondary as medic whether I have Uber or not (tapping AND holding mouse2 is what uses Uber) I can't really use it to put a message in chat.

    If you use quickswitch to get your secondary out when not using Uber, then go ahead! It should work fine :steamhappy: