Source SDK

Source SDK

100 vurderinger
Exporting a Model from Blender to Source
Av Ttiki
Have you always fought with your export of model from Blender to the Source engine? This guide is for you! I won't explain how to model, yet I will teach you how to export your model with a proper collision (concave & convex) with multiple textures and multiple skins and with animations!
You will learn the basis of command in QC files and VMT files. Yes, we will also focus a bit on textures for your model!

WARNING: This guide is in the process of being rewritten to add more details and follow the new modeling guide oon Valve Community Developer wiki!
3
   
Utmerkelse
Favoritt
Favoritter
Fjern som favoritt
Introduction
Today, I will teach you how to export your models easily to Source!
I will be working with custom models for my Garry's Mod map | Twisted Minds - The corridor. This process work with player model and weapons for player view. You will only need a little bit more of information on coding to use them as so.

If you encounter any problem while you export your model(s), feel free to comment on your problem(s) in the comment with, if possible, the log from Blender or Crowbar. I will usually answer in under a day!

Any return is appreciated, comment or like


PS: If you want to download my map, click here and if you like my work why not sub to my Steam Workshop page here

Comment rules
  • No offensive comment!
  • Any structured criticism is welcome!
  • Be cool and nice to everyone, even if a person is not
  • Avoid copy/paste messages, please.
  • You can self-advertize your addon on the comment but no copy/paste(Do not advertise the same addon twice)!
  • Steam Rules and Guidelines
If you do not follow the rules, your comment may be deleted.
Installing addons & 3rd party tools & configuration
Installation of Blender & the Source export addon
Let's begin by installing Blender. You can find Blender on Steam.
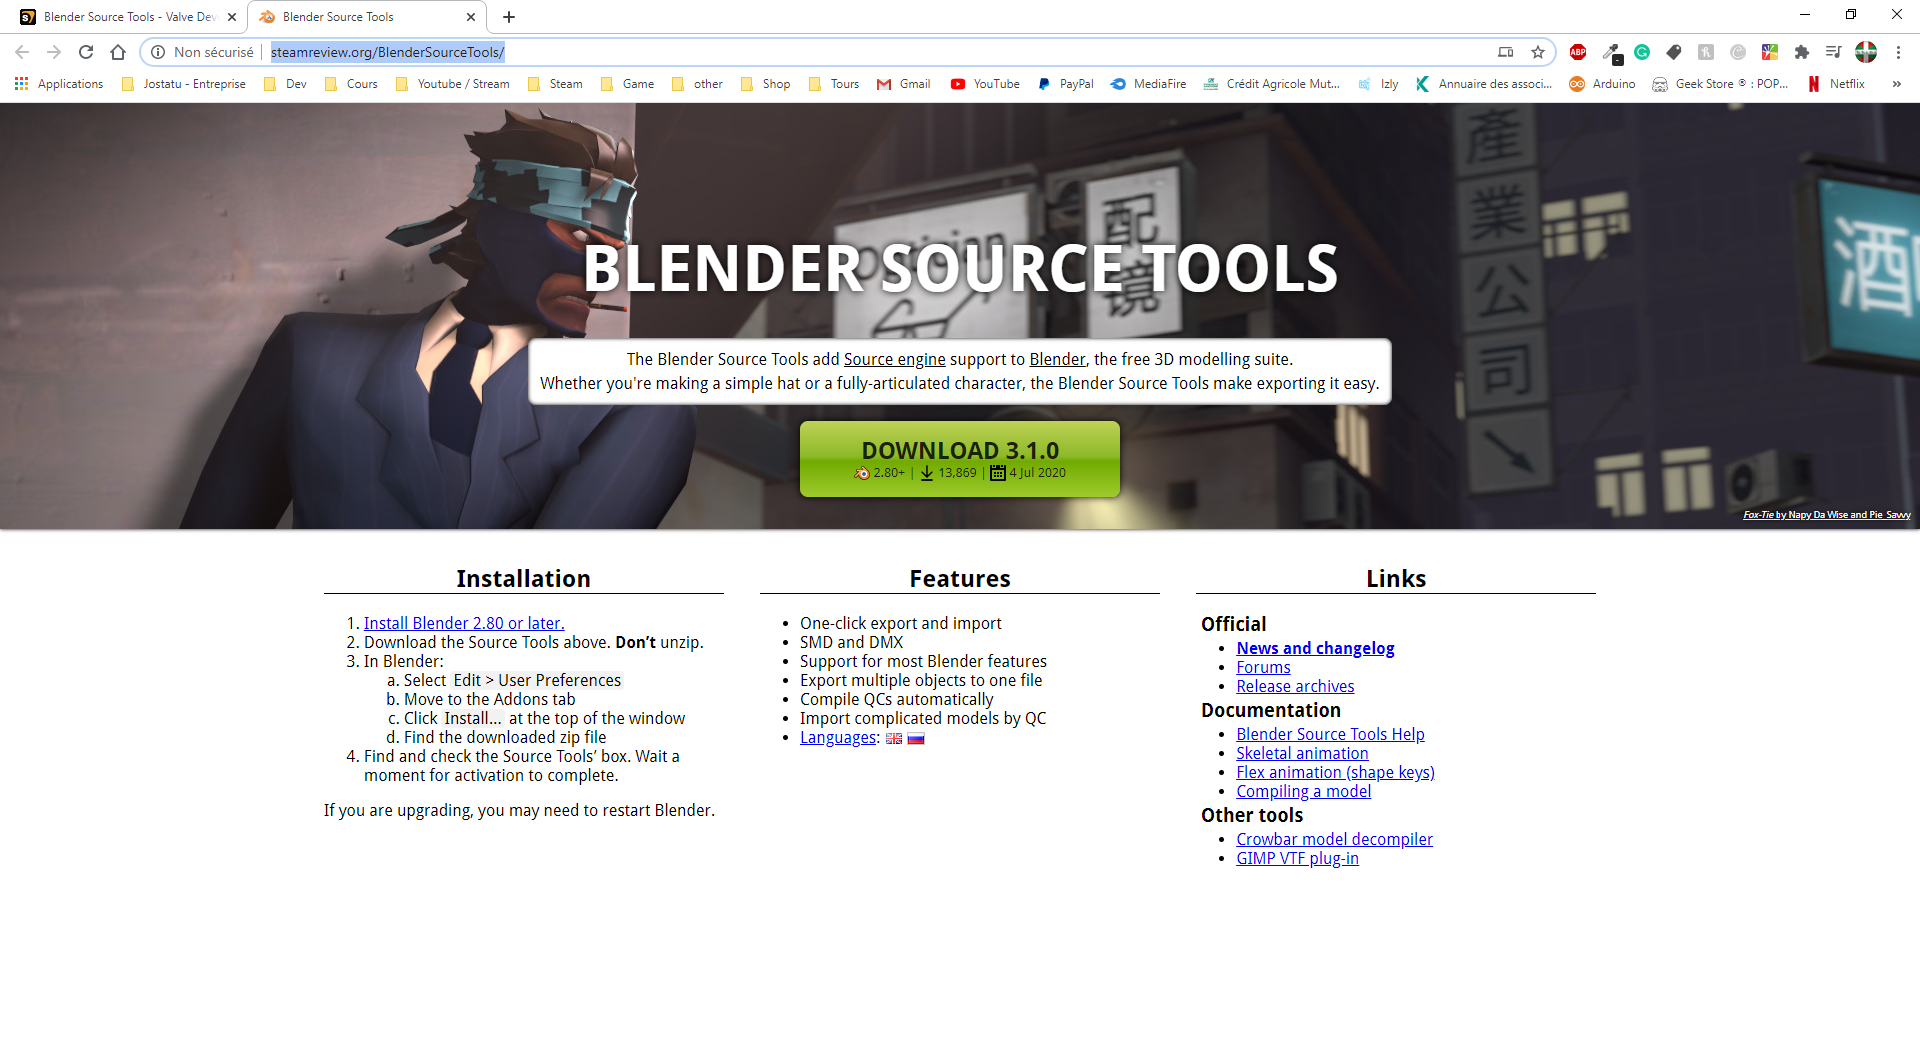
Easy right? Now, let's download and install Blender to Source tool[steamreview.org]. If you want to learn more about this add-on, you could take a look at Blender to Source tool - Official Valve developer wiki. It will also teach you how to install an add-on to Blender if you don't know how to do it!
If you don't know how to model in Blender, you have plenty of videos on Youtube like:
You also have a little and outdated tutorial on Source developer community - Model walkthrough!

Installing Crowbar - 3rd party tool for compiling your model to .mdl format
Opprinnelig skrevet av Valve developer comunity:
Crowbar is a tool written by ZeqMacaw.Its original intended was to be a replacement for Mdldecompiler, made by Cannonfodder. MDLDecompiler has not been updated for many years and can't fully decompile the latest model versions used in Source engine games. Crowbar is being developed to handle these later versions.
You can download Crowbar directly from its Steam Group.

Configuring Crowbar
To configure Crowbar to a specific game, launch it then go to the first tab in Crowbar Set up games
Then, as in the screenshot above, chose:
  1. A name
  2. An engine (GoldSource / Source)
  3. The path to the game's executable
  4. The path to the gameinfo.txt file for the game
  5. The path to the model compiler for the game studiomdl.exe (located inside the bin folder)
  6. The path to the model viewer hlmv.exe (located inside the bin folder)
  7. The path to Hammer or any mapping tool hammer.exe (Hammer is located inside the bin folder)
  8. The path to the packer vpk.exe (located inside the bin folder)
  9. The path to Steam executable

Done! Your location will change with your game install location and your game. Also, Crowbar will certainly put something like <library1>/steam/steamapps... DO NOT USE <library1> OPTION! ALWAYS PUT THE FULL PATH C:/ProgramfilesX86/steam/steamapps...!

Installing VTFEdit for Textures & materials
If you do not have VTFEdit or any other Materials/texture compiler, follow this link to the valve developer wiki - VTFEdit
Setting up your model inside Blender
Let's begin the serious talk. The first thing you will need is a proper configuration of your model in Blender, such as the physics model, materials, origin, etc.

Origin of your model
Chose the origin of your model carefully, as it will be the same in Hammer. For this example, I've chosen a wall lamp. As it will always be a static prop, and against a wall, I've chosen the origin point to be at the back of the model.
Note: the physic model must have the same origin point as your model! Otherwise, the hitbox of your model will deviate from the model!

Physic model
Now, let's work on the physic model. Making a good physic model for your model is important both for render and for optimization. You can see how I made the physic model for the wall lamp.
  1. It's a low polycount version of the model. It is important, your physic model must be as low poly as possible!
  2. The model must have smooth shading enable! It's really for Source! If you do not smooth shade your model, Source will not like it. And we all know what an angry Source does!
  3. Finnaly, all parts of the physic model must have the same materials, and they must have a materials asign. Just create a new Blender material and assign it to the physic model. It doesn't matter if Blender to Source doesn't export Blender materials. You must have a material assign to each part of your physic model!
Also, you need to separate the physic model from the original model by creating a new collection.
Now I have two collections, one with all part that composes my model and another which contain every part of the physic model. As you can read, I used the plural. Blender To Source will export as much .SMD files as there are collections. It will be explained more in the next chapter.

Concave physic VS Convex physic
We will need to be a little bit more technic in this chapter. There are two types of collisions in Source.

What we just made is a convex physic model. You will use this type of collision most of the time. It's more efficient and easier for Source to handle this type of collision. Yet, you'll sometimes need a model where the player can walk under / through.

As you can see in the example on your right, I made a doorway. The player must be able to walk through it.
So, we will use a concave physic model. To do so, we will need to cut our physic model into multiple parts. Source can't handle one physic model to be used as a concave. Screenshots will be easier to understand than words.


On the left, you have a bad example of a concave physic model. If you had to export this model with this physic model you wouldn't be able to walk through it. Source will simplify and make it a convex physic model, as you can see on the screenshot on the left.
However, if you make a physic model into multiple parts, such as the physic model on the screenshot on the right, Source will be able to understand, and so you would have a correct concave physic model where the player will be able to walk through without any problems.
We will learn about the physic model a bit later in this guide under the QC files section below!

Materials
Finally, let's focus on materials and textures for your model! It's the part which is usually missed by people.
First, you will need to correctly UV unwrap your model. You cannot just create a Blender material and export your model with it.
When you have unwrapped your model and assign a texture, create a new material with the texture assign to it. Give your material a proper name without space, special characters, etc. This name will be the name of your VMT / VTF name! So don't mess up, or you will have a pink and black checkboard on your model at the end!
For example, I've named my material the same way as my model. Naming your texture with the name of your model will help a bit with files later.
As you can see on the right, I have my model with a material "wall-lamp" assign to it. It's the same name as my VMT/VTF file.
If you have multiple skins for your model, just create multiple materials with the skin assign to it. Every material name needs to match a VMT/VTF file name!
Also, if your model is composed of multiple textures for multiple parts just create a material with the same name as the VMT/VTM file. The door model above has 3 different textures for the model.
  1. The door texture
  2. A metal part
  3. The handle.
So I've got three materials (without counting every skin for the door part.)

Bones & animation
To create animation for your model you'll need at least one bone.We will animate this bone through the timeline with simple keyframes. My door has two animations for the handle. A lock animation and an open animation. So, in my timeline, I've got two animations.
The first stack of keyframe is the first animation. Then, I've put some idle part to separate both animations. Then, we've got the last animation. Usually, leave the first frame "empty" for the idle animation of your model. I didn't do it here because the first frame of the animation doesn't change anything. Write down the frames of each animation. We will need them in the QC file.
Of course, I only have one bone here, but you can have as much bone as you want in your model.

If you didn't encounter any problem, you can continue to the next section, materials, and textures!
Textures files
I hope you've correctly set-up your model inside Blender because it's going to get tricky from here. Remember when I told you to name your material with a proper name? Well, this is the part where we will need that name.

VTFEdit
Valve uses a custom type of material in their games. From simple brush textures to model textures, you will need to convert your texture to a VTF file alongside its VMF. To make it simple, a VTF file contains the texture, the VMT contains the data.
If you want to read more about the subject, I can give you some links from Valve developer community.

When you have made your model's texture, you'll need to make it into a VMT/VTF. For this, open VTFEdit, File>Export. Open your image. Don't touch anything, and just save your VMT/VTF file wherever you want.
Note: for VTFEdit to save your texture as a VTF AND a VMT file, go-to option, and check create VMT.

Multiple textures and masks
When you have exported your texture to VTFEdit and save it as a VMT/VTF, open the VMT file. This file will need some tweaking. For example, I have three textures for the wall lamp model.
  1. The diffuse map
  2. The normal map
  3. The specular map

Normal and specular map
If you don't know what each texture and to make it simple, the diffuse map is the actual texture the player will see. The normal map will calculate false normals thanks to lightning to add more details to your texture. Finally, the specular map will calculate how much reflectivity the surface will have depending on the alpha channel of this texture. You don't need all three textures, you will only need the diffuse map. Both, normal and specular maps will only serve to add some details to the texture.
Below, you can see the normal map and specular map VMT files:

Diffuse map
Your texture needs to have the VertexLitGeneric shader attach to it. The $basetexture command is the path to the file, simply. The path begins from the materials folder. So in my Half-Life 2 materials folder, I have: tmaterials>models>lightning where there are the wall-lamp VMT and VTF files.
The VMT file for the diffuse texture will be more complex as we need to include every information for the physic material, the bump map (normal map), the specular map, etc... Here this VMT:
I will quickly go into some details for each command line. As always, the shader use is VertexLitGenereic, on the $basetexture command you include the path to your files from the materials folder. Include the path to your normal map for the $bumpmap command. $envmap env_cubemap specify how the game will calculate shining surfaces (what they will reflect). Here, we will use env_cubemaps in the level to calculate the reflection on the model. You can specify a specular map using the $envmapmask command to help Source know where part of your model reflects light. To make both maps work on your model we need to include the next command $normalmapalphaenvmapmask 1. Without this line, Source will not include your normal or specular map. $alphatest 1 is also really important because $normalmapalphaenvmapmask uses the alpha channel to make everything works. Source will not include the alpha channel by default. If you do not specify $alphatest 1, $normalmapalphaenvmapmask will not work, and so your texture won't include your normal map and specular map. The next command $selfillum 1 will use the alpha channel to make part of your textures lit up. It's useful for lightning models to specify where is the lamp's bulb. You don't want an on bulb being dark, would you? I didn't include a map here, but you can create an alpha map where you want your texture in fullbright mode with the command $selfillummask. However, you cannot use this command if you use $alphatest or $translucent!
Finally and it's really important to include the $model 1 command if you use a texture on a model. $model 1 will tell Source the texture is being used on a model and not on a world brush and so it won't be included in the texture browser in Hammer.

Now, let's import our model!
Exporting your model
When you have your texture(s) ready, when you have your skins ready, your animations ready, your physics model ready and your origin point read, we can export your model to a .SMD file format.
As I said earlier in this guide, you will export as much .SMD files as there are collections in Blender.
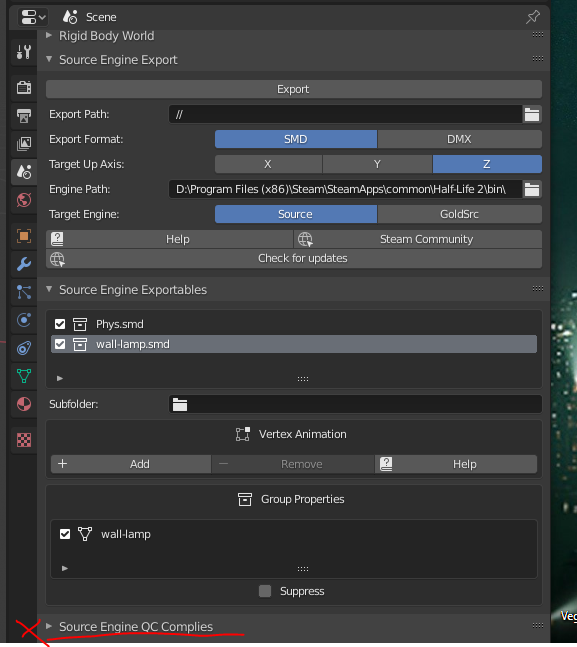
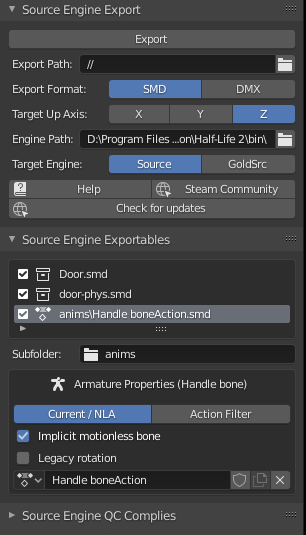
Blender to Source addon is easy to use. After being installed, you can access it in the export tab on the left. You can find the Source export tab at the end of the list. You will need to fill up some paths before you can export your model. The addon is pretty much self-explanatory, you'll need to inquire the path to where your model will export, the path to the bin directory where you have mdlcompiler.exe, etc. You can choose between exporting your model to a .SMD or to a .DMX file. Export your model to a .SMD. You will also have to choose which collection to export. Remember, one collection = one .SMD file!
You don't need to fill anything at the bottom in the QC section. We will get to QC files with Crowbar.
When you have filled every path and chose the file format you can click export.
If everything is set correctly, you won't get any errors from Blender and you should get your .SMD files where you have set your export directory. You can now continue to setting-up your QC file and compile your model to a .MDL format to be used in-game!

Exporting a model with animations.
As I've said earlier, you need to have one bone to animate your model. You must differenciate an imation by leaving spaces beetween them in the time line.
When you will export your model, you will see more boxes checked.
Don't worry about it. Blender will take care of everything and know about your animation, your armature etc.
Note: Export settings are saved with the .blend files! So if you have to export a model because of something you miss, you won't have to fill up every path every time!
Creation of .QC file
The .QC file is like the VMT file for models. It will contain all the information related to animation, skin, physics, etc.
As a .VMT file, your .QC file can be really simple, or complex, ranging from a few lines to dozens of lines in length. I've put multiple models throughout this guide to explore the multiple parts of creating a model like multiple skins, multiple animations, concave and convex physics. Let's begin with a simple .QC file with our wall-lamp. No animation, no multiple skins, no concave physics.

Note: your .QC file should always have your model name. I will work with a different name, but for files management and to make it easier, I would suggest you gave the same name between your .QC, .SMD, .VTF and .VMT

Simple .QC file, no multiple skins, animation nor concave physics with our wall-lamp model.
As you can see from the screenshot above, a .QC file is quite similar to a .VMT file. You have commands and you give some arguments to those commands. To help you make a .QC file, you can use this little website[rzurad.github.io].
You can add commands to your file, write the correct argument, and export your .QC file.
To begin with, use the command $modelname to give our model a name in Source. This name will be used in Hammer for example in the model browser. Note: the .mdl part at the end. We will compile our model into a .mdl file in the next section.

Next, I used the $scale command to scale up my model. I made it too small in Blender and wouldn't be visible in-game. This command lets us scale it up without having to open up your model software again. In this example, I scale it up 50 times. But you could always scale your model correctly in Blender.

$body wall-lamp "wall-lamp.SMD" will tell crowbar which Blender collection is our model to be shown to the player. You could here write Phys.smd and you would see the physics model in Source...

$sequence "idle" "wall-lamp.smd" loops frame 1 is a really important command. Every model must have this command! Even if you don't have animation on your model. Source will not understand a model without at least one animation. That's why, if you open a model in Hammer or model viewer, you will always see an idle animation. This animation as just 1 frame and is just the model. We will describe this command further down in the guide, don't worry.

$collisionmodel "Physics.smd" is the famous collision model we made. Pretty simple. Just write the correct name you chose for your physics collection in Blender. As you can see I made a mistake in naming my collections. I should have named my physics collection wall-lamp-phys for example to make it clearer.

$surfaceprop will let you chose what kind of sound your model will make and which kind of decals will be shown when the player hit/shoot your model in-game. You can find a full list of surface prop on this page : Material surface properties - Valve developer community

$cdmaterials is the path from the materials folder to your model texture. You won't have to put the name of the .VMT/VTF, just the path!
Your model will find the correct texture automatically if you didn't mess up your naming in Blender or VTFEdit.

Finally $staticprops will let Source know our model will be used as a prop_static. A prop_static will have better shadows on it but won't have any animations. If you have a model with animation, you shouldn't write this command as all your animation will be excluded from the compile.
We will continue with the most complex .QC file of this guide in the following section.
Creation of .QC file (Part 2)
Setting-up a more complex .QC file
When you have a more complex model, with animation, complex physics, etc... you'll have to write down a more complex .QC file. Here we will write the .QC file of a door model with multiple skins and multiple animations. We will also write the .QC of the door frame where we will need to specify to Source we want a concave physics box!
Let's get started with the simple door frame.
As you can see, nothing change from the simple .QC file. Nothing except one command. $collisionmodels is now a little bit more complex. You still specify your .SMD files containing your physics model. At the end of the command, you write { $concave } . Not the spaces between brackets {} and $concave. This spaces is really important! You now have a concave model where the player can walk through parts.

Now, for our final .QC file with skins and animations!
There are a lot of fo commands we have already used alongside with new ones and similar ones. Let begin with the animation part of our model.
Animations
As I said earlier, the door will have two animations plus the idle one. There is an open and locked animation. So, we will have three animations. If you have understood this guide at the moment, you will probably understand all three lines in the .QC files. There are multiple ways to include animations in a .QC file. We will not explore those more complex animations in this tutorial. Know that if you have a complex model with complex animation, you should read this article from Valve developer community about animations (QC command).
In Blender, you have animated bone(s) on your model to create animation. We have cut animations in the timeline with pauses. When you have exported your model to .SMD files, you have probably seen an anim folder in your export path. This anim folder contains .SMD files for your animations. For each of your animation, you will need to write down practically the same command with some adjustments. I've started with the idle animation, as always. Then, I had the same commands two more times:
$sequence "locked" "anims/Handle boneAction.smd" fps 30 $sequence "open" "anims/Handle boneAction.smd" fps 30
Here, I will be using the .SMD files with the animation baked inside and not our simple model. Note, I didn't write loops because I don't want my animations to be looped. And for fps, I've chosen 30. The animation will play 30 frames a second! You could set it higher, but the animation will play faster. So you will have to slow down your animation in Blender. Also, note the name I've given to my animations. "locked" and "open". This will be animations names used by Source. So don't use spaces, special chars, too long of a name, etc.

Multiple skins
To have multiple skins, we have created a ton of different materials, with different names and the texture.
In this example, my doors have numbers on them. So I have a texture for each number. Going from 1 to 7.
You also have exported as many files as you have skins in VTFEdit and so have as much .VMT/VTF files as you have skins.
In your QC files, having multiple skins means you will have to create a texturesgroup. Don't worry, anything to worry about. As you can see above, you need to tell in your QC the location of your textures. Usually, you will have them in the same directory. I have my 7 textures
Compiling your model inside Crowbar
As we already have configurated Crowbar, this will be easy! You will need to give the path to your .QC file, the path to the export location of your .MDL. This is usually the models folder. Crowbar will export your model from the models folder. So you should use the root folder of the game you are modding for (for example, here, chose hl2 folder.)
You will need to chose which game you are compiling for (the game you have used when you have setted-up Crowbar.) Then you just need to hit compile! Normally, you won't have any errors. Of course, you will always encounter an error in your life. If you can't fix it, I will be glad to help with the comment below. Just put your Crowbar log to help me! You can view your model using Hammer or modelviewer. At the end of the compile, you'll be able to click on Use in View. This will bring you to the View tab where there is a button to open model viewer. From here, click file, open, and chose your model!

You should see this:
But if you see an error or this:
then, you have a problem... (duh!)
If you get the famous ERROR model, then you have a problem with the .QC or .SMD files. If you have something like the second error, then you have a material/texture error.
In both cases, check your spelling, check the location of the files, check your materials, etc...
Also, and this is important: IF YOU HAVE DECIDED TO CREATE YOU MODELS AND MATERIALS OUTSIDE YOUR MOD OR GAME FOLDER, YOU WILL NEED TO COPY/PASTE YOUR FILES INTO YOUR MOD OR GAMES FOLDER! (i.e: I've made those models to be used for a map for Garry's mod. I'm used to putting my files inside a custom directory containing maps, materials, materialsrc, models, modelsrc, sounds folder... And then, when I'm finished, I copy/paste all of my files into the hl2 or garrysmod folder.)
If you forget to copy/paste your files, you may get errors like those listed above!
End & final thoughts
I really hope I've been able to help you with this guide. If so, feel free to share it to other member of the community who are stuck with their models export!
If you are intrested, I've put a list of articles and website to read more about modeling in Source, VMT/VTF files and .QC files!

Models and modeling software:

Materials

.QC files, commands, etc.
Thank you
Thank you really much. I hope I've helped you with your model export! If so, don't forget:
Also, if you want to help me you can check my maps (where I used these models):
https://gtm.you1.cn/sharedfiles/filedetails/?id=2194424298

Remeber, you can use the comment section below if you encounter any problem! If you found this guide wasn't clear enough, you can give me feedback! I will really appreciate having feedback to get better!

Comment rules
  • No offensive comment!
  • Any structured criticism is welcome!
  • Be cool and nice to everyone.
  • Avoid copy/paste messages, please.
  • Steam Rules and Guidelines
If you do not follow the rules, your comment may be deleted.

Thank you.
Ttiki.
Agur.
My other guides
78 kommentarer
Ttiki  [skaper] 3. aug. 2023 kl. 1.38 
@ChungusBohemian, no worries, happy to help ! :p2cube:
ChungusBohemian #FixTF2 2. aug. 2023 kl. 13.59 
Thanks for all the help!
Ttiki  [skaper] 2. aug. 2023 kl. 0.30 
@ChungusBohemian No, you don't need this flag. However, the problem you encounter may be a problem with the cubemaps. You could try the command mat_specular 0.
ChungusBohemian #FixTF2 1. aug. 2023 kl. 16.36 
By the way, does the texture need the $bumpmap command to work properly? The normal texture works fine inside a highway tunnel map, but when I get to certain parts of maps like gm_construct and gm_bigcity, its too bright and shiny to the point you can hardly see the base texture.
ChungusBohemian #FixTF2 1. aug. 2023 kl. 14.01 
Thanks! It Works!
The problem was on my end. When I was uploading the model to the workshop, I forgot to add the material files. I didn't see that until I looked at the files you sent.
Ttiki  [skaper] 1. aug. 2023 kl. 1.49 
@ChungusBohemian everything should work fine now.

I've made all path relatives and packed all textures inside the .blend pack inside Blender. There is no need to rename for the name file to be less than 30 characters, that's now a thing I know (it's only a constraint for maps files).

It was probably a mistake in the names or something like that. I don't really understand why it didn't work for you. Everything was looking good, so I don't really know what happened. Anyway, I've compiled the entire model now. If you need any more assistance, I'm here to help. I will still try to look into the files you gave me to see if I can spot an error somewhere, I will keep in touch if I find anything.
Ttiki  [skaper] 1. aug. 2023 kl. 1.40 
@ChungusBohemian, do you still see the texture broken but with a shine to them? Or still the simple black and pink textures?
Ttiki  [skaper] 1. aug. 2023 kl. 0.18 
@ChungusBohemian Ho, sorry about that. No problem, you are both bothering me att all, I’m here for this. Maybe I went a little too quickly and missed something else. I’m going to take another look more calmely today.
ChungusBohemian #FixTF2 31. juli 2023 kl. 16.10 
I emailed you the files I changed. Sorry to bother you about this. I am at my wits end.
ChungusBohemian #FixTF2 31. juli 2023 kl. 16.09 
I made the vmt and vtfs for the tires and uploaded it but it didn't work. I renamed the blender materials, the vmts, and the vtfs to be less than 30 characters, and uploaded it to the workshop. The textures are still broken on my end. Is there something else I'm doing wrong or is there a program I'm using that is completely broken?