GTFO
Оцінок: 293
My personal terminal guide
Від Gwennothy та 1 співавторів
Your thorough guide on the terminal. :)
5
24
4
3
   
Нагородити
До улюбленого
В улюблених
Прибрати
Introduction
Hello there fellow survivor ! Try to survive out there, eh? Surviving in the Complex with creatures Naruto running towards you isn't always that easy. You probably want to learn how to work the terminal , to either do things yourself (yeah, you strong independent you!) or to help out your fellow teammates.

The terminal is a computer which can be found in various zones. They are usually spread around the map. From personal experience knowing how the terminal works and how to use it, will save you from a lot of trouble & wasting time. You'll have a better time navigating yourself and be less confused about how the game works and as for what to do most of the time.


I'll be going trough the basics, and the more complex things. Hope it will be helpful! :)


Did you like the guide ? Did you find it helpful?
Please leave a comment and a like for feedback ! I'd really appriciate it. :)

Basic terminal commands
As a beginner, it's really nice to know these three basic terminal commands. They are the most used ones, I will be explaining them one by one.

The most used commands are the following :
  • QUERY
  • LIST
  • PING

So what do these commands do, you say?
List
As it says, it lists things. It will list the things that are spawned in a room/zone.

Query
This command will give you more information on where certain things are.

Ping
Ping Ping Ping ! You will hear a sort of ping sound so that you can find and locate the item.

How do these commands look like ?
  • LIST ZONE_252 or LIST E_252
  • QUERY MEDIPACK_554
  • PING MEDIPACK_241
The LIST terminal commands
The LIST terminal command will let you, as the name implies, do a List in any zone in the complex, giving information on what's currently on the expedition. It usually goes with a zone filter: "ZONE" or "E" to filter the command to a certain zone of your choice and "RE" or "RES" to filter exclusively the resources (Medipacks, Ammopacks, Tool Refill, Disinfect pack) Example: Listing zone 78 by typing LIST E_88 (E_88 being the zone filter)

How to use the LIST command?
To use the List command, you'll have to get near a terminal and type LIST adding the zone filter (ZONE o E) and if you are looking only for resources, add the filter (RE o RES)
Example: In B1, you want to know what resources are in the zone, so you'll have to type LIST RE E_88


As you can see in the picture, I filtered all the available resources in zone 88.

As additional info, there's quite a few filters which may be handy in specific situations
  • LIST -A will show you absolutely everything in the map
  • LIST KEY will show all the keys in the map (even bulkhead keys)
  • LIST MEDI , AMMO or TOOL will show all the medipacks, ammopacks or tool refills in the map
  • LIST CELL , GLP , OSIP , etc. If is an objective item or consumable, you may be able to list them to know how many there are in the map.
You can even add a zone filter to limit the range of the list. Example: I want to know how many cells are in zone 92, so I'll type LIST CELL E_92. That will show all the cells that are on zone 92.
The PING terminal command
The PING command is used to do a Terminal Ping which allows you and your team to know the precise location of a thing or object in the same zone that the command was put on. It will let you hear a ping sound but also show the item it's subzone location.

How to use the ping command?
To use the ping command, you'll have to get near a terminal and type PING plus the ID of the item which you wanna ping. It needs to be in the same zone as the terminal.
Por ejemplo: In B1 , I want to ping that ammopack that was found earlier in zone 88. So, in order to do a terminal ping I need to type PING AMMOPACK_634

As you can see, it marked the ammopack and shown that's on Area - C, Zone 88 being the zone in which the terminal is located and C being area which is inside of zone 88.

Цитата допису author:
As additional info: When you do the command, you'll hear a "Ping" and it will show briefly in the game as "Terminal Ping" in your screen (not in the terminal) which looks like a green diamond giving you info in where's the item. You can add the filter -T next of what you typed on the terminal to keep doing pings indefinitely. Example: PING AMMOPACK_634 -T will keep repeating the ping until somebody picks up the object or you leave the terminal.
The QUERY terminal command
The QUERY command is for when you are looking for a certain item. These could be objective items, resources, storages, doors and things such as HSU, generators, etc.

It will/might also tell you how many uses there are left of items such as medkits, ammo packs or tool refills. This is usefull to know if it's worthwhile to get the item or not.

Stuff that you can QUERY
  • Keycards and Bulkhead Keys
  • Resources such as medipacks, ammopacks, tool refills, etc.
  • Important things for the expedition (Cells, Fog turbine, Collection case, Neonate HSU, etc.)
  • The rest, such as doors, lockers, generators, terminals, almost everything.

How to use the QUERY command?

To query an item, you'll have to find your nearest terminal and type "QUERY" plus the ID of the item that you want to find.
Цитата допису author:
By ID, I mean the whole name with numbers and everything. If a resource says "MEDIPACK_735" you'll have to put everything and that includes those numbers plus the underscore.
Example: In R7B1, there's an item called Collection_case that you need to find in order to progress the expedition. So, in order to find the specific item you'll need to type: QUERY COLLECTION_CASE (remember to add the underscore " _ ") in order to know where it is.


As you can see in the terminal, it's showing where the COLLECTION_CASE is located(Zone_93) and if it's on a PING range.
UPLINK terminal commands
The commands UPLINK_CONNECT & UPLINK_VERIFY are used in certain expeditions which require an IP located in your Hud (top left)

How to do an uplink sequence?

To start, you'll have to type UPLINK_CONNECT plus the IP shown in your top-left part of the hud(It's random). This will create a conection with the terminal and start a group scan. (Remember to set-up your defenses before completing the scan)

Once the scan is done, it will trigger an alarm in which the terminal will inform that it needs a 3 digit code (Ex: Y04) that needs to be introduced before continuing the sequence. So, in order to input the password, you'll need to type UPLINK_VERIFY plus the password that's contained in the 3 digit code outside of the terminal.

The terminal needs the password contained in Y03, so I'll need to type the content, which in this case is TSAR. The full command should be UPLINK_VERIFY TSAR

Success! The password went through. Now you'll need to do it as many times as the terminal requires and remember to wait unitl the password gets a confirm in order to keep going with the sequence. Usually sequences consists of 4 passwords, but it can be more depending on the expedition.
The list of passwords always refreshes and changes when the previous password went through, so if you succeded the first one, the next will be different, and the next and the next..
REACTOR terminal commands
The reactor sequence is similar to uplinks, with the main difference being being forced to move zone through zone to find specific terminals that have a password needed for the next reactor_verify secuence.

How to start the reactor?

Typing REACTOR_STARTUP will make the central terminal start a group scan. Once is finished, it will trigger an alarm which makes enemies spawn. (Remember to set-up beforehand before finishing the group scan)

Once the scan is done, an alert will show on your hud in which how much time left do you have before the reactor starts its sequence, so position yourself acordingly.

When the time is up, it will start a reactor sequence and show the time left before it gives information about where the first code is.

Once the sequence is done, the info will change and your hud will tell you where the next terminal is (in this case, terminal_524) and you (or one of your teammates) will need to find it to get the password needed to continue the sequence. If you don't put the password in time, the timer will reset and the reactor will restart the sequence.

Once you found the terminal, you'll have to type LOGS to find one of the logs that contains the password. In this case, we are looking out for the log that containts the keyword "REACTOR". Once you got the right log, type READ plus the LOGS that contains the password. In this case, the verification code or password is: RING.

Now, go back to the main terminal in the reactor and type REACTOR_VERIFY plus the verification code, in this case RING. The full command should look like this: REACTOR_VERIFY RING

Well done, get ready because the reactor will start warming up again and you'll have to look out for another terminal if needed. Once you are done with all the passwords, congratulations, you finished the reactor sequence!
LOGS and READ commands (LORE)
A few terminal will have some hidden lore that you can find with LOGS and read or listen with the READ command
How to read the game logs?

Find any terminal that contains 2 or more logs and once you found one, type LOGS . Ignore the first log which is a generic log that doesn't contain any info (AUTO_GEN_STATUS) and then type READ plus the log that you wanna read or listen to.

If the log has audio, it will show you a prompt if you wanna listen to it Y or not N
Thanks for using my guide !
Please let me know if you found it helpfull and hit it with the like and dislike button and rate my guide !!

Коментарів: 35
Nymphidius 22 жовт. 2023 о 0:08 
anyone know how to get any of the achievements?? I cant figure any of them out. If any one wants to play with me to figure it out my dms are open too.
Gwennothy  [автор] 24 лип. 2022 о 11:00 
That is very helpful indeed, thank you very much!
Banana Pancakes 23 лип. 2022 о 19:01 
Some additional useful things:

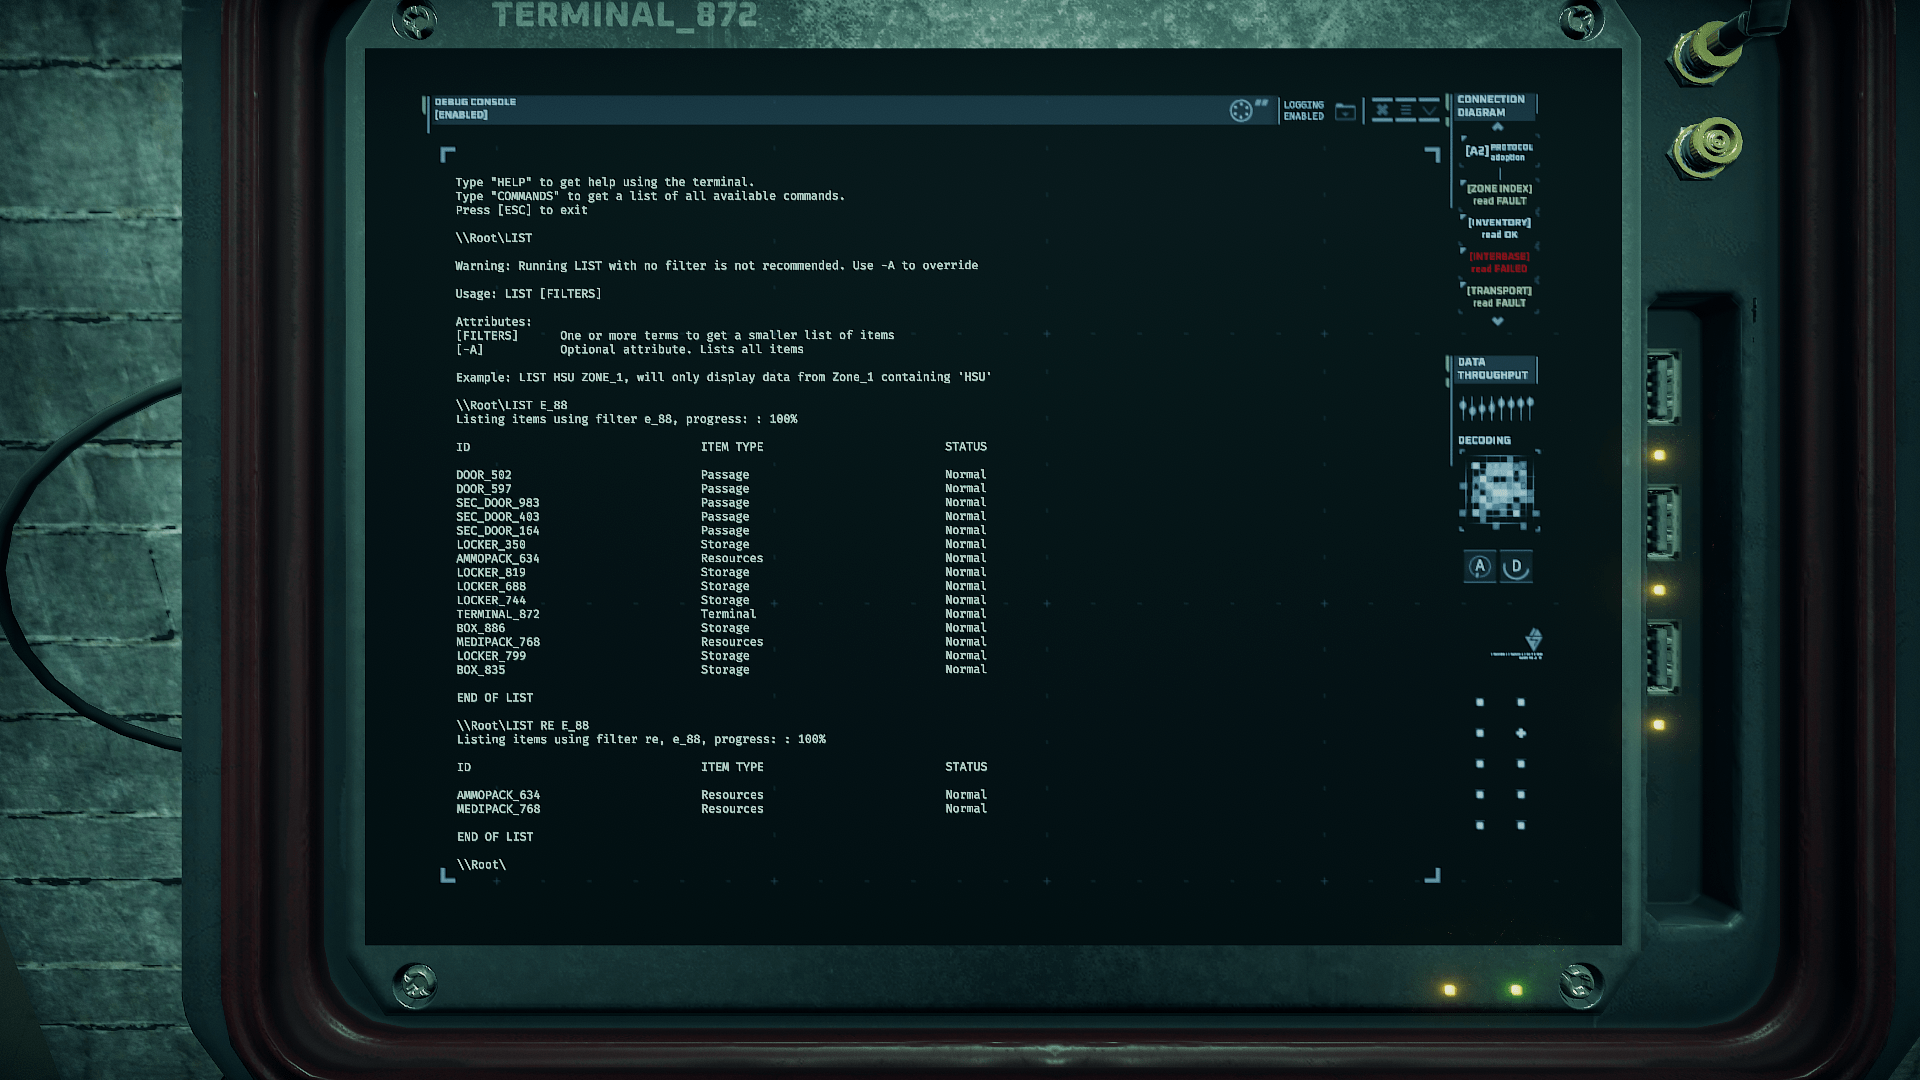
Mentioned before, but you can use the Tab key to autocomplete. Ex: MED + 'Tab' will autocomplete to MEDIPACK.

You can also use the Up arrow to scroll through previous commands you entered. Useful if you are doing the same command over again, or if you messed up and just need to correct the previously entered command (use the Left and Right arrows to move the cursor in the terminal. What you type goes on the left side of the cursor).
Gwennothy  [автор] 24 лют. 2022 о 7:03 
thank you !
Cy64 22 лют. 2022 о 7:04 
@XallZall "List Zone_62" will tell you everything in that zone. (That includes useless clutter like doors and redundantly displaying resource boxes as well as their contents separately.)
"List zone_62 resources" will narrow it down to just useful things.
"List zone_62 tool_refill" for just tool refill kits in zone 62
"List resources" for all the usable supplies left on the map. (Not including small items like glowsticks and fog repellers.)
"List tool_refill" for all the tool refill kits on the map.
XallZall 23 жовт. 2021 о 14:44 
Great Guide, hopefully shortcuts will be included in it as well.
Btw, is it possible to list a specific zone? I have not managed to get it working, so for example, list zone_62a or something like that.
Gwennothy  [автор] 5 жовт. 2021 о 13:10 
Anyone who could help me update this guide?
Blondie 5 жовт. 2021 о 13:09 
and when pinging items put "space"-T at the end and the terminal will continually ping the item as long as you stay in the terminal. PING MEDIPACK_564 -T or PING AMMOPACK_782 -T
Blondie 5 жовт. 2021 о 13:04 
A really useful shortcut, if you're looking for things in a certain zone (such as zone 83) just type "LIST 83" this will show all resource packs/cells/hsu/boxes/etc. in zone 83. And this shortcut can be used when finding specific items like if there are 6 different battery CELL's on the map but you want to know which one is in zone 70 you'd just type "LIST CELL 70" and it will bring up any cell in zone 70 (and also any cell with 70 in the name so be aware of that, CELL_702 likely isn't in the zone, just has 70 in the name)
Bogsy 14 верес. 2021 о 0:22 
I really hope they do something more with the terminal. Like a hacker evolution type thing where you can override doors, alarms and do helpful things besides location.