Battle Brothers

Battle Brothers

454 rating
(Ongoing) An Overly Ambitious Guide on Efficient Late-Game Character Builds: Intended for Experienced Players
Oleh NM9G
This guide is formed around an absolute efficiency, min-max based perspective with minimal guesswork involved, with the focus is on making the best use out of a reasonably refined end-game company.

This guide is not meant for beginners of the game, as covering all the basics and disciplines you will build from playing this game is more fitting for an entire guide of its own, which is not my sought ambition. The intended reader is one who has gone through several campaigns, is committed to refining their strategies and wishes to achieve an efficient, flexible, reliably strong late-game company that can be created in your first 125+ days that will defeat any end-game content with significantly lower risks than early to mid-game momentum builds (this guide is not early-game construction focused, but does provide early-game tips & strategies). You will also gain information to help utilize an efficiency-based playstyle, in order to maximize the potential of these builds, and provide you some information to help you make efficient decisions when experimenting with alternative builds.

That being said, all of my work is open to civilized debate in the comments & is open to alterations. Please read thoroughly about the idea in the designated sections in the guide before you comment, as it is likely that I have already addressed it in the guide.
I also encourage you to read thoroughly all of the main sections on the guide regarding the introductory sections, core concepts on this composition, build further elaborations, formations & the intended roles of a character build.
15
5
5
8
2
5
2
2
2
2
   
Penghargaan
Favorit
Difavoritkan
Batalkan favorit
♦ DLC & Acknowledgements ♦
  • This game guide is currently fully optimized for the Beasts & Exploration DLC, Warriors of the North DLC, Blazing Deserts DLC & Of Flesh And Faith DLC & the latest changes. As a guarantee, any enemies, build changes, and game balancing reworks added to the game will have been heavily tested and researched in order to verify that this guide and its contents are still the most efficient for a late-game orientated playthrough.
    I still dedicate daily/weekly time to playtest, and engage in discussion in order to continue to gather more perspectives & seek to discover more information, in order to really ensure that these sections are truly representative of this guide's goal to provide the best possible team composition & builds; However, it is important to note that areas of this guide are always subject to being updated for further elaborations & refinement. Feel free to share your take regarding an efficient late-game playthrough or any well-thought-out information that would be helpful to the refining of this guide, thanks.
    Acknowledgements:
  • This guide is primarily geared for experienced players of Battle Brothers. If you are a new player looking for a build to start off with, I would not recommend this build guide for you, but you are still free to give it a read to see what may be in store for your future. Just keep in mind that without an intimate understanding of AI patterns and advanced world map game mechanics, you might struggle to execute an efficient usage of this guide. But feel free to experiment and enjoy the game, and allow yourself to learn all the many ways to play Battle Brothers, instead of starting off with a strictly min-max playstyle. Additionally, you are free to use this guide for any difficulty, but I will be primarily talking about Expert Combat, Expert Economy, Low Starting Funds, and Ironman.
  • To start off, it is clear that there is no one way to play and succeed in Battle Brothers. Whether you use my guide or not, you can still be successful & have a good time using alternative playstyles and builds; However, the focus of this guide is to present the strongest company composition which is built around a sensible amount of absolute efficiency, and how to efficiently achieve the means needed to recreate the character builds involved. For more information on popular & effective meta builds, see the build/perk section closely related to the idea, Q&A sections down below or ask me why a build isn't included.
  • In terms of what min-max perspective I practice with this guide, I lean heavily towards maximizing the maximums (pushing the potential of strong late-game companies), opposed to focusing on maximizing the minimums (making less perform late-game feats). Both are valid perspectives, and multiple perspectives are always under consideration & frequent study. Additionally, if you do intend to do a legendary location boss rush, or a similar run that ends before 150 days, this guide might not be the most efficient with a very short-term campaign in mind. This is because there are perks and strategies that primarily benefit the short-term. As a reminder, this guide is only the most efficient for a lengthy campaign, but will still allow you to obtain an incredibly strong company for your first 100 days that will continue to be refined & excel beyond the late-game.
  • Luck: It can work in your favor, and against you. It does exist and will be a constant factor during your campaign. Now, to make this clear, luck is slightly different than Rng. Luck is always going to be uncontrollable, but Rng can be manipulated in your favor with most game mechanics. Bad Rng does happen, but it happens a lot less than you might think. Most negative outcomes come from a butterfly effect, accumulation of misplays, in and out of combat.
  • One of the biggest problems about learning the ropes of Battle Brothers is that players are not always given exact data about how the game works. This has caused anecdotal conclusions to be formed for each individual player (and the meta community as a whole) about how the game mechanics function based on the outcome of a learning experience. This meaning that one would use a personal experience or an isolated example instead of reinforced mathematical/calculated evidence. I was not void of this fallacy when learning the ropes of Battle Brothers, but with this guide I have refined my thinking throughout the years on what is more rooted in reinforced data and coding/mechanic truths in Battle Brothers. With that in mind, when in pursuit of truths, you should practice being cognitively flexible & when given information, very skeptical. Within reason, you should ethically test those assertions for yourself and consider all the conclusions that could be made, in order to come to the most "based in truth" conclusion that is back by data that can be reinforced & challenged.
    "A great challenge of life: Knowing enough to think you are right, but not knowing enough to know you are wrong."
    -Neil deGrasse Tyson

  • As always, if you believe me to have made a mistake, feel free to leave a constructive comment and we can discuss it in the context of this guide, in which is centered around a sensible amount of absolute efficiency. Additionally, remember that a honest pursuit of true efficiency requires an open mind to being proven incorrect, and that being provided a better answer will only strengthen the quality of one’s beliefs.
♦ Important: Understanding Min-Maxing Perspectives ♦
When it comes to placing value on a build or any specific aspect of the game, one must understand the perspective of the evaluator. This meaning that we can define what is the action of min-maxing, as well as understanding the goals of what the build is made for. While you may think this is unnecessary, each evaluator has their own differing mind set on what they consider a min-maxed character build is.

As previously stated, my goal of these builds is to present the strongest company composition that is built around a sensible amount of absolute efficiency.
To further elaborate on that, let's start by breaking down the wording & terms I use to define my perspective.
  • Absolute: To be able to consider something absolute isn't really a real concept that exists and can be proven. But to an agreeable extent people can come to know certain concepts to be with a large degree of certainty and without a person or idea there to dispel its correctness. So in the context of this guide, the builds that make up a specific party composition composed here have not been proven to be less effective than any other party compositions. Keeping in mind that these builds are within a reasonable means to be obtained (not reliant on extreme 9 star hedge knights, mandatory veteran leveled units, unique named/legendary gear, or modified origins/games).

  • Effectiveness: For my definition of effectiveness when it comes to Battle Brothers builds, I categorize it with the idea that your unit & company will be able to safely defeat any content in the game that is realistically a possibility to encounter. This meaning, that there is always, at most, a very low risk of a unit not surviving through a fight, compared to running higher risks of losing units by tempting Rng with an overprioritization of offense or defence. Additionally, it means that you will also be getting through the fight in an effective manner, as well as minimizing damage received, consistently. To put it visually, you could imagine two scales, one for survivability, and one for damage output. You can either put it all into damage output and run higher risks of a unit dying in future fights due to an unlucky streak, or you could put it all into survivability, which could cause problems with high risk situations where ending the fight sooner would have been more effective and perhaps even safer. With my builds I aim to provide a lean towards survivability, while also putting a lot into damage output. Essentially, you will have an answer to every realistically possible threat in the game, whether it be protection from rare high damage armour penetration that would end a glass cannon eventually, as well as you will have the ability to deal practical top-end damage output without sacrificing much in the means of survivability.

  • Efficiency: So for a lot of Battle Brothers players, efficiency can be defined in largely two ways: one, by the means of the least amount of real life time made to becoming a powerhouse (often measured by defeating end-game content using fast, temporary builds that aren't based on utilizing high stat hires, or even end-game equipment), and two, by the means of the least amount of in-game mistakes made & creating the strongest powerhouse that the game allows you to create (within reason, aka. not reliant on veteran levels, legendary gear, and heavy event stat farming). With this guide I focus on the second means, and it's important to differentiate the two perspectives because they will lead you to different evaluations on perk choices, weapons, and strategies for being an effective company. An example of this is how we level out units in the early portion of the game, and how someone who values winning the quickest may be a fan of the perk Fast Adaptation as they do not seek the luxury of finding units with high base melee skill or melee skill stars. Another example would be how being fatigue neutral is highly regarded due to its ability to dish out sufficient late-game damage outputs without heavy investments into fatigue with better units. With a focus on creating the strongest company for the late-game content, it means that your final builds will not be using perks or strategies that will be less effective against any of the harder late-game content than other build compositions. Thus bringing us back to valuing creating lower risks for losing units, while being competitors for high-end damage output. There is more to be said about the many perspectives and aspects of defining efficiency, but these are the main ideas needed to understand my perspective on how I define an efficient character build & company composition.

So in conclusion, if you are finding yourself thinking that there is a noticeable difference in values on a perk, weapon, build, etc., just remember to see it from the perspective of what that person sees as efficient. You are both possibly correct in your own perspectives & that you should seek to express your perspective to one another in order to correctly understand why someone values the way they value something.

In regards to extra alternate playstyles I do not support with this guide, these include, but are not limited to:
  • Highly featured builds focused around early-game momentum (perks, weapons, compositions), builds that are focused on making use of low tier hires, or builds that are beginner friendly.
  • Runs that make enemies with factions, but intend to avoid the consequences of doing so by ending their run early, or forcing a reset of relations with a noble war/holy war end-game crisis.
  • Intentional 3rd party aggro exploiting for high risk foes/camp thinning/singling out a unit from a group to farm for weapon drops early on. As well as most other exploits that derive from a technical bug or flaw in the game design that would be likely addressed as a bug or unintended mechanic that desires fixing.
  • Preseeded runs with emphasis on knowledge of loot locations, famed item drops, and excessively lucrative trade routes.
  • Modded games, which includes Quality of Life mods, as they can change balance aspects of the game or create bugs/a difference in code. This includes alternate starting origins (See the "Alternate Starts" sections below to know which ones this guide supports).
♦ Roadmap: Ongoing Support & Refinement ♦
  • As a reminder, there may be some sections marked as "[Under Construction]", in which contain valid information, but are incomplete in wholeness. Spreading misinformation or causing confusion with information is also a problem with Battle Brothers discourse I diligently aim to avoid, but it's still possible that I've made a mistake somewhere that might need challenging/attention. Additionally, hasty conclusions are NOT regarded as the cream of the crop when it comes to a guide centered around absolute efficiency.

  • Guide Roadmap:
    Currently working on: [Noting that activity was greatly halted during the 2024 year, Resuming updating this coming 2025]
    [Priority 1:] Providing Further elaborations & knowledge to expand upon the understanding of the party composition and the builds that consist of it. (93%)
    [Priority 2:] Slowly, adding & completing additional/bonus sections, as a little something to give back for your continued support. (About 94% done, placeholders & under construction sections)
    [Priority 3:] Additionally, I am refining and reviewing previous sections for comprehension/grammar improvements to better communicate the information. (47%)
    Next 1: Extra thorough reevaluation on information presentation. (About 10%)
    Next 2: Image information, aesthetic pass & moving images. (About 3%)
    Next 3: Request & actively seek formal peer reviews & finalization.
    Next 4: Continue to keep up with the Battle Brothers meta-gaming scene & pray to the old gods that no more drastic gameplay related changes come to the game so that I may rest in peace.
♦ Choosing your map & Starting off ♦
When choosing your map, whether you pick a pre-researched seed or not, you must first decide what your playthrough goals are, in order to find a layout that will work for you. For the purpose of sticking to this guide, your goal will be to have your company obtain a "godlike status" quickly, while also maintaining that level of strength throughout the deep late-game. In other words, you must be aiming to play longer than your first crisis, aim to compete against the most difficult the game can naturally scale, and ideally you want to play with a standard of between 150 to 500 days and not overprioritize the completion of your company in the first 100 days by finalizing your builds with early to mid-game patchwork perks on unrefined hires.

Now that we have your goals set, we can look at what should be desired for when you pick your map for a long-term campaign. Noting that, getting a good map is nice, but not mandatory for an efficient playthrough. So do not take this as a list of must haves for a seed.
Firstly, basic shape should be taken into consideration.

This means that you should be looking for:
  • More undiscovered distant land mass to explore and conquer.
  • Less water running in between the lands, so that roads may stay intact, unless said water leads to an abundance of ports.
  • Swamps, forests, and mountains don't completely plague the map; However, you can still use unfavorable terrain to your advantage. (a singular mountain top for overseeing the land, Small oases/forests for hunting beasts, and the occasional tactical positioning using swamp terrains).
  • A large open area on the map to use as an enemy camp farming ground for later in the game. Preferably, in between towns in area without terrain debuffs.
  • A map with convenient enemy spawns, as different areas of a map have unique enemy faction spawning grounds.
Secondly, the town layout is just as important.

This meaning that:
  • Towns are closely clustered together in favorable areas, so you can go from quest to quest with ease.
  • Having towns that can be used as exploration points for when you want to branch out into the wilderness, or having a route that you can take through the wilderness to get to your next town for the extra chances to run into hidden camps or enemies.
  • There are not important towns that are extremely isolated on sea islands or by means of a great distance from civilization.
  • You should look to have at a minimum of 2 to 3 port access spots that you can travel great distances with, especially in the South near or at the arena city.
Lastly, it is important that you consider the city types provided to you by your seed. Each settlement type is unique, so, just remember to read the city's description or become familiar with how the game regulates your seeds economy.

Another aspect of towns is the importance of:
  • What trading goods and resources the towns offer (gems, dye, salt, tools, etc.).
  • What city type is it in relation to its resources? (city = costlier prices to buy but better to sell to, villages = cheaper to buy from but worse sell to, fortresses = likelier to have weapons and armour in high supply).
  • What recruits you will be likely offered based on city type (forest village/hunter's cabin/lumber camp= Hunters, Lumberjacks and Wildmen, fortresses = combat affiliated troops, swamp city = Cultists and Witchhunters. etc.).
  • Are there a decent amount of attached buildings for your city (blast furnaces, ore smelters, workshops, etc.).

Starting Companions:
Another aspect of a map seed to consider is what starting stats/traits/backgrounds your chosen start gives to you. For this guide we will be looking primarily at the three Companions from the Rebuilding a Company, A New Company & Southern Mercenaries starts.
Ideally, you want to start with positive traits or at least not have any noticeable negative traits on your starting units, but primarily you will want the two melee skill star Companion to be buffed out with good traits/base stat rolls. Additionally, the archer Companion, and the shield Companion are to be utilized until someone better comes along in the late-game. There will be coverage on the ideal talent stars in the build sections of this guide, and feel free to read up on the Traits in Review sections to help identify what traits are going to be good for this build guide.


In general, you ought to play with a map that fits your needs, but randomizing your map seed is just as viable; However, it is important to note that if your seeds can roll poorly and can impact the efficiency of a playthrough. If you intend to spend a lot of time in a single save, it's worth spending a minute to look over the potential of your seed.
That said, don't overstress small inefficiencies with your map seeds, I would recommend just playing with randomized seeds and adapting your playstyle accordingly.
♦ Alternate Starts: Applicable Starts: Part 1 ♦
Sorting Key:
Applicable = This start will be covered by the entirety of this guide.
Partial = This start will play out similarly to how this guide is set up, but some factors like starting units, tasks, and equipment timings will be different.
Not Covered = This start is too unique to be covered by this guide, and would require a guide of its own in order to ethically cover the differing factors for this style of campaign.

Applicable Starts:
  • Rebuilding a Company: (Applicable): While this start is advertised as a tutorial, it is your classic start for any Battle Brothers campaign. The duration of the tutorial is no more than a couple days long if one is efficient with their time. With that said, you will start out with some decent starting companions to work with, and some easy gold making opportunities in the form of the tutorial. You will be rushed into the tutorial, unless you decide to pass on the opportunity to make the easy gold. Otherwise, this start is largely free of any large advantages or disadvantages.
  • A New Company: (Applicable): Much like the Rebuilding a Company start you will be given a few sturdy starting companions, yet this time you will be given no tutorial contract to grab value out of. With this in mind, this is the most positive or negative modifier free, campaign start that you can choose. This makes it a great baseline to use for measuring the many factors the game has to offer with an ethical lense. The main difference between this start and the Rebuilding a Company start is that you will be deprived of a few money-making opportunities: the starting fight loot & experience, the Hoggart fight loot & experience, renown & contract payment from completing the Hoggart fight. With this in mind, you will be allowed to hire more at your own hiring pace, allowing you to choose exactly the right backgrounds to hire along the path of your journey.
  • Southern Mercenaries: (Applicable): With this start, you will begin your campaign in the southern city states with the usual starting companions, given a few weapon & armour changes. This start will be good for grabbing some select hires (Manhunters) and earning some extra gold in the arena to spend with your starting gold. Otherwise, this start will be just as good as any of the other applicable default starts.
♦ Alternate Starts: Partially Applicable Starts: Part 2 ♦
Partially Applicable Starts:
  • Band of Poachers: (Partial): (Limited inventory space slightly hurts the economy ramp)
    With the Band of Poachers alternate start, your company will be slightly faster on the world map, able to obtain a scouting report for attacking locations, start with a smaller inventory cart, and start with three ranged favored backgrounds. Being faster on the world map will help with performing money making tasks faster, especially when combined with the scout retinue, which could help in obtaining gear slightly faster. You will be able to reliably decide if attacking a wilderness camp is something you can pull off when you are still in the developing stages of your company, which could lead to obtaining famed items earlier. You will also start with one Hunter and two poachers specialized in ranged skill, which can greatly decrease the need for hiring any ranged units until you can seek to replace them in the late-game. While this is all great & can be seen as an advantageous start, you will miss out on 18 inventory slots, which ought to push you to purchase the first cart upgrade sooner than ideal sometime around day 25. Otherwise, your campaign will be largely similar to the standard Applicable campaign starts, with the exception of some minor starting economic and relation barriers.
  • Beast Slayers: (Partial): (10% worse buying and selling prices cripples ones economy)
    The Beast Slayers alternate start will allow you to start off with some more slightly talented units of the Beast Slayers background, which will allow you to take greater advantage of early-game encounters. It is notable that you will start out with a noticeably low starting gold compared to other starts, but you will have some different forms of company wealth with your starting items & renown. Overall, the benefits of seeing tracks from further away and gaining extra beast loot has a minimal impact on the campaign & it’s economic ramp; However, it can lead to obtaining a full set of valuable armour attachments & craftables sooner than the usual 100+ days. Otherwise, the main deterrent from running this alternate start as a fully applicable start is the 10% economic penalties to buying & selling. This will mainly slow down your armour timings & how early you will want to approach certain fights due to a lower equipment strength.
  • Trading Caravan: (Partial): (10% better buying and selling prices skew economy & playstyle)
    As the Trading Caravan alternate start, you will start out with a large collection of trading goods to push you over 2,000 gold on even the lowest starting gold amount. On top of this, you will have a permanent passive for 10% better buying & selling to increase your profits throughout your campaign. With that said, the reason why this start is only partially applicable to the playstyle of this guide is because the armour timings will be noticeably quicker. With that in mind, it will leave room for a different money spending priorities such as: more room for refining hires early to mid-game, hiring retinue members, or even skipping past the earlier armour tier and buying near end-game gear. As for some downsides: the starting units aren’t going to be impressive candidates for the late-game, and the -34% penalty to renown gain will have a mild impact that will prevent you from being able to take on noble contracts & may incentivize a heightened priority on going after wilderness locations.
  • Deserters: (Partial): (Acting first can lend itself to a slightly different playstyle, and different early-game start advantages/disadvantages)
    With this alternate start you will have some strong advantages to utilize throughout your campaign, while also some early-game disadvantages that can mildly hinder your companies early-game momentum. To start, your main disadvantage with this campaign is that you will start with three Deserter background units (low resolve, fatigue, and hp), instead of units that can be comfortably taken into the informal portion of the late-game. Additionally, your units start off injured and with -100 relations with the closest noble house, which means the first few combats will either be delayed a few days or be dicier than usual, as well as a noble house faction essentially being off limits for 100+ days or at the end of an end-game crisis involving human on human warfare (given you don't worsen it by attacking their faction). Additionally, you will start out with only 750 starting gold (low starting gold option), which leaves very little for hiring optimal early-game hires or buying proper equipment for new recruits. That said, you will start out with a gear advantage, as you will likely have some durable chain armour to start out with, and also start out with 150 renown as a base for getting better pay on contracts quicker than most starts.
    As for the main advantages of this campaign start, you will be able to act first at the beginning of every combat, which does lend itself to a different typical & specialized starting positioning of your company. This could involve optional, yet optimal strategies such as guaranteed arrow tanks, archers in the front rows for a maximized optimal shooting range, or AI kiting units. This advantage also has it's uses against some of the enemies that have very high initiative like hexe, who often get a turn before your own archers. Additionally, you can retreat without gaining mood losses, you will still take the penalty to renown, but you won't have to worry about your units upon re engagement having lesser starting resolve (sometimes resulting in wavering or breaking morale statuses, resulting in debuffs).
  • Oathtakers: (Partial): (Economic ramp & strategies will differ moderately from oaths & starting conditions, causing temporary minor party composition changes)
    The alternate start, Oathtakers will offer a varying playstyle that will influence your decision making involving what combats to take throughout the campaign due to the rotating oath's mechanic that replaces ambitions. With the start of the campaign you will start with two strong Oathtaker background units (one is limited by the old trait) with powerful starting armour and weaponry (including the battle standard). With this in mind, you will be limited to only 500 starting gold and less tools and supplies than usual (low starting gold option), which does limit who you can hire early on. With this in mind, you can take advantage of your strong starting units and taking advantage of powerful oaths to gain advantages that change every 10 days. That said, it is inevitable that you will have to take oaths that do not benefit your current company, and certain oaths will become entirely hindrances in the late-game. These oaths will moderately affect how you present your company for the duration of these oaths, but will largely unaffect what builds are the strongest for your team composition, even with the limitation on company size from the standard 20 to 18 total. Since you will not be able to have ambitions, you will be without the benefit of the ambition related orc/goblin/undead trophy necklaces, which will alter some very specific cheese strategies, but will largely be fine. Additionally, you will need to face off against an exclusive event that tests the strength of your strongest units at one point in the early late-game.
    Overall, you will likely boon from the oaths during the ramp up portions of the game, but will be burdened by them in the late-game due to some of the more annoying limiting oaths.
♢ Alternate Starts: Non-Applicable Starts: Part 3 ♢
Non-Applicable Starts:
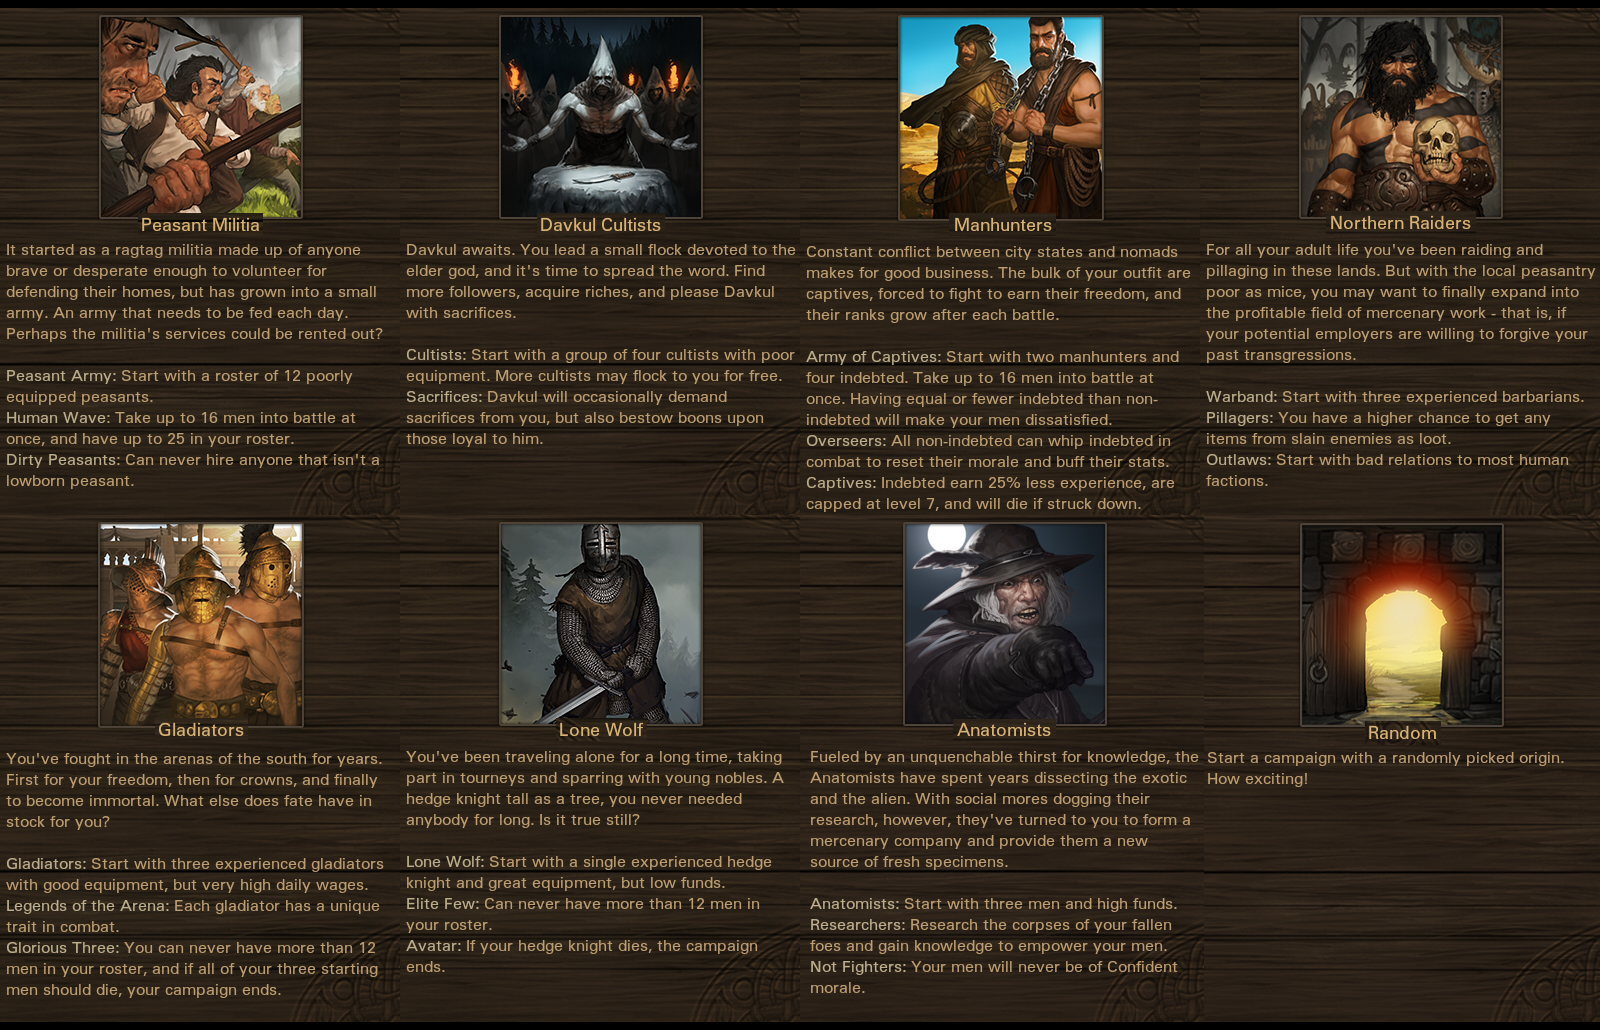
  • Peasant Militia: (Not Covered): (Different background hiring limitations and a larger company means different character builds and party compositions that are more efficient in this scenario, thus changing the entire playstyle and economic ramp)
  • Davkul Cultists: (Not Covered): (Somewhat limited to certain backgrounds, at the mercy of sacrificial cultist events, and builds being different due to the many bonuses traits/abilities of running a cult)
  • Manhunters: (Not Covered): (Differing Indebted and Manhunter party composition mechanics and increased party size that strays from the standard backgrounds, playstyles and builds that are featured in this guide leading to a very different combat strategies, builds and party compositions)
  • Northern Raiders: (Not Covered): (Starting off with negative relations to most of the territory map will severely limit one's economy style to either focus on raiding or farming random ruins with the small inclusion of contracts. This changes one's economic priorities and progression ramp too severely)
  • Gladiators: (Not Covered): (Each of the three Gladiators gained from this start are given special traits, which promote the usage of unique specializations and are used too differently from the builds in this guide. Additionally, your party size is limited to 12 troops, which alters the ideal builds due to unit roles/party composition, and if your Gladiators die your campaign ends leading to more ideal defensive specs for your company)
  • Lone Wolf: (Not Covered): (Limited to 12 troops, which changes what builds are more efficient due to the compromises with unit roles made, as well as the design of your company to prioritize the absolute safety of the Lone Wolf)
  • Anatomists: (Not Covered): (You are built for body enhancements, thus changing what builds are more efficient by significant extremities)
  • Random: (Not Covered):
    Reasoning for Not Covered: This start option is not going to be covered simply because you can be put into an alternate start that is not covered by this guide. If you are looking to take your start seriously, you will want to control as many Rng factors as possible and this is not the way to do that. Of course, this option will still always be a good way to mix up the predetermined elements of your campaign start.
♢ Starting Gold & Building Your Company ♢
Alright, so now that you have settled on a map & origin to start out on, let's talk about how one should begin their efficiency-based campaign. Noting that this isn't parameterized around pre-researched seeds, exploits, non-applicable alternative origins, and other unintended early-game strats focused around inconsistent momentum building.

Starting Gold:
Starting with a key factor for a successful start, and that is how you spend your starting gold.
  • In a Low Staring Gold campaign, you have little room for error in terms of gold spending. This meaning that your start will be higher stakes in terms of stocking up on end-tier recruits & equipment, those will have to come a bit later.
    With 1,900 gold in hand (Rebuilding a Company, A New Company & Southern Mercenaries starts), you want to almost always buy one or two discounted weapons in the market. This could cost you around 80-700 gold, but it will still leave you with room for hires and perhaps even some armour. Weapon-wise you could purchase a couple of spears, a couple of knives/daggers, cash out for a rondel dagger or even a severely discounted tier 3 polearm/military cleaver/tier 2 crossbow as weapons for one or two of your hires. The aim is to loot low tier humans and raiders for better weapons, and to avoid buying what you will easily loot in the near future (while taking advantage of very high damage and plus accuracy weapons, typically double gripped).
    Spending money on trade goods is a great way to make profit early on for a better start.
    Under ideal circumstances, you will want to spend efficiently on your hires and weapons, to be able to save up for your first piece of decent armour. As after a small handful of contracts you should be starting to gain enough momentum to purchase your first piece of medium tier armour (190+D). More likely tho, you will spend most of your starting gold. Just make sure that you were able to secure some worthwhile value out of what you purchased. Regardless of your starting gold spending habits, you should make sure your frontline troops have at least a 30D+ hat and a 50D+ body armour (ideally, avoid purchasing directly) to protect them from being killed in two hits for your first few fights until you upgrade from looting brigands.
    With your money quickly being spent on accessories, you should also be looking for affordable hires from backgrounds that have potential to roll decent base stats (typically high melee skill priority).
    (See the Capable Backgrounds to Hire sections for help in narrowing down backgrounds).
    Rebuilding a Company, A New Company & Southern Mercenaries only: For most starts, you can take your time hiring ideal backgrounds at your own pace, instead of settling for too many lesser backgrounds. But if you cannot afford or find any of the ideal backgrounds for a few days, you might need to hire from the passable backgrounds tier and hope that your item purchases/good combat positioning/fodder perks to win you your early combats. It is not good to rely heavily on Rng, but it is probable that you can be forced into that situation. That being said, overspending on one area is a misplay that you should acknowledge and learn from in your next run, if it ends up going poorly. Make sure you hire an added 4 to 6 troops to secure your numbers without spreading your gear too thin.
  • Now that we have our goals set for what we should aim to buy, let's talk about how you should spend your gold in a Medium Starting Gold, and High Starting Gold campaign.
    With a larger pool of starting gold you shouldn't have to be settling for subpar hires to meet the requirements of your starting contract (Rebuilding a Company). You may even be able to afford a luxury hire, such as a Hunter, or other better hires recommended in the Capable Backgrounds to Hire section of this guide. With that in mind, it is fairly straightforward as extra gold, is extra room for creating a stronger start for your company. One should also start to purchase better armour right away or reinvest the gold into trading goods.
  • One factor to take note of is how starting gold options also affect how many tools, ammunition, and medicine you start out with and can hold in total.
  • Regardless of what starting gold path you take, this guide will primarily be talking about an Expert Combat, Expert Economy, Low Starting Funds, and Ironman campaign.

Battle Efficiency Example: Rebuilding a Company:
The "Rebuilding a Company" campaign starts with an initial fight, in which you should generally minimize the incoming damage your three Companions will receive. Additionally, allowing your axe Companion to get the starting experience (xp funneling) is technically the best outcome as said previously he will likely be worth keeping. Additionally, you can use the dagger from the archer Companion to secure armour loot. If you end up getting a shield, some armour, or a weapon you will be saving yourself 80-300 gold for the first few days. After the initial fight you should accept the Hoggart quest to net yourself 400 extra starting gold.

Battle Efficiency Example: Rebuilding a Company:
With the Hoggart fight being all too familiar to the Battle Brother's veterans of the world, I don't think I need to talk about this for too long. The main goal of this fight, as it should be with every single fight you have in Battle Brothers, is to take the least amount of damage to your troops (mainly avoiding big injuries), while simultaneously obtaining as much armour & weapons as possible as loot. That said, daggers and flails are splendid for this ideology. Once you are done with the Hoggart fight, you will receive one or two trading goods to help you progress and some payment for the contract. In other words, gear upgrades, loot to sell, and xp farming through risk and reward management is the reliable strategy for gaining momentum in Battle Brother's early-game.
♢ Your First 25 Days ♢
After kicking off your new company, your next priority is to make as much gold as possible, without wasting any of it on unnecessary expenses.

Moving Forward:
After you've started your campaign, your focus should be on sticking with 8-12 usable troops, ideally with good stats, stars, and traits, for a good portion of the early-game. If you didn't manage to beat the Rng with your initial hire's stat rolls, don't stress out too much there is no controlling the Rng factor when hiring troops besides picking the correct backgrounds. It is likely you will have to label more than a few as fodder and replace them later in the campaign if they do not meet the stats, stars, and traits standard (explained in the character build sections below).
This being the case, your focus should not be to refine or gather max units, but to focus on taking contracts and fights your current company is capable of handling. This is so you can earn gold to make leaps in armour upgrades until your frontline is equipped with 105D-145D head armour (looted), and 190D-210D body armour (purchased). Two to four of your frontliners should be armed similarly by roughly around day 10 to day 25, the rest should be using what you've looted from fighting nomads/undead/raiders or have gained for free by other means.
You should aim to fight almost every foe you come across, but the enemies you should prioritize fighting in the early-game are: manageable amounts of brigand raiders, barbarian reavers, nomad outlaws, orc young, and select amounts of beasts such as: hexe, alps, direwolves, unholds, and schrats.
Crafting items achieved from fighting beasts can be valuable, but those fights usually are mildly less lucrative than fighting human opponents due to not dropping gear; However, some valuable craftables in the early-game that one could prioritize are: Beast Trophy Necklaces (free bonus resolve; Ideally Alp/Hexe), Direwolf Pelt Mantles (temporary armour attachment), and Living Tree Shields (high-end heater shield).

Only hire units when you can equip them with armour:
It's helpful to know that the number of troops, and your party level both factor into how an enemy party is generated for a contract. As a reminder, equipment does not factor into difficulty scaling, nor does your total renown. Additionally, distance from civilization and time is a scaling factor for world map enemy difficulty. Most enemies also get stat and perk boosts after certain day thresholds, others just scale with increased unit tier/count.
A benefit of keeping your troop count lower is that it is much easier to have a balanced armour value in your party earlier on. So rather than having 10 to 12 men who are poorly equipped with armour spread out thin amongst your troops, you can have a handful of solid frontliners who are geared up in metal armour and can take on stronger opponents for better loot. When you run a large party, you will run the risk of casualties a lot more due to the armour spread, and dying is a big setback, as you spend money on recruits (cheap or not), and their gear, which you don't always get back. The main purpose of the early-game is to gain momentum in terms of experience (core perks), armour (core early-game durability), economy (contracts, killing brigand raiders and nomads to buy high-end body armour), and renown (better contract pay).
While this is a partially experiment-based conclusion, keeping your party around 8-10 troops, while focusing on gaining armour, for the first 20ish days is an efficient tactic that tells the game to generate smaller groups of enemies for your quests for you to overpower, while you also power level your good hires using Student to also bring the difficulty back up in your favor. That said, hire as you find ideal backgrounds (for cheap: Brawlers, Anatomists, Wildmen, Manhunters, Lumberjacks, Militia, Disowned Nobles etc.), and only when you can keep them safe from at least a few oncoming attacks via arms & armour.

Some notable hires you should work on obtaining is: a banner carrier, an additional archer, and some talented melee skill fighters.

Now that we have gotten down how your first 25 days should go, let's talk about some tips on how to maximize your economic momentum in the early-game (without abusing unintended playstyles).
  • One of the faster ways to get gold is to increase your company's renown so that the contracts from towns pay more, which is gained the fastest by completing ambitions/contracts, as well as aided by destroying locations and winning fights along the way.
  • Choosing strategic contracts that are easy to complete in a short amount of time for good pay is also a way to build economic momentum. Arena fights pay well. One should aim to complete the noble contract ambition, and make the most out of any possible downtime. Do not feel the need to play out a campaign if you feel you have been largely inefficient before the 25-day mark.
  • Besides contracts, you can come across parties of nomads, barbarians, raiders, and orc young to fight if you feel like you have the advantage. That being said, be sure to understand your party strength, and gauge if you can win the fight from the safety of a paused world map. Parties with high-end ranged units can be a riskier engagement and should be decided upon if you can handle the risk of high damage armour penetration. Fighting ranged units at this point in the game can come at an advantage, as it can be a great way to achieve a working hunting bow, a composite bow, or even heavy throwing javelins.
  • It is also important to remember that, in combat, if you feel as if you have the advantage in a fight, and can afford to be vulnerable, you can swap to/start the fight with your daggers and puncture your target for their armour. This is particularly valuable against raiders, and other human opponents.
  • One should also seek to head to the Southern city states to make easy money following the arena schedules and by farming camps and contracts in the downtime, especially before the day 40 Dodge buff.
  • If you are fortunate enough, you will get a village with good trading goods that you can buy from for decent profits as you go town to town for contracts. You could seek this feature when looking at map seeds, but it is not necessary to find a map with good trade routes.
  • With daggering down opponents in your vocabulary, one could, if given an ideal opportunity, seek to dagger down a mercenary company for their armour loot. Mercenary companies have the chance to spawn in with Sellsword’s Armour (260D), warbows, and they can even be partied up with a hedge knight, in which could carry end-game gear. That said, fighting mercenaries is damaging to faction reputation and renown, and is most definitely a high risk, high reward situation that one should not rely on for most playthroughs (keeping in mind who hired those mercenaries before you decide to attack).
  • Besides fighting roaming parties, you should also attack world map fortifications if you can afford to take the battle described to you by your scouts. You will likely earn some trade goods and decent loot as a reward. Just keep in mind that setbacks will slow your momentum drastically, so be careful about your engagements, and try not to take unnecessary losses for slim chances at success.
  • Regarding ambitions, it is important to remember that spending gold on ambitions is going to take away from your armour timing economy efficiency, and that choosing ambitions that don't require time or money to be wasted is preferred. With this in mind, obtaining the company's battle standard is fairly beneficial.
  • When it comes to retinue decisions, you could seek to pick up your first retinue member after meeting your day 25 armour needs if it is optimal (see The Retinue section below).
♢ Days 25 to 75 ♢
Once you've established a strong 8 troop company and obtained some decent mid-tier armour, you are ready to work on expanding your loot tables, expanding your ranks to 12 units, increasing the level of your hires to level 11, preparing your troops for the first late-game crisis, and to continue to min-max every day for gold, in which you should save for end-game gear.

Company Progression & Ongoing Goals:
  • Alright, from here on your company should be fairly sturdy and you can start grinding manageable amounts of human raider, barbarian reaver, and orc young parties with greater ease. This is so that you can obtain decent weapon loot & gear to sell in between contracts. Before engaging with a raider party, you should be cautious of groups that have multiple marksmen, because you will not have the armour, attachments or perks to help sustain heavy archer fire in the case that the enemy marksmen spawn in with tier 2 ranged weapons. With barbarian reaver parties, you will want to play carefully to avoid allowing the two-handed weapons to strike your units by using whips, maces, and/or great positioning, due to the high amounts of armour penetration damage. Your current success is determined by your ability to make smart decisions on what enemies to engage for an efficient use of your time on the road.
    The weapons that you should expect to get are: some pikes for your backline, flails, arming swords, boar spears, head choppers (orc cleavers) for your frontline, and some sipar/kite shields to help you through some future fights against marksmen & more. If you manage to fight some brigand/nomad leaders do attempt to dagger down them for their armour, and also obtaining their tier 3 weaponry is always a plus.
    That all being said, you are going to need to be efficient on how you spend your time on the map, in order to make economic deadlines. While pressuring yourself to achieve gear with deadlines is good in practice, you are still welcome to go at your own pace, if that is how you feel like playing the game. Just remember that being more efficient will only help you succeed in the long run.
  • In terms of gold spending, your primary focus should be on purchasing body armour for your frontline troops, this is arguably the more important purchase as typically it is unreliable to try to seek out enemies with high-end armour to loot.
    Just like before, you should only make armour jumps well above your current armour level, in order to get the most out of your money. The most valuable armour piece, besides unique armours, is the 320D Coat of Plates. The reason why you would jump directly to the best armour is not only to get the most out of your gold, but you will not be able to reliably get the small chance to loot a coat of plates until you start encountering hedge knights and noble troop knights in the late-game. In this portion of the game your best bet for free armour upgrades will be from looting the bandit leaders you come across for their chest and head gear; However, you are likely to only obtain some mid-tier armour upgrades from fighting brigand/nomad leaders, but it will save you from needing to buy any head armour in between the 140 thru 250 durability levels. Additionally, one could seek to isolate barbarian chosen or various human champions (rare) for their armour and weapon loot.
    Whether or not it was a struggle to equip your frontliners with a couple 190-210D Reinforced Mail Hauberks, you should still work on obtaining 320D Coat of Plates armour next. If you did not get enough mid-tier armour for your non-Nimble frontline, this may slow down your goal of an even distribution of armour in the short term, but this will allow you to excel in obtaining a complete max armour value in an efficient time period.
    This being said, it is easier said than done to find in a store & purchase 6 coat of plates by day 75 (keep in mind that this is obtainable by as early as day 55). Many factors would pile into reaching that goal, such as: trade opportunities, high paying contracts, convenient fights along the road, very little setbacks early in the game, or the need to not spend more gold on better hires. Not every run will go this way, and understandably so considering the gold cost of the armour in total. That said, if your map seed doesn't have enough blast furnaces to reliably spawn coat of plates, you can always settle for Adorned Heavy Mail Hauberk (300D)/Coat of Scales (300D)/Padded Mail and Lamellar Hauberk (290D)/Heavy Lamellar Armour (285D) as a substitute, but don't aim for a company using these armours over the more valuable Coat of Plates, as not having to replace your armour later is more valuable than settling for weaker armours. Either way, it is better to be prepared for future fights with better armour, and every run it isn't always going to go exactly the way you want it to. It is important to remember that with every run you actively try to become more efficient, you will likely see that your goals will become more achievable, and that you can continue to push your economic efficiency to the next level.
  • Head armour wise, you should be okay with your 140D head armour that you looted, but keep in mind that higher-end head armour is still obtainable from brigand/nomad leaders/fallen heroes/barbarian chosen. Additionally, purchasing head armour most likely will not be the best way to go about spending your hard-earned gold, as body armour is far more important to secure first. (Note: you can also come across barbarian chosen and fallen heroes with high tiered helmets that cost a lot in fatigue but can be worth it for the armour values depending on your hire's fatigue).
  • In terms of weapon choices, you should be well stocked with tier 3 weapons from all your raider fights. You should always be prepared to choose the correct weapon before you enter a fight depending on the enemy type, but you will primarily be using one-handed flails, and high-end cleavers/swords. This is of course until you obtain the primary weapons for the intended units. Additionally, you should try to obtain warbows for your archer units if you see the opportunity without having to spend your hard-earned gold. If you were not fortunate enough to obtain a free premium weapon to help you out in the late-mid-game, do feel economically free to take advantage of a good discount on a two-handed flanged mace, two-handed hammer, qatal dagger to give to your end-game ready frontliners. As achieving a good two-handed weapon early on can be very helpful for certain fights. With that said, try not to go overboard on purchasing weapons, as buying body armour for a stronger frontline is important to secure, as defensive perks start to become available.
  • Aside from obtaining gear as loot or from gold purchases, you should promptly expand your party size to 12 as you come across good hiring opportunities. So again, you don't want to be spending too much money on hires, spreading your armour thin, having too many weak links in your party, and having the AI measure up to your large company size immediately. The idea is that you can be picky about who you chose to take the chance on hiring and will be able to slightly refine your company's hires at this point in the game, in terms of ideal stats, stars, traits, and backgrounds.
  • Sometime in this day range, you will also at least be leveled up enough to have Battle Forged and other valuable high-end perks. Which can mean that you are just about ready to take on select noble contracts, such as fighting orcs more reliably. They do come with risks, but they are good for making a decent pile of gold. Once you get some better gear, you can test your mettle with orc warrior fights.

This all being said, from day 25 to 75 you should seek to obtain end-game body armour, and any additional gear advantages for the upcoming late-game crisis.
♢ Days 75 & Going Beyond ♢
Once you've gotten to this point in the game, you will be ready to finalize your builds in order to dominate the late-game foes of Battle Brothers reliably & effectively. You will do this by purchasing the needed remaining end-game head/body gear & weaponry that your company is missing and to refine your current hires for the extensive end-game content to come.

Finalizing Your Company: (Gear will be listed in order of importance)
  • Obtaining 300D Full Helmets for Battle Forged units & any remaining Battle Forged 320D Coat of Plates body armours (Eventually buying spares is welcome too). Do note that you should seek to obtain 320D Decorated Full Helms through fighting a noble house with it being highly preferable during a war of the noble houses or the holy war on the side of the southern city states (famed helmets are acceptable as well, instead of souring your relations).
  • Obtaining any two-handed weapons for your end-game builds. This more limited to: Two-Handed Hammers, and Two-Handed Flanged Maces (Purchased: but also both dropped by Hedge Knights, or attached to some late-game hires). You will likely need to buy them, as they are much rarer to loot than other weapon types.
  • With Heavy Throwing Javelins being very strong for your archers, you will want to continue to farm barbarians until you have the sufficient amount. In addition, you will want to purchase or seek to obtain Warbows if you couldn't obtain any in the earlier portion of your campaign.
  • After you’ve obtained less of a money farming goal for gaining an armour advantage, you can shift your priorities to spend gold crafting the remaining armour attachments for your builds, or farming the relevant foes if you lack the materials. You may collect most of your materials through a naturally played campaign where you take every fight opportunity you can handle, but there are certain foes that are elusive enough that you have to focus hunting down. A case of this would be the white furred unholds being highly desired for crafting the Additional Fur Padding attachment, but also being primarily found in the northern tundras in low quantities. This meaning that you may have to spend some focused farming in the northern part of the map to hunt white furred unholds.
  • Aiming to obtain or purchase the remaining secondary equipment for your active builds (Battle Whips, Rondel Daggers, Qatal Daggers, Polehammers/Billhooks, Throwing Nets/pots, Armoured Wardogs/Warhounds, Falcon, Tank weapons, etc.). (See Keeping Your Inventory Efficient section & the equipment section of each character build for more information)
  • Improving your Nimble armour load out from bandit gear to 120D Sallet Helms for Archers and/or Nimble Tanks, with the added purchasing of 160D Noble Mail and/or appropriate Nimble armour sets (See the appropriate character builds that use Nimble to know what armour combos to pursue).
  • Additionally, seeking to obtain Hexe Necklaces for the added resolve for non-ambition necklace users, as well as obtaining the ambition necklaces that you have not yet obtained.
  • While replacing your hires is dependent on how lucky you were in your initial hiring, you will still most likely need to work on replacing your imperfect hires for better stats, talent stars, traits and backgrounds. In addition, you will likely want to expand your rooster further to fill up your remaining company slots with the relevant roles. You will also want to seek the help of the Recruiter retinue follower to increase the amount of hires available to you and to give you more chances to find better backgrounds to hire from (see "The Retinue" sections for extended strategies).
  • Lastly, you may want to work on expanding your inventory size based on how well you are doing on inventory space. Additionally, you ought to be hiring the relevant Retinue hires based on your company’s evolving needs, until you are set on your final group of retinue members (See Retinue section for further information).
Going Beyond:
  • At this point in the game you should be fully equipped with armour and gear. You will have reached level 11+ and have transitioned into using your finalized gear sets. You should have a working crew of fighters, but you will still likely need to spend some time refining your hires for better recruits with better stats, stars, traits, and backgrounds. With this in mind, you will still have to pick and choose your fights when dealing with some high tiered enemies; However, you will cut through any foe with ease with proper tactics, as well as a leveled & geared 12-man crew.
  • In terms of improving your company from this point, you should focus your efforts on obtaining spare armours + armour attachments, famed weapons & armour, unique armours, and refining your hires (better stats, stars, traits, and backgrounds). You can also pursue taking out the three crises, the kraken, the witches hut, the goblin city, the forbidden library, the black monolith, the Ijirok and any other late-game challenges you wish to take on. Otherwise, your motivation to continue playing is of your own making, as the game will continually scale according to your crew. Although, it is important to note that this guide is only valid in it's claims if you intend to have a playthrough that doesn't end before day 120 or stretch beyond 750 days, as there are various build compositions that take advantage of the shorter (patchwork hires and perks) & longer playtimes (hyper refined veteran level Lone Wolfs).

This all said, the game of Battle Brothers is vast and complex. It can be a consistently challenging game, and I'm sure that is why it is still exciting to play for many, even after hundreds of playthroughs. This can be in part due to the presence of Rng in the game, but more largely due to the accumulation of uncountable, minute inefficiencies that occur, to make every campaign different. Just remember, in combat, good positioning is key, pick your contracts very carefully, and always aim to be efficient. You should always try to better your game by practicing good battle safety, economic safety, and explorative safety. Most importantly, you should play to enjoy the game, and one should avoid disciplining one's Battle Brothers experience too much with the burdensome ethics of absolute efficiency. Of course, keeping the passion for being absolutely efficient can be a way to have fun with the game, and for me, I will not be giving up the discipline anytime soon. Find what works for you, and remember that life is about the experiences you gain out of it.
[Under Construction] ♦ The Retinue: From Early to Late: Part 1 ♦
The Optional Early-game: (Note: it is likely you will not seek to spend your gold on a retinue member in most campaigns this early due to greater opportunities to gain momentum):
  • The Scout (which is also a late-game retinue member), for traveling 15% faster, in order to spend more time making money, gaining experience, and renown. Additionally, it allows you to catch up to enemies faster, or escape more easily from enemies on the world map, given that your party size isn’t slowing you down too terribly. Overall, with the Scout in your company, you will be gaining an advantage over daily wages, mood loss, food loss, terrain based injury events, potential for more battles, and the money gaining economy aspects of Battle Brothers, in which will only more likely than not strengthen the success of your playthrough. Acknowledging, that there are a multitude of factors that determine the actual value gained from moving faster on the world map for each run.
    Will they be Replaced?: No, the Scout will provide irreplaceable value throughout your campaign.
    Obtaining: You will have to win 5 battles against beasts, which will happen naturally in a normal playthrough, and can be accelerated by picking beast specific contracts. You will have to pay 2,500 gold, which I would recommend doing only after you secure some mid-tier armour for your frontline and are on track for a well timed run. If you happen to fall behind the curve or decide to capitalize on an alternative opportunity, do take your time on hiring the Scout, and try to obtain them later when you are ahead on the difficulty to company safety curve.
The Guaranteed Late-game:
  • The Quartermaster
  • The Blacksmith [Although somewhat unfavoured in its repair formula, still more worth it than others]
Situational Late-game:
  • The Paymaster
  • The Cook (On Hold till it's patched)
  • The Surgeon
  • The Scavenger is an easily undervalued retinue member for his ability to recover up to 15% of destroyed enemy armour as tools and 10-20% of ammunition used after a battle, due largely to the fact that he simply is not very effective until the very late-game, where enemy counts are very large. In the early-game, your goal will to gain armour by bypassing armour, or to kill an opponent with all damage going into their hit points, which largely lowers the amount of destroyed armour there actually is. Additionally, the late-game foes, such as orc warriors or barbarian chosen, or ancient undead all have large armour pools to gain additional tools from. While paying for tools & ammunition is not a late-game concern, it's more of an availability issue when it comes to wilderness runs or consecutive fights away from buyable tools. For this reason, being able to repair one's armour is a must for an efficient Battle Forged company, and to refill ammuntion after spamming heavy throwing javelins while away from civilization is also very helpful.
    With that said, you will often find that you will need more tools or ammunition from civilization eventually and run out of inventory space to carry loot, so this is not a retinue member to be highly valued, as if there were better retinue member options, the Scavenger would be easily replaced.
    Will they be Replaced: After you've considered the other Temporary Late-game options, and have decided that none of the Situational Late-game options suit your company, you ought to be hiring the Scavenger as your last retinue hire, to not further replace.
    Obtaining: Innate with your first retinue slot, but they should not be hired until the very late-game.
♢ The Retinue: Temporary Late-game Members: Part 2 ♢
Temporary Late-game:
  • The Recruiter would be employed promptly once you reach the late-game and have already achieved a secure armour/survivability advantage over the late-game content in the game. With the primary benefit to hiring the Recruiter being that you will have 2 to 4 more available options of hires per settlement (which helps with recruitment pool manipulation, aka. hiring cheap backgrounds to keep the recruitment pool adding in new hires instead of replacing hires at random), and your overall goal being to replace your lesser hires & achieve ideal hires (stats, stars, traits & backgrounds) that will maximize your reliability in defeating end-game content in Battle Brothers. While perfecting your rooster is a min-max orientated perspective, it is in general a good idea to at least replace the troops that fell behind in stats by a reasonable margin. As for the economic value gained from hiring the Recruiter, one isn't too worried by this point about saving gold, but the Recruiter will likely pay for himself after enough hires are rolled due to the 10% less up front pay when hiring. With that said, it is not worth hiring the Recruiter if you already have a majority of your company as ideal hires.
    Obtaining: Naturally (recruit 12 units)
    Duration of Stay: Overall, you will only want to keep the Recruiter for as long as you need better hires. This could be a couple of weeks or up to 75 days depending on how lucky you are with finding suitable hires to start to train.

  • The Drill Sergeant for obtaining up to 20% more experience for your low level troops, with 2% lost per level gained. This is mainly beneficial for obtaining faster levels, also known as strong perks and stats for talented hires, at a faster rate. Which you may not always have in your company in the beginning. If you happen to have a good amount of troops that are not talented in their respective stat roles (aka. frontliner = melee skill, archer = ranged skill, tanks = melee defence), you won't benefit from ramping up their level as much, as increasing your level comes with a higher difficulty in contracts (primarily an early-game concern). That said, combined with Student, other exp boosts and/or with funneling kills for exp to select units, on valuable hires, the added experience gain can greatly increase the rate of exp gain for desired units, which allows for engaging in late-game content more reliable, much sooner. On top of the bonus to experience gain, anyone in your reserve will not lose mood from not participating in battles, which can be helpful if you are looking to build a big reserve of troops, and you are not looking to attempt to meet the mood needs of each reserve unit with tavern visits, combat participation, or spacing out negative mood impacts.
    Obtaining: To obtain the Drill Sergeant is somewhat painful, as it requires that you hire and sacrifice a unit in battle in hopes that they will survive with a permanent injury, so you can then retire that unit. The cost of hiring the Drill Sergeant is also a hefty 3,500 gold, which can be hard to justify spending for the early-game, but it can be worth the added experience gain in those rare campaigns where you have all good hires early on, or if you want a boost to training a cluster of units in the late-game a bit faster.
    Duration of Stay: If you are not taking advantage of the larger exp boost while they are lower level by taking big fights, or you simply don't have enough good hires to train at a time, it is definitely acceptable to skip the Drill Sergeant for your campaign, as the exp boost diminishes too quickly as they level for it to be worthwhile for generalized training. Otherwise, it is efficient to keep the Drill Sergeant for the first 6 levels, till as long as it is not hogging a valuable retinue member slot.

  • The Bounty Hunter is strong in aiding the gathering of famed weapons and armour by increasing the spawn rates of champion variants for select late-game foes by 3%, as well as paying for itself faster than most retinue members. It's worth starting off noting that not all champions will drop famed items that are worth using, and not all enemies that are commonly encountered will have a chance at becoming champions. That said, the foes that have a reasonable likeliness to have a famed item of actual use in this guides suggested equipment builds are: Barbarian Chosen, Orc Warriors/Warlords, Nomad/Brigand Leaders, Hedge Knights, Knights/Officers, Blade Dancers/Swordmasters, Nomad Executioners, Master Archers, Desert Stalkers, Necromancers, and technically Goblin Skirmishers for jagged pikes. This meaning that not every champion encounter will be guaranteed to have a famed item of value, beyond gold from selling the item/exp gains from killing the champion, which can just be added risk from outlier damage received, leading to unit death. Not to say champions aren't reliably managed with strategy, or are not worth the benefits, but it is the only real downside of the Bounty Hunter besides the initial fee and retinue slot.
    Obtaining: Obtaining the Bounty Hunter is more or less left to chance, since fishing for famed items early is a gamble, but with a reasonable campaign, obtaining 3 famed items will occur naturally at least, before the end of the first late-game crisis. That said, it will pay for itself in experience bonuses from fighting champions, famed items that can be used or sold, and the bonus gold gained from slaying champions.
    Duration of Stay: It is a higher priority retinue member for farming your companies famed equipment the most reliably, but it is still worth noting that you will have enough famed items eventually, and this guide doesn't aim to accommodate for ultra-late game refinement (veteran levels, reliance on famed/legendary items, ultra-precise recruit refinement).

  • The Minstrel is another retinue member for aiding the acquisitioning of famed items for the late-game, as well as mild impacts to renown gain. The action of gaining better tavern rumors does come in handy for identifying potential pathing for standard economy pathing, but largely, the only rumor that has value is the hinting of a famed item location near the tavern settlement, which out of the filtered rumor is still a small percentage of the rumors you will encounter. That said, in combination with other retinue members, like the Bounty Hunter, or other late-game strategies for finding famed weapons & armour in the late-game, the Minstrel can be worth hiring when your income is not a concern & hunting for famed items takes a priority in your goals. Additionally, the renown gain becomes greatly obsoleted once you hit your economic goals at the start of the late-game, and gold income becomes more of a natural process, while it is also too impractical of a purchase early on for everything except for perhaps completing ambitions in quick succession to help boost the future pay of contracts.
    Obtaining: A simple visit to all locations on the map will happen naturally most of the time, except for when locations are extremely isolated, but it should happen before the start of the late-game, due to the hiring section of the late-game & the natural inclination to visit towns for contracts or explore areas for nearby civilization locations to profit from. Unfortunately, this will very likely be locked in the early-game due to the min-max playstyle of efficient pathing for quests/camps and lucrative combat locations.
    Duration of Stay: It mainly is an opportunity cost of an empty retinue slot in the late-game, but that said, you will eventually gain enough famed items where it becomes a matter of farming for better famed items, and at that point, you are more or less breaching into ultra late-game territories, which most players will not venture too deep into.
[Continued]...
[Under Construction] ♢ The Retinue: Avoided Members & Cart Upgrades: Part 3 ♢
Temporary Late-game Continued:
  • The Alchemist is a useful temporary retinue member solely because you may have a rare crafting recipe you want to roll on saving materials for.
    This could include: Additional Fur Padding (Thick White Fur), Horn Plate (Kraken Plate), Protective Runes and Sigils (Shimmering Ashes, Witch Hair), Unhold Fur Cloak (Thick White Fur), Hexen Trophy Necklace (all hexe crafting ingredients), and/or even Fermented Unhold Heart (Unhold Heart, Wine).
    While it isn't necessary to do this, it is wise for some of the rare ingredients that are hard to find opportunities to obtain. Additionally, you will have the opportunity to craft Snake Oil from various ingredients; However, gold is most likely not an issue in the late-game for an efficient company, making it a low priority retinue hire for that reason.
    Obtaining: Craft 15 items. This can be done easily by crafting low tier crafts such as: Trophy Necklaces (nachzehrer variant easily obtainable for the early to mid-game), Large Quiver of Arrows (late-game archer gear), Reinforced Throwing nets, Antidotes (if any company largely Nimble), Poisoned Oil (cheap), Smoke Pots (cheap), Paint Remover (very cheap), or aided through a gradual accumulation of natural crafts throughout the first half of your campaign.
    Duration of Stay: The duration of this retinue member is flexible, but one could save a large portion of your company's late-game crafts for a single crafting session while hiring the Alchemist solely for that crafting session.
Avoided Retinue Picks Reasoning:
  • The Brigand
  • The Agent
  • The Lookout
  • The Cartographer
  • The Negotiator is a retinue member without a true purpose or niche for min-maxing purposes, due to the economic momentum potential of negotiating for better contract pay not actively being high with early-game contracts with lower base pay, as well as the notion of thought that late-game income is not hard to achieve & you are more often than not overflowing with income at that point. As with all retinue members, the upfront cost of 3,000 gold is not typically quick to pay for itself, primarily in the early-game. That said, beyond the added near guaranteed negotiation attempt for greater contract pay, the 15% increased daily relations gains/decay technically will provide better buying and selling prices by keeping your previous gains higher; However, Unfortunately, the actual percentage gains possible is nearly negligible. And while there is a mathematical probability that you will gain even greater contract pay from negotiating beyond the safe negotiation attempts, it is largely impractical to negotiate too heavily as the likeliness of being locked out of a contract all together is always a risk after the second negotiation attempt (third attempt has a 99% chance to not be locked out). The primary benefit of the negotiator is to gain economy in the late-game and to mildly retain relation gains upon completing contracts for better a greater selection of recruits during the late-game recruitment phase. That said, technically you could hire him early-game, have him pay off himself eventually from negotiations/better relations = better selling prices, and likely by the late-game have a mildly larger recruitment pool available for hiring late-game hires, as long as you don't drop your relations by failing contracts/assaulting friendly units.
  • The Trader
When to Purchase Inventory Upgrades:
  • Cart: The first upgrade for your company inventory storage space, is the Cart upgrade, and should be purchased anytime after obtaining a majority of your late-game body armour and find yourself running low on space due to stuffing your inventory with back up equipment (typically any time post day 75 is good, as it will cost 5,000 gold). You won't need the inventory space too early in the game (even when maximizing repairs/big city sells, and the number of combats), despite an occasion or two where you might max out your inventory, as it is better to spend your gold on equipment or even refined hires (not recommended until your gain your gear advantage first).
  • Wagon: The next upgrade to your company inventory storage space, is the Wagon upgrade, which is another 27 inventory slots, but at the cost of 10,000 gold. Ideally, you will not need to purchase this upgrade until you've fully equipped all of your units with their appropriate weapons and armour, but it's realistically fine to purchase this whenever you find yourself with the gold and in need of space.
  • Big Wagon: The last upgrade to your company inventory storage space, is the Big Wagon upgrade, which much like the previous upgrade ought to be bought at your nearest convenience that you are desiring to spend 20,000 gold on inventory space.
♦ Keeping Your Inventory Efficient: Part 1 ♦
With the large assortment of enemies in Battle Brothers, a few fights are bound to require a different strategy than the normal party composition listed in this guide at various stages of the game. With these differing strategies comes the necessity to use a different item or tool to most efficiently deal with your opponent. Knowing that before every battle, one must pause and consider what the best loadout is for defeating one's opponent the most efficiently, you ought to stock up on the correct items and tools beforehand. Here is what you may choose to keep in your inventory as you progress through your campaign.

What to collect in one's inventory:
    Weapons & Accessories:
  • In your company inventory it would be beneficial to carry around additional battle whips for your melee skill using units (more so if they use Cleaver Mastery), as being able to switch out your dagger for a whip can sometimes be more efficient when fighting tough enemies that you don't don't need their armour as loot (Champions drop famed armour no matter the damage recieved). This would mean that you would swap to a whip for the option to disarm your opponent when fighting against high damage units, orcs, barbarians, mind controlled undead and beasts.
    (Recommended Amount: 4-10 whips for your melee skill using units, with the consideration that polearm users receive equipping priority with whips in their bag slots in the early to mid-game)
  • For the mid to early late-game fights against schrats and hexe loadouts, you will want to have a small supply of one-handed axes to break the shields of schrats. The most common axes to collect are handaxes for dealing less damage to your allies when against hexe, but you do eventually want to hope to loot fighting axes (non-hexe) and longaxes (for considering holding in your pockets in hexe fights, for general polearm options, or schrat shield breaking). You can choose to collect two-handed axes, but they are not going to be necessary, as long axes and fighting axes are sufficient enough.
    (Recommended Amount: Enough for your melee skill units in the early-mid-game, and 2 one-handed axes for your Nimble Tanks in the late-game)
  • Another valuable weapon to collect in your company inventory is a small supply of polearms. These can be jagged pikes+, long axes++, polehammers, billhooks, or even swordlances+ (number of +'s is desirability). This is because there will be fights in the early-game, mid-game, and rarely in the late-game, where having your typically frontline melee fighters wield polearms, while your tanks absorb the attacks of your foes. The enemies you typically want to employ this strategy are: unholds, lindwurms, schrats, hexe, ifrits, and sometimes a low number of barbarian chosen.
    (Recommended Amount: Enough for your units who are not end-game durable, with some consideration for long axes being used for breaking schrat shields, and situational polearms for your Quick Hands users)
  • In the early to mid-game you can utilize a small supply of spears to better your chances of hitting your opponent if your unit is not specialized in melee skill or still in training. This would be primarily for your Nimble Tanks. You can also use these in fights against hexe to lower the damage output of your units against one another.
    (Recommended Amount: 3ish spears of the highest tier collected)
  • One item that might need to be frequently replaced (unless the employment of the Blacksmith in your retinue) is the living tree shields or heater shields or famed equivalent that are used by your Nimble Tanks, as they are vulnerable to being heavily damaged or shattered. It is also sometimes valuable to carry a small supply of kite shields (or famed equivalent) in case you ever want to arm one of your new hires or damaged units some extra ranged defence in a ranged heavy fight in case of an unfortunate scenario.
    (Recommended Amount: 2 living tree shields or famed equivalent, with the consideration for 2 kite shields/lindwurm shields/famed equivalent)
  • Another valuable item to carry is a few spare large quiver of arrows for you archers to use in special fights where more arrows are more valuable than heavy throwing javelins. Heavy throwing axes can be employed in rare scenarios. While you are able to carry any spare quiver on your ally's quiver spot, you cannot store heavy throwing javelins in the quiver spot, which leaves you needing to store them in your company inventory temporarily.
    (Recommended Amount: 4 slots on reserve for the situational storage of heavy throwing weapons)
  • With the increase in numbers of dangerous enemies it is sometimes more efficient to equip a unit with a two-handed flanged mace for the ability to reliably daze your opponents. The choice on how many you will carry is dependent on how many two-handed mace specialists you already have in your company. In other words, if you have no two-handed mace specialists in your company to swap in & out of fights, you may want to carry around about 2 two-handed flanged maces. It is valuable to note that in the early to mid-game it is convenient to obtain and use the barbarian two-handed spiked maces until you reach the late-game where you have extra gold to spend on spare weaponry.
    (Recommended Amount: 4-6 two-handed maces in your inventory or used as up to 2-4 two-handed flanged mace specialists)
  • With the use of early-game Duelists in one's company composition, it would be efficient to carry a few alternate or spare Duelist weapons with the primary alternate choice being winged maces (or southern variant) for situationally stunning your opponents (primarily equipped in specific barbarian chosen fights as an alternate tactic with more control focus). That said, you can chose to carry spare head choppers (orc cleaver), noble swords, and/or warhammers.
    (Recommended Amount: up to 4 spares of any variety in one's company inventory)
  • The ability to stun in Battle Brothers is somewhat lackluster due to the number of high-end foes that are immune to being stunned and for the stun abilities lack of damage output. With this in mind, there are still situations where stunning your opponent is a valuable strategy. The most commonly valuable usage of stunning is done against the hexe foe to prevent or delay a hexe from reusing hex (share damage received as hexe). In addition, it is good to stun your own units who are under the affects of a hexes charm, while dealing as little damage as possible to them. It's up to you on how many low tier maces you want to carry, but I would recommend up to 4 or more kept either on your reserve units or in your company's inventory.
    (Recommended Amount: up to 4 or more low to mid tier maces in your inventory)
♢ Keeping Your Inventory Efficient: Part 2 ♢
    Spare Armours:
  • Regular Battle Forged Armours: This consists of a handful of 320D Coat of Plates with the Additional Fur Padding attachment for the reduced damage to body HP, as well as spare 300D/320D Full Helms or Decorated Full Helms. These serve the purpose of being quick swap outs in case you require your Battle Forged users to be at full strength shortly after a battle.
    (Recommended Amount: 1 back up set per Battle Forged user)
  • Irregular Battle Forged Armours: With the desire for efficiency, having some spare Battle Forged armours that protect against niche attacks is useful. For all your Battle Forged frontline units you may also choose to carry a replacement set of 320D Coat of Plates with the Protective Runes and Sigils attachment to help in fights with alps and hexe if desired.
    (Recommended Amount: Typically one per unit, but try to reduce the burden on your Inventory space)
  • Regular Nimble Armours: This consists of a handful of 120D Sallet Helms + 120D Assassin's Robe with Bone Platings for the free absorption of an attack to the body for -2 fatigue (any Nimble user) or Horn Plate for the -10% damage to the body & +30 durability to the body (Nimble Tank). You may chose to cycle through raider armours in case of an armour shortage.
    (Recommended Amount: At least 1 back up set per Nimble user)
  • Irregular Nimble Armours: With the desire for efficiency, having some spare Nimble armours that protect against niche attacks is useful. For your Archers, obtaining some spare 160D Noble Mails with the Unhold Fur Cloak attachment for the -20% ranged damage to the body & +10D for large goblin battles can help stave off the poison debuff for your archers. As for your Nimble Tanks, obtaining some spare 190D Barbute Helmets, 140D Assassin's Face Masks + 160D Noble Mails with the Unhold Fur Cloak attachment can also serve as an anti goblin poison armour set. If you happen to have a Nimble melee combat unit, having a spare set of Nimble armour with the Protective Runes and Sigils attachment to help in fights against alps and hexe.
    (Recommended Amount: Typically 1 back up per unit, but try to reduce the burden on your Inventory space)
  • There are a number of valuable consumables that can safely strengthen your companies potential. One of the most valuable consumables is the throwing net/reinforced throwing net for denying enemy units melee defence/rd/initiative and likely a great deal of AP. Another valued throwable consumable is the flash pot, which is used for applying the dazed debuff for up to 2 turns on up to 7 targets for fights against enemies with lethal potential damage outputs in the late-game. Additionally, the smoke pot can be used to safely move out or around enemy zones of control in cases where Rotate is unavailable. While this next one will not be used in ideal scenarios, you will still desire to carry a few spare bandages in the case of a dangerous bleed.
    (Recommended Amount: Several throwing nets/reinforced throwing nets on your units and in your company inventory, flash pots and smoke pots deployed partially or fully depending on the encounter, and bandages held on spare slots on supporting units)
  • When it comes to consumables, there are ones that provide one-time powerful buffs, at the cost of your unit eventually being eligible to gain the Addict trait (-10% to all combat stats, as well as resolve and can result in the death of a unit or loss of a treasure/trophy) via an event. That said, there are plenty of valuable consumables that will do a aid greatly in the success of special encounters, and can be used frequently if you intend to not keep the unit long-term. A valuable consumable is the second wind potion, which will grant +4 fatigue recovery per turn for a single battle, which is invaluable against foes such as the kraken, against exceptionally large barbarian chosen and other exceptionally fatigue intensive end-game fights. Additionally, you can carry a night owl elixir in the rare case of needing to snipe a high priority foe during the night at the cost of increasing your potion consumption risks. The consumable strange mushrooms will grant you a bonus 25% damage, while also losing -15 melee & ranged defence. This bonus damage is great for gaining an edge in your next fight, but should be used very sparingly for a long-term campaign.
    (Recommended Amount: Your usage of these consumables should depend on the unit count they would apply to, as well as a small general supply of second wind potions for use on demand, Keeping in mind that storing potions can result in them being lost)
  • Besides the bonuses you can gain during combat, there are consumables (bound to the same consequences as other potion consumables) that can help you out of battle that are worth keeping a couple in your inventory. Firstly, we have happy powder, which can be used to keep a unit in a good mood, in case they become angry (less than 15% mood), which can result in a desertion. Lastly, we have the apothecary's miracle for very rare cases where you have received a heavy injury and need it to be treated for quick use of the unit.
    (Recommended Amount: These consumables are used extremely sparingly, and you shouldn't need more than a couple of happy powders, and a single apothecary's miracle (if at all) in your company inventory)
  • With most late-game hires it will be more efficient to utilize the benefits of the bonus resolve gained from using beast necklaces than it will be to field wardogs, warhounds or the armoured variants. That said, there are late-game hires that will have exceptionally high starting resolve (more than 55 base without free bonuses), where it ought to be more efficient to make use of an armoured warhound for securing fleeing enemies, distracting dangerous foes, denying hexes, disabling necromancers, etc. Do be mindful that it's likely that there will be lethal dog fights via an event every so often.
    (Recommended Amount: 1 to be held on the applicable units, and non-combat units in reserve, or a couple in the inventory as spares)
♦ Core Concepts of this Company Composition: Part 1 ♦
This section is an overview of the reasonings to why these builds are right for the strongest, reasonably refined, company composition in Battle Brothers. This section will make bold assertions sometimes about damage output & the need for specific units that specialize in defeating, in the most reliable & efficient way, all end-game content. As stated previously, this guide is about min-maxing the max to the max, opposed to making due with what is sufficient to defeat end-game content, most builds in the game can defeat end-game content and are perfectly viable.

What this Company Aims to Accomplish:
This company aims to provide the units and means to be able to defeat any end-game content, assuming adequate game knowledge, adaptability and experience to play effectively (acknowledging, most builds are easy to use, and do not require exploiting the AI too greatly or in a largely unintended way).
This company will provide you with the highest practical damage output in the game, while maintaining reliable formation options, maximizing survivability to an optimally reasonable amount, providing answers to niche enemies or situations that challenge the survivabilty to each unit or the company itself, all while being reasonably attainable without excess veteran leveling/hire refining beyond the reasonable means of hiring premium backgrounds/searching for talented mid-tier backgrounds throughout a reasonable intended campaign length (See "Capable Backgrounds to Hire" sections for optimal backgrounds).

Overview of Reasons to why this is the Strongest Company:
To put it in somewhat briefly, this composition provides the top practical Dps this game has to offer, without skimping on survivability by any practical or reason-based mathematical conclusion.
  • Main Damage Dealing Concepts:
    You will have the means to deal safe, powerful, and effectively executed Area of Effect damage output against all opponents (primarily end-game opponents such as Orc Warrior hordes, Plethoras of Barbarian Chosen accompanied by armoured Frost Unholds, and other epic tiered end-game fights as the focus, due to a aim to defeat them reliably).
    Starting with the main frontline unit, the Two-handed Hammer and its three tile AoE, of the highest and most practical Dps in the game against the staple end-game opponents players aim to build around fighting, while also having an exceptionally strong single target Dps (which is on par with the strongest single strike single-target attacks in the game, due to how Dmg breakpoints work with lowest hits to kill). (See "Hammer AoE Two-Hander: Further Elaborations" section for more).
    In close relation to the two-handed hammer AoE, the flexibility to faster weaken & defeat multiple opponents that other units are already engaged in, is the Dps aspect of the role of the Heavy Polearm & its use of the Swordlance (somewhat sub par AoE Dps compared with single target Dps weapon builds, but also strong due to the users available positioning aka. enemy defeat finisher/set up, ideal for Fearsome, doesn't require Underdog/Reach Advantage and amplified Melee Defence, while benefiting from a different stat/perk goal), and the optimal usage of the Two-handed Flanged Mace as a sidearm when efficient. (See "Heavy Polearm: Further Elaborations" section for more).
    With AoE in mind, using a 6-tile round swing AoE can deal more Dps than a 3-til AoE, but those builds are not reliable due to surround mechanics/being surrounded by attacking foes, positioning requirements, build differences involving amplified secondary stats, the higher threat of death by damage received, and other Dps type elements.

    In regards to single target leaders such as the Man Splitter (typically built with Fearsome, and other Dmg perks in optimal scenarios), Orc Cleaver Duelists (has a place in an end-game comp largely due to advanced utility options, as well as being among the top single target Dps while utilizing Bleed and Decapitate), and even the Qatal Dagger Duelist (which is much more effective when merged with a Two-handed Flanged Mace utilizing Quick Hands & maximizing spare AP), these builds will mathematically be out damage outputted by three tile Two-handed Hammer AoE by a noticeable margin, while also can provide more value in the utility/survivability (primarily, a greater application of resolve checks, Reach Advantage providing several stacks of Melee Defence, and opponents being defeated much faster) department as well.
    That said, AoE isn't enough by itself, as it is greatly complimented by secondary Single Target damage roles, such as: Orc Cleaver Duelists and their ability to dish out nearly the highest single target Dps, while also prioritizing armour penetration damage, which is the fastest way to kill armoured late-game opponents by means of single target Dps (not to forget to include the enhanced ability to Disarm opponents, which is to be counted in favour of the Cleaver Duelist), the utility and high armour penetration damage of the Two-handed Flanged Mace & it's optimal pairing of the Qatal Dagger (this method primarily is synergistic due to the Two-handed Mace's lack of utilization of Reach Advantage and it's weapon mastery for its solely used basic attacks ability to apply Daze and have spare AP for a Dagger Mastery, Duelist Deathblow strike, in which rivals it's single target competitors and applies an extra strong debuff for amplified survivability, this, by a large margin, excels in effectiveness and damage output the separation of dazeing/stunning and daggering amongst two different units will do).

    Lastly, this company utilizes in some fights where ranged units are desired, Heavy Throwing Javelins/Axes paired with Throwing Mastery & Duelist, which are among some of the highest single target damage outputs in the game, with exceptional note that a great handful of end-game foes will be hit much more easily by attacks targeting ranged defence instead of melee defence (largely a niche concept, but one that does impact whether a unit gets taken down more reliably so). The Handgonne does provide a higher technical Dps (double handgonne is definitely the strongest, despite it's somewhat exploit reliant strategy, and over reliant play on ideal, non-standard enemy positioning) and the ability to apply Fearsome to great effect, However, the primary reason why a ranged unit is utilized is the ability to snipe distance foes that cause fights to play out at greater risks than they need to (and as a side note, the AoE Dps of the Handgonne will very likely not reach it's peaks due to enemy positioning, and the single target Dps of Heavy Throwing builds are more reliably practical in damage output and usefulness in applying spot multiple tile Dps).
♢ Core Concepts of this Company Composition: Part 2 ♢
  • The Role & Priority of Survivability:
    When it comes to the Survivability of this composition, there was no expense spared for providing each role with survivability composition consideration, and seeks its best means of a reasonable amount of survivability. The cores of this companies survivability is a solid base hit points paired with Colossus in order to survive a great majority of the reasonably preventable 1 to 2 shot headshots in Battle Brothers, while also in most cases, leaving room to be able to receive another fatal headshot (primarily referring to consecutive headshots from Barbarian Chosen 2h Maces/Axes, a handful of end-game one shot headshots from 2h weapon wielding Hedge Knights/Orc Berserkers/Lindwurms and some strikes from 2h champions). That stated, the threat of Orc Berserkers with 2h flails, damage boosted Champions with famed 2h weapons, and/or high rolled 2h weapon attacks to the head are capable of taking down most Battle Forged users if these hyper niche enemies/attacks land specifically on the head and/or in rapid succession are very rare and very preventable with strategy/preventative measures.
    These threats are treated somewhat lightly, since they are very rare to encounter and are very reliably dealt with by means of disabling (whip disarms, tanks, distance strikes, etc.) and reasonable take down methods that you learn from playing the game. The main difference between this composition and most answers to these threats, is that Nine Lives/Steel Brow is largely ignored on frontline units, and hit points aren't excessively leveled beyond reasonable detriment to other key stats such as: utilizing fatigue optimally for Dps/survivability/utility, and maintaining high melee skill & melee defence.
    As briefly brought up, the survivability gained from having allies applying Daze on some foes, as well as your AoE frontliners gaining massive stacks of Reach Advantage every turn to bring in reliable dodge percentages that inch closer to the 5% chance to be hit more so than other frontline builds settling with a non-amplified melee defence, will be greatly advantageous for your company's survivability, while also maintaining a large Dps lead on taking multiple opponents out with AoE and all the benefits that come from it.
    It also notable to bring up tanking in survivability, as it overall helps the team composition manage greater swathes of high damage opponents or niche enemies most frontliners would be uncomfortable standing next to for extended periods of time, over the course of a long campaign. That said, read more on tanking in the following section, as I consider it a Utility and not a necessity for survivability in this composition.

  • The Use of Company Utility:
    While a use of utility isn't always needed, there are several instances where a clever use of a debuff, disable, tactical position skill, and other means of dealing with specific attacks or foes is optimal to make use of.
    Some of the more obvious tactical utilities out there are: banner carriers (shared resolve among your allies in resolve concerning encounters) and their abilities (Rally the Troops being a niche puzzle answer to Geists, Alps, failed resolve checks, and resolve specific attacks from other foes), Battle Whips (for disarming opponents and removing their ability to deal damage) which can be available to anyone with the adequate melee skill, but is amplified with users that have greater opportunity cost to utilize it, the Daze dubuff (applied by both the high damage output Two-handed Flanged Mace, and the throwable Flash Pots, which can be ideally wielded by duelists, and supporting units if needed), AP saving skills (Rotate can be wielded to a great effectiveness on supporting units to move allies forward for optimal damage output, or to allow for disengagements) and items (Smoke Pots can be held by utility roles to allow for more niche instances of in-combat disengagements of a unit, and the notable use of Throwing Nets to disable niche opponents), the use of dedicated tactical tanking during fights that desire it (Nimble Tanks allow for ample survivability when hit less frequently with excessive melee defence, and ample fatigue for use of Indomitable more so than their Battle Forged counterparts, but also largely as a company composition compliment asset of Nimble to the allied Battle Forged roster), also the use of spot tanking (which involves a unit built more durable than a frontliner, while also providing a main role that isn't centered around damaged received such as: Polearm units sitting in a pocket position or inner flank with one enemy in contact with them drawing both aggro via AI baiting and damage received from the frontline unit, or a unit such as the Banner Carrier that wields Indomitable, moderately excess HP and the ability to carry to switch to a shield), and the niche enemy solutions of a distance archer utilizing Bow Mastery and Bullseye to snipe high priority targets to lower the risk of a possible negative outcome of a handful of niche encounters (Necromancer with 2h Fallen Heroes (primarily 2h flails), Hexe encounters (with allies that require heavy damage output), Goblin Shamans, Gunners/Engineers (mortars), most distant priority targets, Orc Berserkers with flails, and turn 1 damage, as well as to a lesser extent baiting AI to advance towards you, or at your ranged unit).

A Brief Conclusion: With that said, this company has a guaranteed strength against 99.9% of all encounters you will face in Battle Brothers, without relying on too incredibly refined hires or units wearing famed armour/weapons and without needing to excel a reasonable playthrough length to construct with excessive veteran leveling. Each Build section will have a deeper dive into their unit role and values, as well as the "Perks in Review" sections giving greater incite on the perk evaluations made in this guide. It is important to remember the parameters, perspectives, and acknowledgements made to understand the reasonings and rules in which this guide follows, and that Battle Brothers is a game worth exploring and developing your own playstyles to best fit how you enjoy the game.
♦ Perspective on Leveling Stats: Further Elaboration: Part 1 ♦ [Under Construction]
With the expanding diversity in perspectives with how to build & level units in Battle Brothers, there is more of a need to elaborate on this guides perspective, when it comes to general stat build philosophy & placing practical value on stat categories.
This is keeping in mind this guides goals & perspective involving providing a company composition that is built to reliably take down end-game content with significantly lower risks than other competitive company compositions with reasonable expectations on campaign length, unit refinement, efficient usage of strategy, and the capability to handle any encounter in Battle Brothers without high risks of losing a unit.

The Leveling Value of Stats, Categorized: Key:
Keeping in mind that this is a evaluation on the value of each stat for leveling and the limited number of level ups, stat ranges, & the three category limitation rules you will be restricted to while building a unit.
Additionally, an extra term defining the practical limits to stats requiring careful distribution will be added as needed to help identify whether a stat benefits from leveling as much as possible, or will be satisfied with specific breakpoints.

  • Primary Stats: Core stats that are the main means beating opponents and keeping your units alive in combat with their specified roles. These should be valued high in terms of leveling.
  • Secondary Stats: Back up stats that ensure that the core stats can achieve their goal in encounters that require exertion of your unit. These should be carefully portioned to meet the needs of the unit and the potential exertion of the stat based on its intended role.
  • Niche Stats: Stats that don't require leveling, but can moderately benefit from being at certain thresholds. Some builds make use of amplifying these stats, but should be disregarded when distributing stats.
  • Unrewarding Stats: There is currently no benefit to leveling or filtering hires for these stats, due to the current state of the game's implementation of these stats.

  • Limited Value: These stats cease to gain a practical or desirable value after a set value on ideal builds. Either that, or they are not valuable to level beyond the base amount at all.
  • Limitless Value: These stats, under practical limitations, don't stop gaining value upon leveling on the ideal builds that utilize them, despite soft caps.
Further Elaborations:
  • Melee Skill: [Primary Stat; Limitless Value]:

  • Ranged Skill: [Primary Stat; Limitless Value]:

  • Melee Defence: [Primary Stat; Limitless Value]:

  • Fatigue: [Secondary Stat; Limitless Value]:
♢ Perspective on Leveling Stats: Further Elaboration: Part 2 ♢ [Under Construction]
  • Hit Points: [Secondary Stat; Limited/Limitless Value]:
    At it's core, hit points allows for the extended value in survivability when combined with armour and/or perks. In the case of hit points used as a primary means to extend survivability, it does next to nothing due to how much damage an enemies attack can do to how much we can level hit points.
    That said, you can use Nimble, and your value becomes limitless, meaning the more hit points, the more survivable your unit is. For leveling HP with Nimble on an effective hire, you do not want to compromise on HP rolls, due to the large disparity in the amount of hits you can take, as the breakpoints between fatal hits is much smaller than it is for non-Nimble units due to the damage reduction. Realistically, the Nimble HP desired range is 130+ HP after Colossus at level 11, which is close to 105+ HP for a unit to level (pre-Colossus, reasonably achievable).
    That stated, hit points has a lifespan in tandem with armour, which is made viable with Battle Forged builds, and is not realistically limitless in value as it largely revolves around mathematical thresholds that are difficult to reach the next tier of due to the amount of HP leveling a unit is capable of, and how much armour you have remaining with each sequential hit. While it isn't precisely mapped for all durability levels of Battle Forged (including famed armours), the mathematical breakpoints for high damage headshots from common end-game enemies such as barbarian chosen with maces/hammers suggest that you are very likely to survive two headshots with a great certainty at around 90 hit points. Exactly how much HP/armour (Battle Forged percentage too), Weapon skill damages vary, how much damage you take before hand, and injuries can effect whether or not that chance is slightly higher or lower for this kind of attack. To reach this level of HP, it depends greatly on the hire you pick, as some backgrounds/hires can achieve this level of HP with the low investment cost of Colossus, with maybe 1 level up/or a few veteran level ups into HP, while other hires may take several level ups to get to this target HP. Whether or not it becomes worthwhile to level to this point, really depends on the base HP of the hire (also the stage of the game), and needing to avoid taking away from the stats that come as a higher priority, which in most cases are to maximize Dps.
    It can be efficient to take Steel Brow, or Nine Lives as an added means to survivability if it fits into your specific build to help protect against the hyper niche headshot situations, but Colossus paired with at least 300/320 durability armour & Additional Fur Padding as an attachment is the late-game standard, and will be sufficient protection against receiving damage & dealing with armour penetration. Remembering, that once your armour is depleted, the remaining hit points you have is in practicality, non-existent beyond taking that final blow. There are many low to medium damage attacks that will deal damage to your HP while you armour is still durable, and having HP for that will matter for extending your durability to make full use of your armour. As stated before with certain HP thresholds, attempting to reach the next threshold against 1 shot or 2 shot attacks (attempting to survive 1 hit more beyond these), usually will not be practically worthwhile, due to the heavy investment with leveling & over perks needed for defence. Whether it is hitting 100 HP or aiming for 125+ HP for Battle Forged, as a practical number for builds involved in heavy armour, these HP values will not break any actual thresholds without also specializing in Steel Brow on top of leveling + Colossus. And even then, it does come down to overspecializing in the uber niche scenario where a rare opponent is even encountered, is unhindered, rolls higher on the damage roll of the weapon (sometimes more than once needed), overcomes your units high melee defence, very large chance to hit Additional Fur Padding body instead of the head, Nimble Tanks standing in the path to meet them, the Daze debuff from 2h maces/throwing pots, Disarms from whips, even the rare usage of a stun, throwing nets to distract or halt movement, injuring or focusing down said opponent before they can act, Indomitable being utilized, and killing all their allies and causing a loss in morale.
    There will always be reasonable risks in Battle Brothers that will be made that can cause the loss of a unit, but it does come down to the practical measures to protect your unit from a reasonable amount of said risk, in order to create a reliable build that can function both defensively & offensively in the best, most optimized, and practical way.

  • Resolve: [Niche Stat; Limited Value]:

  • Initiative: [Niche Stat; Limited Value]:

  • Ranged Defence: [Unrewarding Stat; Limited Value]:
♦ Frontliner Build: Cleaver Duelist ♦
The Cleaver Duelist:
(Damage Orientated & Tactically Flexible; Low Contact Frontliner)

Perk Order:
Student → Colossus → Pathfinder → Cleaver Mastery → Underdog → Battle Forged → Duelist → Berserk → Executioner → Killing Frenzy → Recover

Brief Perk Reasoning: See more in the relevant perk sections.
  • Student: The reason why you pick Student for the Cleaver Duelist build is to allow you to obtain high tiered defensive and offensive perks at a faster rate by utilizing the bonus experience gain. You will not need Student to skip past any perks, as you will come back to obtain Recover.
  • Colossus: With the perk Colossus you will be able to gain the necessary hit points to avoid a vast majority of all one shot armour penetration attacks with only a minor investment into hit points (see Perks section). Also, the extra hit points will allow you to be more comfortable against high armour penetration damage enemies & hit point targeted attacks.
  • Pathfinder: With Pathfinder you will save AP when traversing tough terrain/elevation in a battle, as well as greatly saving fatigue for repositioning, retreating, and movement.
  • Cleaver Mastery: With Cleaver Mastery you will gain additional bleed damage on your main cleaver weapon, a strong reduced fatigue cost from using weapon abilities, and the accuracy penalty to whip disarms lowered.
  • Underdog: The reason why you will want Underdog on your Duelist user is because melee defence is still an important stat for any frontline fighter, and the ability to get full value out of your melee defence is important, even if your only in contact with 2 enemies. That said, late-game battles will often include your units being surrounded by two or more enemies often.
  • Battle Forged: By pickling Battle Forged you will gain a healthy 30% to 40% damage reduction while wearing heavy armour. While it does deteriorate in value as you take damage, the reduction is very noticeable against all incoming types of damage, as well as the defensive value of Battle Forged exceeding the value of a Nimble user.
  • Duelist: With Duelist you will be gaining an additional 25% to armour penetration damage with a one-handed weapon, which is an exceptional form of damage output when partnered with a military cleaver/orc head chopper's high damage output. This form of damage output is preferred for your main frontline force, due to the ability to be able to use Indomitable, as well as perform exceptional damage output.
  • Berserk: The perk Berserk synergizes well with builds aiming to maximize damage output, by allowing an additional attack or action upon a kill. With a 4 AP weapon in hand, you will also be able to secure a free turn to use Indomitable or use Recover to stay on top of your fatigue drain.
  • Executioner: By picking the perk Executioner you will be amplifying your damage output by a small amount on a good portion of your strikes, and increase your hits to kill ratio on valuable late-game foes, making the difference between having to take an additional hit or not. Additionally, some members of this team composition take advantage of Crippling Strikes to help set up Executioner strikes.
  • Killing Frenzy: The reason why Killing Frenzy is a strong perk for a Duelist is because it will allow you to deal more damage, which is valuable for a damage dealing role. It shows the most value when you are fighting mass numbers of units in the late-game and beyond.
  • Recover: By picking Recover you will be allowing your unit to use fatigue intensive perks and abilities, while also maintaining a working fatigue for the rest of the fight. Recover also synergizes with Berserk procs, as it will allow you to use Recover, while also providing damage output.

Main Stat Priority: Melee Skill (95+) → Melee Defence (35+) → Fatigue (145+, Before Gear; 65+, After Gear) → 0 or 2 max rolls into Hit Points (85+, Colossus Included)

Equipment: Decorated Full Helm (320D), Coat of Plates (320D), Additional Fur Padding attachment (-33% penetration damage taken), Orc Cleaver/Famed Orc Cleaver, Battle Whip/Rondel Dagger, Reinforced Throwing Net/Smoke Pot/Flash Pot, and Hexen Trophy (+6 Resolve). All weapons and armour will become famed equivalents.

Brief Summary: With the Cleaver Duelist you will want to focus on dealing exceptionally high single target damage, while having good damage mitigation, and strong tactical flexibility in combat with an advantage with disarming exceptionally dangerous foes. The cleaver is the primary weapon of choice due to the high base damage of a clever use of cleaver skills combined with Duelist, amplified damage of easily obtained named orc cleavers, or, if efficient for a certain encounter, a two-handed cleaver. Your Cleaver Duelists will serve as all around damage output specialists that will also allow for tactical flexibility if needed.
The Cleaver Duelist will take 2 slots in your active company (interchangeable with other damage dealers depending on the fight, can choose to build more Cleaver Duelists).
♢ Cleaver Duelist: Further Elaboration ♢
Composition Role:
  • Provided functions & How to use:
  • Strong Against: All general foes, End-game unarmoured & armoured opponents: Ancient Undead, Barbarian Chosen, Orc Warriors, Late-game assortment.
  • Weaker Against: The hyper minority of 2h weapon high damage, high rolled, headshot attacks or repeated said attacks to the head and/or body (everybody is weak to this tho without over speccing in defence (100+ HP/Steel Brow & Colossus) at the cost of combat efficiency, and this threat is typically disabled by utility roles, but if you play long enough it can eventually happen). The utility of the Cleaver Mastery, battle whip disarms are a more reliable mitigating factor for these niche foes.
  • Why the Cleaver Duelist in this composition: The cleaver duelist allows for extremely high single target Dps targeted at the HP of your opponent (Armour Penetration for faster hits to kill), which multiple basic strikes if paired with tactical decapitates lead to extremely fast and efficient takedowns of late-game foes. On top of the orc cleaver being one of the kings of single target damage output, there is the benefit of being able to disarm an opponent with much less of a hit chance penalty, using a battle whip in the rare situations it is more efficient to do so. The cleaver duelist does desire less contact than an AoE frontliner, but by no means are they less effective at taking a hit than most other frontliners. That said, the high armour penetration, being a leader in turns/hits to kill against nearly all late-game foes, the synergy between Berserk and Recover, and the excellent utility options of the battle whip secure the cleaver duelist a role in a late-game composition.
Deeper Stat Explanations:
  • Melee Skill: 95+: Primary Stat: Overcoming the -10% weapon mastery disarm penalty.
  • Melee Defence: 35+: Primary Stat: Seeks a contact of 2 enemies, and can disarm. No access to Reach Advantage to cover for a lower melee defence.
  • Fatigue: 145+ Before Gear, 65+ After Gear: Primary Stat: Orc weapon, situational secondary skill, and situational disarm.
  • Hit Points: 85+ with Colossus: No Leveling or up to 2 Max Rolls: Narrowly avoiding the uber niche double headshot chosen strikes, damage prevention desired (disarm, allies).
  • Resolve: 50+: No Leveling: Arena Likely Desired: Standard prevention of negative morale checks/gains.
  • Other Stats: Does not make use of Ranged Skill, or gain much from Initiative or Ranged Defence to merit leveling.
Ease of Hire:
  • Does this require a special hire?: Yes, this hire desires a build that is capable of maintaining the high fatigue costs of the orc cleaver, situational instances of using the decapitate skill, and have the ability to situationally disarm a dangerous foe. In Addition, you will require a unit that has solid base hit points (65+ then Colossus), repairable base resolve (34+ then bonuses), melee skill that can be 95+ at level 11, which can be the average Hedge Knight or triple melee skill starred peasants, and a standard mid-potential for melee defence.
  • Is it worth using on Mid-Tier hires?: No, you should probably use a less stat hungry frontliner build, such as a Fodder unit to be replaced at your soonest convenience.
Pros & Cons of the Alternatives:
  • Nimble Variant: [Pros]: Earlier to be strong in the build with 15-25 more fatigue, alternative stat priorities for different hires (HP, MS, MD) and can be built semi-casually, and gains the strengths of Nimble's damage reduction type (see perk section).
    [Cons]: Battle Forged gear can close the gap on fatigue differences with famed gear, while having a defensive lead against high Nimble with standard efficient end-game BF gear (300/320 + AFP) with no inefficient stat splits, and is not vulnerable to the weaknesses of Nimble (see perk section).
  • Two-Handed Cleaver: [Pros]: Can be built on lower tier hires efficiently with close to the Dps output of an orc cleaver Duelist with slightly less investment in fatigue/melee defence (Reach Advantage)/extra perk point that can be used on stats/survivability/utility (not efficient with Executioner enough to be worth it), and stronger Dps on non-armoured targets than a Duelist.
    [Cons]: Less armour penetration than a Cleaver Duelist, which can mean less resolve checks, bleed procs, slower takedown with hit points, and not as great on an armour penetration composition, can use a two-handed cleaver on a Cleaver Duelist to gain the Dps benefit against non-armoured targets without special investment, minding that orc cleaver Duelists are still higher Dps output leaders for single target.
♦ Frontliner Build: Hammer AoE Two-Hander ♦
The Hammer AoE Two-Hander:
(Damage Orientated; Complimentary Frontliner)

Perk Order:
Student → Colossus → Pathfinder → Hammer Mastery → Underdog → Battle Forged → Berserk → Killing Frenzy → Reach Advantage → Executioner/Steel Brow → Recover

Brief Perk Reasoning: See more in the relevant perk sections.
  • Student: The reason why you pick Student for the AoE Two-Hander build is to allow you to obtain high tiered defensive and offensive perks at a faster rate by utilizing the bonus experience gain. You will not need Student to skip past any perks, as you will come back to obtain Recover.
  • Colossus: With the perk Colossus you will be able to gain the necessary hit points to avoid a vast majority of all one shot armour penetration attacks with only a minor investment into hit points (see Stat Priority below). This is especially needed for surviving the duration of your armour & rare consecutive headshots.
  • Pathfinder: With Pathfinder you will save AP when traversing tough terrain/elevation in a battle, as well as greatly saving fatigue for repositioning, retreating, and movement. This is particularly valuable with 6 AP two-handed strikes.
  • Hammer Mastery: As a two-handed AoE weapon user, you will greatly benefit from the fatigue reduction when performing AoE strikes, in which you will often chain with Berserk procs. Additionally, your mastery will provide a minor hit chance bonus for your AoE strike, as a minor bonus.
  • Underdog: The purpose of Underdog will be to protect your AoE Two-Hander's melee defence, as you will often desire to be surrounded by 3 or more enemies to make the most out of your AoE cleave, without being severely punished.
  • Battle Forged: By picking Battle Forged you will gain a healthy 30% to 40% damage reduction while wearing heavy armour. While it does deteriorate in value as you take damage, the reduction is very noticeable against all incoming types of damage, as well as the defensive value of Battle Forged exceeding the value of a Nimble user.
  • Berserk: The perk Berserk synergizes well with builds aiming to maximize damage output, by allowing an additional attack or action upon a kill.
  • Killing Frenzy: The reason why Killing Frenzy is a strong perk on this build is because it will allow you to deal more damage, which is valuable for a damage dealing role. It shows the most value when you are fighting mass numbers of units in the late-game and beyond.
  • Reach Advantage: With Reach Advantage, you will be allowed to maximize your damage output with AoE strikes, being partly at the center of 3 or more enemies aggro, while also gaining up to 25 melee defence, with 10 to 15 melee defence being the average gains.
  • Executioner: By picking the perk Executioner you will be amplifying your damage output by a valuable amount on a good portion of your strikes, and often increase your hits to kill ratio on valuable late-game foes, making the difference between having to take an additional hit or not to down an opponent.
    Noting: It is almost just as valuable to go Steel Brow instead, to minimize ultra rare 1 to 2 shot headshot threats from ultra rare instances, as well as potentially reducing head injuries & seeking to reduce damage received overall, since both perks strive for better survivability.
    You may seek to place Steel Brow AoE units more on the outer flanks, and Executioner units on the inner frontline AoE pockets in a formation.
  • Recovery: By picking the perk Recover, you will be able to freely utilize your fatigue intensive abilities, and extra attacks from Berserk, while also maintaining a working fatigue for the rest of the fight. In any meaningful battle against large amounts of late-game foes. you will greatly benefit from being able to maintain the ability to use your fatigue intensive abilities.

Main Stat Priority: Melee Skill (95+) → Melee Defence (30+) → Fatigue (150+, Before Gear; 68+, After Gear) → 0 or 2 max rolls into Hit Points (90+, Colossus Included)

Equipment: Decorated Full Helm (320D), Coat of Plates (320D), Additional Fur Padding attachment (-33% penetration damage taken), Two-handed Hammer, Jagged Pike/Reinforced Throwing Net/Smoke Pot/Flash Pot, Battle Whip/Rondel Dagger, and Hexen Trophy (+6 Resolve). All weapons and armour will become famed equivalents.

Summary: The goal of the AoE Two-Hander is to deal very high AoE damage, benefit from high stacks of Reach Advantage, while occupying several opponents. Also being able to situationally take advantage of a whip disarm, jagged pike for budget two tile reach or a throwable consumable in battle.
The AoE Two-Hander will take 3-4 slots in your active company (somewhat interchangeable with other damage dealers, alternate weapons or tanks depending on the fight).
♢ Hammer AoE Two-Hander: Further Elaboration ♢
Composition Role:
  • Provided functions & How to use:
  • Strong Against: All general foes, End-game unarmoured & armoured opponents: Ancient Undead, Barbarian Chosen, Orc Warriors, Late-game assortment.
  • Weak Against: The hyper minority of 2h weapon high damage, high rolled, headshot attacks or repeated said attacks to the head and/or body (everybody is weak to this tho without over speccing in defence (100+ HP/Steel Brow & Colossus) at the cost of combat efficiency, and this threat is typically satisfactorily minimized by utility roles or choosing Steel Brow over Executioner, but if you play long enough it can eventually happen).
  • Why the Two-Handed Hammer in this composition? The two-handed hammer is the highest practical Dps out of all the means to kill in Battle Brothers. The three tile Shatter skill provides reliable top tier takedown power of multiple end-game foes over the course of a few turns, while most other builds will require two to three turns to take down just one opponent. It is a stat intensive position that does hold it's own with Reach Advantage stacks, but it does desire utility support (daze, stacking AoE and disablers) against certain difficult/rare foes. That said, one shouldn't ignore a weapon build with a great balance of survivability and top practical Dps (by a solid hits to kill margin) that helps any damage orientated composition in defeating dangerous opponents.
Deeper Stat Explanations:
  • Melee SKill: 95+: Primary Stat: A slight -5% penalty from using AoE strikes with weapon mastery.
  • Melee Defence: 30+: Primary Stat: Seeks contact with 3 enemies, aided greatly by Reach Advantage, and access to disarm & allies.
  • Fatigue: 150+ Before Gear, 68+ After Gear: Primary Stat: AoE fatigue heavy skills, and taking advantage of Berserk procs.
  • Hit Points: 90+ with Colossus: 0 or up to 2 Max Rolls: Somewhat comfortably avoiding the uber niche double headshot chosen strikes, desires comfortable positioning.
  • Resolve: 50+: No Leveling: Arena Likely Desired: Standard prevention of negative morale checks/gains.
  • Other Stats: Does not make use of Ranged Skill, or gain much from Initiative or Ranged Defence to merit leveling.
Ease of Hire:
  • Does this require a special hire?: Yes, this build does desire a build that can handle the high fatigue/melee skill demands of AoE strikes, and the ability to reliably disarm opponents in rare situations. In addition, you will require a unit that has decent base hit points (65+), at least repairable resolve (34+ before bonuses), which can be the average Hedge Knight or multi-starred peasants, and a standard mid-potential for melee defence.
  • Is it worth using on Mid-Tier hires?: Somewhat, as despite some of the secondary stats like fatigue and hit points being intensive, you can use an AoE two-handed hammer build with less stats for okay results that still competes really well against single target builds in Dmg output and defence. That said, the trade off would be less hit point protection with the compromise use of Nine Lives instead of Colossus, or to trade Executioner for Brawny for a subpar usage of the build. This way of using the AoE two-handed hammer build would mostly be for making temporary use of a unit until you have a replacement that isn't subjected to higher risks involving running out of fatigue too early, or not having an ideal one shot protection setup.
Pros & Cons of the Alternatives:
  • Concept of the application of AoE vs. Pure Single Target: [Pros]: With using the two-handed hammer AoE you are focusing your damage on 3 units at once, which sets up multiple opponents up for being damaged/finished off by supporting Dps units (either backliner, or frontliners). That way your options for taking down a specific opponent is strong among multiple candidates, as well as being able to Dps down all 3 opponents at once if desired (notably applying up to 3 resolve checks per turn, or 6 with Berserk procced, as well as stacking AoE from other units in a composition aids faster enemy defeat). During this you can gain the beneficial standard gains of 10-20 (full range 0-25) melee defence from Reach Advantage. When comparing a two-handed hammer's three tile AoE Dps to the single target Dps of a mansplitter (or the two-handed flanged mace/qatal dagger single unit combo) against orc warriors or barbarian chosen, its math favors the AoE in defeating 3 opponents in 3-4 turns (faster hits to kill after a kill is made with perk considrations), while the others take 2-3 turns to kill 1 opponent (resulting in roughly 5-6 turns to kill 3 opponents with considerations for Killing Frenzy and Berserk after each kill) (both builds built with maximum practical Dps perks included, since both benefit from Executioner noticeably). There are of course moments where single target is desired, and the two-handed hammer does not fail in that department, since noteworthy common end-game foes cap out at being 2 shot for chosen, or 3 shot for orcs, and neither weapons go beyond that or one another noticeably. Additionally, you are occupying multiple opponents this way, with added means to survivability.
    [Cons]: With Single Target weapons, you have the daze debuff, which is incredible for reducing the opponents damage output, while also dishing out strong damage. It is also slightly more reliable to take out a prioritized singular opponents without as much assistance, such as focusing a chosen putting one of your injured units at risk of unlucky headshots. It also is a greater advantage to daze high hit point beasts rather than attempting to AoE repeatedly said opponents in most cases. Additionally, AoE costs a heavy toll on fatigue (requiring a Recover turn, if the fight demands it, after 3-5 swings), and has higher unit expectations for hires with HP/Fat/MS. That said, the single target of the two-handed flanged mace & qatal dagger combo is exceptionally high in Dps, making it on par in its own way, and not "obsolete" with the late-game min-maxing perspective.
♦ Frontliner Build: Debuff Two-Hander ♦
The Debuff Two-Hander:
(Damage & Debuff Orientated; Utility Low Contact Frontliner)

Perk Order:
Student → Colossus → Quick Hands → Dagger Mastery → Pathfinder → Battle Forged → Berserk → Duelist → Killing Frenzy → Executioner → Underdog

Brief Perk Reasoning: See more in the relevant perk sections.
  • Student: The reason why you pick Student for the Debuff Two-Hander build is to allow you to obtain high tiered defensive and offensive perks at a faster rate by utilizing the bonus experience gain. You will not need Student to skip past any perks, as a good number of your perks are within the first four perk tiers.
  • Colossus: With the perk Colossus you will be able to gain the necessary hit points to avoid a vast majority of all one shot armour penetration attacks with only a minor investment into hit points (see Stat Priority below). This is especially needed for surviving the duration of your armour, rare consecutive headshots, and noting that daze with not always be applied on all high armour penetration damage enemies at the right times.
  • Quick Hands: By using Quick Hands you will be able to situationally attack using a polearm or follow up your 6 AP dazing strikes with a 3 AP qatal dagger deathblow strike. Quick Hands will also allow you to swap back to a 6 AP weapon when your next turn starts.
  • Dagger Mastery: With Dagger Mastery you will be able to follow up your dazing strikes with Quick Hands into a 3 AP qatal dagger deathblow strike to finish off an opponent or deal additional damage. This paired with additional damage perks, you will be able to maximize your impacts in a single turn.
  • Pathfinder: With Pathfinder you will save AP when traversing tough terrain/elevation in a battle, as well as greatly save fatigue for repositioning, retreating, and movement. This is particularly valuable with saving AP on your main weapon, polearm, and sidearm.
  • Battle Forged: By picking Battle Forged you will gain a healthy 30% to 40% damage reduction while wearing heavy armour. While it does deteriorate in value as you take damage, the reduction is very noticable against all incoming types of damage, as well as the defensive values of Battle Forged exceeding the value of a Nimble user.
  • Berserk: The perk synergizes well with builds aiming to maximize damage output, by allowing an additional attack or actions upon a kill.
  • Duelist: With Duelist you will be gaining an additional 25% to armour penetration damage with a one-handed weapon, which is an exceptional form of damage output when paired with the qatal dagger. This synergizes well with your dagger strikes as your two-handed flanged mace will deal a good amount of armour penetration damage.
  • Killing Frenzy: The reason why Killing Frenzy is a strong perk on this build is because it will allow you to deal more damage, which is valuable for a damage dealing role. It shows the most value when you are fighting mass numbers of units in the late-game and beyond.
  • Executioner: By picking the perk Executioner you will be amplifying your damage output by a valuable amount on a good portion of your strikes, and increase your hits to kill ratio on valuable late-game foes, making the difference between having to take an additional hit or not. Additionally, some members of this team composition take advantage of Crippling Strikes to help set up Executioner strikes.
  • Underdog: Passing on the opportunity to prevent 5 to 15 melee defence in loses is too detrimental of a loss for when against late-game foes. When being in contact with two or more late-game foes, maximizing the potential of not being hit goes a long way in terms of survivability, even if contact is typically more limited more often than a flank unit.

Main Stat Priority: Melee Skill (95+) → Melee Defence (30+) → Fatigue (150+, Before Gear; 65+, After Gear) → 0 or 2 max rolls into Hit Points (85+, Colossus Included)

Equipment: Decorated Full Helm (320D), Coat of Plates (320D), Additional Fur Padding attachment (-33% penetration damage taken), Two-handed Flanged Mace, Billhook/Polehammer/Jagged Pike, Qatal Dagger, and Hexen Trophy (+6 Resolve). All weapons and armour will become famed equivalents.

Summary: The goal of the Debuff Two-Hander is to deal high a burst of single target damage in high risk fights, while also dazing your opponents to be able to use a qatal dagger deathblow strike with one's spare AP and to increase the company’s survivability in high damage encounters from utilizing the daze penalty. Additionally, you have the tactical flexibility for situational usage of a polearm to inflict two tile damage if it is a more efficient move. You will be without the guaranteed protection of Indomitable, so your survivability will be largely dependent on your supporting units, dazing & positioning.
The Debuff Two-Hander will take 3-5 slots in your active company (interchangeable with other damage dealers or tanks depending on the fight).
♢ Debuff Two-Hander: Further Elaboration ♢
Composition Role:
  • Provided function & How to use:
  • Strong Against:
  • Weak Against:
  • Why the Two-Handed Flanged Mace in this composition?:
Deeper Stat Explanations:
  • Melee Skill: 95+: Primary Stat: If you are going to go single target as your primary damage, you will want decent melee skill, otherwise standard end-game melee skill.
  • Melee Defence: 30+: Primary Stat: Seeks a contact of 2 to 3 enemies, and will debuff with daze for greatly reducing damage received, and has support from allies. No access to Reach Advantage for massive melee defence gains, but the single target killing power & ability to daze is strong enough to not need much more than average.
  • Fatigue: 150+ Before Gear, 65+ After Gear: Primary Stat: Single target attacks don't burn through much fatigue, even occasional with Berserk procs. The 3 AP deathblow strikes from the Qatal dagger you will want the extra fatigue to take advantage of the 6 AP to 3 AP strike combos.
  • Hit Points: 85+ with Colossus: No Leveling or up to 2 Max Rolls: Sufficiently avoiding the uber niche double headshot chosen strikes, with daze lowering the damage of heavy armour penetration received.
  • Resolve: 50+: No Leveling: Arena Likely Desired: Standard prevention of negative morale checks/gains.
  • Other Stats: Does not make use of Ranged Skill, or gain much from Initiative or Ranged Defence to merit leveling.
Ease of Hire:
  • Does this require a special hire?: Yes, this build desires a background with high base fatigue (105+ starting with stars) and the potential for end-game melee skill (95+ at level 11), which is achievable with the average Hedge Knight or triple melee skill starred peasants, with basic considerations for hit points (60 to 70+ before Colossus), melee defence (good rolls or stars), and resolve (capable of getting 45-50+ after arena).
  • Is it worth using on Mid-Tier hires? Somewhat, as while it is relatively stat hungry in fatigue and somewhat in melee skill as well, you can make efficient usage of this build or a build that is less effective to a similar degree in value. You would just be missing out on extra Dps with frequent deathblow strikes with the spare AP, and potentially be less able to fully utilize Berserk for added, and constant Dps. But say you had 15 less fatigue or 85 melee skill, you will still be able to provide the much desired daze dubuffs, while also dishing out heavy Dps, with the worst state being that you are in fatigue neutral mode, which doesn't compete in Dps with a min-maxed AoE two-hander in the long run, but even when used sub optimally will be more valuable than a good portion of late-game builds.
Pros & Cons of the Alternatives:
  • Dedicated Dagger Duelist + Dedicated Mace user vs Combo: [Pros]: With a dedicated qatal dagger Duelist, the damage output of the singular unit would be exceptionally high, you would be able to take advantage of Fearsome due to a slightly freer perk requirement, which could result in faster enemy routes, a slight bonus to fatigue due to the qatal dagger being weightless, as well as throwables/nets being more available due to a less cluttered unit inventory/Duelist offhand. The benefits of a dedicated one-handed mace user is that some late-game foes can be stunned, and it allows for the use of a shield for higher melee defence, since stunning doesn't deal any meaningful amount of Dps, and more utility/flexibility in durability perks. As for a two-handed mace user without the combo, it is typically not used for fatigue and exchanges Dmg output for a small boost to HP for mildly better resistance against rare armour penetration, and the potential for more room for utility/durability perks.
    [Cons]: The combo of two-handed mace + qatal dagger allows for a faster takedown of foes due to more efficient Dps outputs/AP/fatigue usage than both roles combined when compared to a separation of the roles when talking about two active Dps units opposed to a Dps unit + a set up unit (especially when talking about one-handed mace set up), maximizing the potential of both builds in one unit, which allows for you to utilize other units/roles or additional combo users in your team composition to increase your team strength even more (summarized as: combining the two roles, doesn't lessen the value of the role survivability by a meaningful amount or have any meaningful shortcomings, thus allowing for more room in your company roster due to the roles being combined into one unit, instead of two. This also allows for a much higher Dps output, because you will have two full powered Dps units, instead of one qatal user (Dps) and a set up (much less Dps)). It is more dangerous to separate the roles due to a lack of an efficient Dps company roster when taking on many dangerous opponents, and you will be more prone to running the risk of more enemy turns, despite the efforts to daze/stun (not to say it isn't strong/viable).
♦ Frontliner Build: Nimble Tank ♦
The Nimble Tank:
(Defence High Contact Orientated & Aggro Holder; Supporting Utility)

Perk Order:
Student → Colossus → Rotate → Shield Expert → Underdog → Nimble → Indomitable → Recover → Dodge → Steel Brow → Gifted

Brief Perk Reasoning: See more in the relevant perk sections.
  • Student: Much like the other builds, picking up Student allows for your unit to obtain key defensive perks at a quicker rate; However, you will not need this perk to skip past any perk tiers, as this build is heavily reliant on perk tiers 1-3.
  • Colossus: With the key defensive perk of this build being Nimble, you will need Colossus for increasing your HP as high as you can get it, in which should be at least 125+ to ensure that your tank can actually tank. Additionally, picking Colossus as your second perk pick up allows you to get a more effective Nimble survivability as soon as you are able to use Nimble down the line.
  • Rotate: As a tank, your role is to provide damage absorption support during a fight against dangerous opponents, while also using Rotate to relieve units from unfavorable situations. Additionally, Rotate can be used to better position your nimble tank into the zone of control of your opponents to dodge or tank your opponent's attacks.
  • Shield Expert: With the nimble tank build you will be utilizing the benefits of high melee defence shields in addition to your already high melee defence. With the priority being to dodge your opponent's blows, obtaining as much defensive capabilities as possible is key, which is why Shield Expert is picked up for the additional passive & active melee defence. Additionally, a side reason why Shield Expert is picked is so that you can sustain more shield damage and the additional hit chance to knock back your opponent.
  • Underdog: With the purpose of the nimble tank to lock enemies in your zone of control and absorb the attacks of your opponents, it helps if when surrounded your unit doesn't suffer large debuffs to their melee defence. While the nimble tank is beneficial the most for fights against schrats & unholds, you will still use them in fights against groups of heavy hitting enemies in which the perk Underdog provides its full value.
  • Nimble: By going Nimble on your tank you will be able to defend the majority of the incoming armour penetration damage that could cause an injury or threaten the survivability of your Battle Forged units. While the existence of Nimble units isn't completely mandatory for survival of your frontline units, it does help in reducing incoming damage enough to merit using nimble tanks against certain foes such as: schrats, unholds, barbarian chosen, lindwurms, and other heavy armour penetration damage dealing attacks. Additionally, going Nimble allows you to have more fatigue for using Indomitable, or other actions, since both BF & Nimble tanks level the same stats (HP, Fat, MD). Otherwise, it is best to avoid using your nimble tanks in every fight as they will cripple your damage output in fights where killing your opponent faster is more efficient (i.e. groups of large nachzehrers, or swathes of weak enemies).
  • Indomitable: With the obvious being that a nimble tank is purely defensive, you will most definitely want to pick Indomitable, as the 50% incoming damage reduction and immunities to being stunned or moved is incredibly strong for defending oneself. Indomitable will also serve as a fail safe for shieldwall when you have a decent chance of getting hit by an opponent.
  • Recover: The perk pick-up of Recover is needed because with a nimble tank you are going to need to spam your fatigue heavy perks and skills such as: Indomitable, Rotate and shieldwall. While you will not have the perk Berserk to synergize with Recover you will still need to use Recover to be able to continue to use your active abilities.
  • Dodge: With Dodge you will typically have around at the start of the fight +10 melee defence depending on your character's base initiative. The perk will deflate in value to as low as a +5 to melee defence when you are at an initiative low point due to low fatigue; However, the added melee defence is highly welcome and will give you a passive advantage in avoiding blows.
  • Steel Brow: The inclusion of Steel Brow will award your damage absorbing tank with slightly more passive effective HP to extend one's lifespan by during combat, especially when talking about high damage attacks. It of course only applies to head hits, but those are the most damaging hits for your Nimble tanks, especially when utilizing a low head durability armour setup.
  • Gifted: By picking Gifted on your Nimble tank, you will be gaining a +4 to hit points (Colossus increases the hit point gain to +5), which will increase your survivability with Nimble. You will also gain an added +3 to melee defence, which will help your dodge chance slightly, most notably in low percent to hit situations that aren't 5%. Additionally, you will gain an added +4 fatigue to aid in keeping your ability cycle going with a Nimble tank build. (see "Popular Meta Builds" section for optional runner up perks instead of Gifted)

Main Stat Priority: Melee Defence (35+, Before Dodge & Shield Bonus) → Hit Points (130+, Colossus Included) → Fatigue (150+, Before Gear; 110+, After Gear)→ 0 to 1 Max rolls into Resolve (55+, Arena Included)

Equipment: 1) Sallet Helm (120D) or Barbute Helmet (190D) + Assassin's Robe (120D, End-game Nimble), 2) Dark Cowl or Assassin's Head Wrap (40D) + Noble Mail (160D, Pre-End Game), 3) Assassin's Face Mask (140D) or Barbute Helmet (190D) + Noble Mail (160D, Anti-Goblin Poison), Southern Mail Shirt (110D Alternative until looted Assassin's Robe), Bone Platings (Absorbs First Body Hit, Pre & End-Game), Horn Plate (-10% Body Dmg & +30D, End-Game Option), Unhold Fur Cloak (-20% Ranged Dmg & +10D, on Poison Resist Armour) attachments, Fencing Sword/Fighting Spear/Qatal Dagger/Three-Headed Flail, 2 Living Tree Shield, Reinforced Throwing Net/Smoke Pot/Flash Pot, and Hexen Trophy Necklace (+6 Resolve). All weapons and armour will become famed equivalents.

Summary: The role of a tank is to mitigate damage received when facing off against specific late-game foes such as: large amounts of schrats, unholds, lindwurms, barbarian chosen, and other fights that would benefit from distracting several units or dangerous foes. Additionally, a nimble tank can be used as a supporting unit to rotate in or out your damage dealing units for better AP usage. While a nimble tank isn't without use during a standard fight, it is usually more efficient to swap them out for damage dealing units.
The nimble tank position should take up 2-3 of your reserve company, but will be situationally placed in one's active company, in exchange for any position when it is more efficient.
♢ Nimble Tank: Further Elaboration ♢
Composition Role:
  • Provided functions & How to use:
  • Strong Against:
  • Weak Against:
  • Why include a Nimble Tank in this composition:
Deeper Stat Explanations:
  • Melee Defence: 35+: Primary Stat: This is before shield & perk bonuses. Seeks contact with 3 or more enemies or high priority risk foes.
  • Hit Points: 130+ with Colossus: Primary Stat: A sufficient compromise number for an efficient, yet reasonable Nimble hit points amount that is competitive with Battle Forged against certain foes, without requiring a max rolled hit points background and talent star combination.
  • Fatigue: 150+ Before Gear, 110+ After Gear: Primary Stat: Spends all their fatigue on high cost actives & active perks such as: Indomitable for mitigation, shield wall for reaching high dodge percents, and Rotate for tactical flexibility.
  • Resolve: 55+: No Leveling or up to 1 Max Roll: Arena Likely Desired: Mildly above standard prevention of negative morale checks/gains. Not a Lone Wolf tank, not aimed at holding off monolith sized forces, but more focused on long term survivability and efficient usage.
  • Other Stats: Does not make use of Ranged Skill, nor Melee Skill, or gain value from leveling Ranged Defence. Initiative leveling is not required/efficient, but it does benefit Dodge if the base is high.
Ease of Hire:
  • Does this require a special hire?:
  • Yes (except much more easily than most builds), this build desires a build that is capable of building up high reserves of hit points (65+ before Colossus) for extended durability, talent starred and/or high base melee defence to effectively dodge late-game foes, acceptable base resolve (34-45+ then bonuses), and a large pool of fatigue obtained from your standard late-game backgrounds. You can obtain these stats from most decent backgrounds that you should be hiring from for other positions, which is mostly determined by their talent star placements & naturally high base stats.
  • Is it worth using on Mid-Tier hires? Yes, this build is stat hungry, but can function with primary stats largely underleveled, with the idea that you would be prioritizing your strategy around what stats you do have leveled. For example, if you have high base hit points and fatigue, you can spam Indomitable instead of sharing responsibility with shield wall, or the reverse for high melee defence. The idea of the Nimble Tank is to combine all the strengths of their obtained stats & ability options to create the value needed for replacing a Dps unit in your party composition with a unit that has almost exclusively defensive purposes.
Pros & Cons of the Alternatives:
  • For now see current alternatives explained in the "Popular Meta Builds Sections".
♦ Backliner Build: Heavy Polearm ♦
The Heavy Polearm:
(Complimentary Damage; Supporting Utility)

Perk Order:
Student → Pathfinder → Rotate → Polearm Mastery → Quick Hands → Battle Forged → Berserk → Killing Frenzy → Fearsome → Recover → Colossus

Brief Perk Reasoning: See more in the relevant perk sections.
  • Student: As a polearm user, obtaining a quicker stat and perk advantage is still very valuable when it comes to securing battle efficiency. You will not need Student to skip past any perks, as a majority of your perks are within the first four perk tiers.
  • Pathfinder: The reasoning behind picking Pathfinder for your high AP weapons save AP when traversing rough terrain during a battle, allowing you to keep the advantages of using your Polearm Mastery, as well as saving fatigue for when you need to traverse the battlefield.
  • Rotate: With your role as a polearm user being to support your frontliners by dealing damage from the back row, helping in absorbing damage to improve your overall company survivability, and using Rotate a polearm user can relieve a unit in an unfavorable situation, while still performing the other roles mentioned previously.
  • Polearm Mastery: By using Polearm Mastery on your polearm user, you will be saving a hefty amount of fatigue on your AoE reap attacks, as well as allow for a smoother usage of Berserk chained attacks. Arguably more importantly, you will be reducing the 6 AP strikes of a polearm to 5 AP, in which opens the possibilities of additional movement, and other actions.
  • Quick Hands: As a reap AoE damage dealer as your primary role, you will occasionally leave one enemy inconveniently alive, and you will want to swap to a two-handed mace for high single target damage to finish off that enemy and to spot tank foes. It could also be chained with Berserk AP refunds, and it could be used to save a small amount of working AP when using the situational battle whip disarm.
  • Battle Forged: The reasoning behind why Battle Forged is picked for this polearm build is because Battle Forged will provide you with the means to survive melee encounters, as well as provide assistance with surviving high damage ranged attacks. With a Nimble build you would be more susceptible to bleed and poison, as well as be less durable in a general sense to be a greater asset in damage absorption for the team. There are many efficient Nimble polearm builds, but this guide is about the top builds that form the strongest company, and with an optimal unit you can perform both top Dps and still be an incredible defensive asset.
  • Berserk: While the perk Berserk isn't a complete must have on every efficient damage build, this perk pick up is without question an extremely valuable investment to almost double your damage output by allowing you to chain your strikes, or reposition after a kill.
  • Killing Frenzy: With Killing Frenzy, you will be gaining a valuable damage increase that will allow you to deal more damage, inflict injuries easier, as well as set up or finish off opponents for your frontliners.
  • Fearsome: The perk Fearsome will allow for your AoE polearm user to inflict multiple improved morale checks against your opponents, in which decently affects the odds of lowering the morale level of high value opponents such as: orc warriors, and barbarian chosen. While only having an investment of 55 average base resolve (+10 from arena victories, 10+ extra from Banner Carrier), you will increase the odds of a morale check being successful by a noticeable margin.
  • Recover: By picking the perk Recover, you will be able to freely utilize your fatigue intensive abilities, and perks, while also maintaining a working fatigue for the rest of the fight. In any meaningful battle against large amounts of late-game foes, you will greatly benefit from being able to maintain the ability to use your fatigue intensive abilities and perks.
  • Colossus: With the perk Colossus you will be able to gain the necessary hit points to avoid a vast majority of all one shot armour penetration attacks with only a minor investment into hit points (see Stat Priority below). Although a polearm user may be seen less in melee contact range of foes, having Colossus will allow you to safely utilize Rotate to help take in damage for your allies.

Main Stat Priority: Melee Skill (95+) → Fatigue (150+, Before Gear; 63+, After Gear; 75+ LPR Attach.) → Melee Defence (25+ Any is a Luxury) → 1 to 3 Max Rolls into Hit Points (95+, Colossus Included)

Equipment: Decorated Full Helm (320D), Coat of Plates (320D), Additional Fur Padding (-33% penetration damage taken) attachment, Swordlance/Famed Warscythe, Battle Whip/Rondel Dagger, Two-handed Flanged Mace/Reinforced Throwing Net/Smoke Pot/Flash Pot, and Hexen Trophy (+6 Resolve). All weapons and armour will become famed equivalents.

Summary: The role of the Heavy Polearm is to provide added enemy defeat setup, flank or inner formation two-handed flanged mace Dps daze support, apply Fearsome and complimentary damage output using the AoE Reap skill, providing safe Disarm/Rotation support for units in need of repositioning, while also being a competent unit for absorbing aggro/damage for the gaps in the company. The optimal use of the swordlance is to provide strong damage output with two tile layered AoE for your frontline & two-handed hammer users, with added benefits such as Fearsome & general utility, while also generously using the two-handed flanged mace for targeted Dps/daze support.
The Heavy Polearm will take 2-3 slots in your active company, with a recommendation to carry an extra in reserve (interchangeable with other backliners or frontliners depending on the fight).
♢ Heavy Polearm: Further Elaboration ♢
Composition Role:
  • Provided functions & How to use:
  • Strong Against:
  • Weak Against:
  • Why a polearm user in this composition:
Deeper Stat Explanations:
  • Melee Skill: 95+: Primary Stat: Standard late-game desired melee skill for landing multiple hits per turn on late-game foes.
  • Fatigue: 150+ Before Gear, 63+ After Gear: Primary Stat: AoE fatigue heavy skills, taking advantage of Berserk procs, and pocketed two-handed flanged mace or optional utility with moderate fatigue costs.
  • Melee Defence: 25+: Shared Primary: Sharing Aggro away from your frontliners and protecting from flank overflow will aid in overall company damage distribution & survivability; Therefore, as much as is reasonably attainable is desired with shared leveling distribution with hit points.
  • Hit Points: 95+ with Colossus: 1 or up to 3 Max Rolls (as much as needed): Shared Primary: Sufficiently avoiding the uber niche double headshot chosen strikes or repeated armour penetration hits, still desires lower end contact with foes.
  • Resolve: 45+: No Leveling: Arena Likely Desired: Not in contact with more than 1 foe typically, so slightly sub-standard resolve is acceptable; Otherwise, a standard prevention of negative morale checks/gains. Benefitting Fearsome as well.
  • Other Stats: Does not make use of Ranged Skill, or gain much from Initiative or Ranged Defence to merit leveling.
Ease of Hire:
  • Does this require a special hire?: Yes (except more easily than most builds), this build desires a unit with high base fatigue for maximizing AoE reap attacks, slightly above average hit points (60+ before Colossus), and melee skill that can sufficiently reach late-game expectations for reliably hitting late-game foes with optimal weaponry. Otherwise, you can obtain these stats from most decent backgrounds that you should be hiring from for other positions.
  • Is it worth using on Mid-Tier hires?: Yes, this build can be insufficient in most stat categories and still provide a good amount of utility and Dps role support as a polearm unit, with the main sacrifice being the amount of fatigue for multiple AoE strikes and availability of fatigue for utility perks. That said, the stats that are lacking determine if you require a patchwork perk build or if you should build this unit as a Nimble variant.
Pros & Cons of the Alternatives:
  • Nimble vs Battle Forged: [Pros]:
    [Cons]:
  • Full Frontline with No Polearms vs Backline Supporting Dps: [Pros]:
    [Cons]:
♦ Backliner Build: Distance Archer ♦
The Distance Archer:
(Damage Orientated; High Distance Targeting)
Perk Order:

Student → Crippling Strikes → Quick hands → Bow Mastery → Throwing Mastery → Nimble → Berserk → Killing Frenzy → Duelist → Executioner → Bullseye

Brief Perk Reasoning: See more in the relevant perk sections.
  • Student: As a ranged skill user, obtaining a quicker stat and perk advantage is still very valuable when it comes to securing battle effectiveness. You will not need Student to skip past any perks, as you will have enough perks in the lower tiers to satisfy one's advancement.
  • Crippling Strikes: With heavy throwing javelins & a warbow, you will increase your odds of injuring barbarian chosen & orc warriors by a decent margin to merit the perk point. In conjunction with Executioner, your enemies will also die decently quicker for you and your allies than without spending the perk points here.
  • Quick Hands: The perk Quick Hands would be used as a 4AP weapon swapping enabler for swapping between using heavy throwing javelins for high short range Dps and swapping to a warbow for long range snipes. The frequency of swaps is varied on the battle, but can be as frequent as is required for increasing efficiency in battle.
  • Bow Mastery: As a bow user, your goal will be to utilize the range advantage of the warbow to be able to take out high priority targets out at a distance (hexe, necromancers, beastmasters, goblin shamans, etc.), as well as to deal repeated quick shot Dmg throughout the battle, and Bow Mastery will aid you in completing both of those objectives (increased range/reduced fatigue costs).
  • Throwing Mastery: While you already have one weapon mastery, when combined with other perks (Duelist, Killing Frenzy, Executioner), the increased Dmg output gained from Throwing Mastery for heavy throwing javelins becomes massive at close range. Additionally, reduced fatigue drain from repeated javelin tosses are welcome.
  • Nimble: As a bow user that is dependent on high vision, going a heavy armour build is unideal due to the helmet vision penalties and that going a Nimble light armour build is greatly more efficient for an archer. Some people try to go without Nimble on their archers, but when it comes down to surviving for a few turns of an orc that broke through/overflowed, you will need some defensive capabilities, and Nimble will be more reliable than building up melee/ranged defence and completely relying on perfect positioning.
  • Berserk: With Berserk you will be gaining an additional 4AP to use on chaining bow and javelin attacks for a solid increase in damage output with up to 3 attacks per round. It may be also important to note that the archer will also clean up a good amount of kills, making good use out of Berserk.
  • Killing Frenzy: When it comes to Killing Frenzy, the main factor to consider is if your build will be gaining enough kills to make use of the added bonus damage. With the archer, not only will you benefit from the bonus Dmg, but you will also greatly increase the hits to kill Dmg output of your weaponry.
  • Duelist: While Duelist is primarily thought of a melee perk, currently throwing weapons also gain the added +25% ignore armour Dmg, in which greatly increases the Dmg output on heavy throwing javelins. In combination with other Dmg increasing perks, as an archer, you can rapidly take out even the most dangerous foes like orc warriors & barbarian chosen.
  • Executioner: With the perk Executioner, you will be able to increase the Dmg output of your attacks by a noticeable amount to merit spending the perk point on Executioner.
  • Bullseye: The perk Bullseye will increase you chance to hit targets hidden by cover up to nearly 50% from the typical 25% without Bullseye. It may be more preferable to shoot at uncovered targets in many situations, but when it matters, you will need to shoot at targets behind cover & when succeeding against high priority targets behind cover, it can trivialize certain fights.

Main Stat Priority: Ranged Skill (95+) → Fatigue (140+, Before Gear; 115+, After Gear) → Hit Points (90+)/Melee Defence (Any is a Luxury)

Basic Equipment: Sallet Helm (120D) + Assassin's Robe (120D, End-game Nimble)/Dark Cowl or Assassin's Head Wrap (40D) + Noble Mail (160D, Pre-End Game), Bone Platings (Absorbs First Body Hit), Unhold Fur Cloak (-20% Ranged Dmg & +10D, on Poison Resist Armour) attachments, Warbow, Heavy Throwing Javelins, 2 Large Quiver of Arrows, and Hexen Trophy Necklace (+6 Resolve)/Falcon. All weapons and armour will become famed equivalents.

Summary: The role of the archer is to provide accurate damage from a distance, enemy defeat setup and to deal a substantial amount of damage using throwing weapons at close range. You will also aim to take out high priority targets that are largely unreachable in melee.
The Archer will take 2 to 4 slots in your active company depending on the encounter or number of long distance targets (Interchangeable with other backliners or frontliners depending on the fight).
♢ Distance Archer: Further Elaboration ♢
Composition Role:
  • Provided functions & How to use:
  • Strong Against: All general foes, End-game unarmoured & armoured opponents: Ancient Undead, Barbarian Chosen, Orc Warriors, Late-game assortment. Ranged priority targets: Hexe, Necromancers, Goblin Shamans, other ranged priority targets, and taking advantage of distance damage.
  • Weak Against: Being able to absorb a large amount of melee combatant damage for the team composition, as well as repeated sources of melee damage due to low melee defence & a lack of overprioritizing of defensive longevity (largely a non-issue due to positioning, and the strengths of allies, while the archer utilizes the opportunity to create value out of hitting unobtainable ranged targets, and supporting Dps). Encounters at nighttime put strain of an archers effectiveness (without Fangshire). Additionally they are not at peak effectiveness for Alp, Ifrit, or Scrat fights due to either damage output limitations, or enemy positioning concerns.
  • Why a distance archer in this composition: The primary reason why this ranged unit is a part of this composition is due to the value gained from targeting enemies at a distance (to varying degrees depending on the enemy composition & outcome), while allies cannot. While being able to target foes further away isn't inherently given to be the best use of a unit in combat, it is of course, in combination with other beneficial uses such as: targeting a units ranged defence instead of melee defence, which also involves building into ranged skill, supporting Dps from close or further away in tile distance to create opportunities for faster & safer enemy defeat set up, fulfill the role of negating threats in niche encounters, and to manipulate the AI into targeting and/or advancing towards your company. That said, not every fight needs more than one to two archers to take enough of an advantage in doing this, when a polearm/frontline hybrid, or pure frontline build can fulfill the role required of the specified fight.
Deeper Stat Explanations:
  • Ranged Skill: 95+: Primary Stat: Standard high-end ranged skill for reliably hitting enemies intended for Dps, as well as a decent skill amount for sniping distance foes with range & even a sufficient amount with maxing out Bullseye percentages.
  • Fatigue: 140+ Before Gear, 115+ After Gear: Primary Stat: Utilizing the added distance Dps of multiple quick shots and multiple 4 AP javelin throws per turn. Since you will have a surplus of fatigue than most builds & semi-limited ammunition, you will likely never need Recover.
  • Hit Points: 90+: Primary Stat: Aimed at providing a decent amount of hit points for avoiding awkward scenario deaths when your archer is used in melee.
  • Melee Defence: Any is a luxury: Aimed at providing aid in scenarios where your archer is used in melee. Not intended to be leveled over high rolls in hit points or other primary stats.
  • Other Stats: Does not gain superior utility/Dps from Melee Skill, Resolve is only primarily desired for obtaining a confident status faster as an archer (40+ easily obtained by background and/or with arena traits), Initiative provides value for out initiativing certain distance foes but does not merit leveling over other priority stats or Ranged Defence is not desired enough to merit leveling.
Ease of Hire:
  • Does this require a special hire?: Somewhat, while this build desires a decent pool of fatigue for duration based fights and a high amount of ranged skill to reliably hit targets near & far. That said, all your needs for a hire comes from an average Hunter hire or ranged skill star rolled ranged capable hire.
  • Is it worth using on Mid-Tier hires?: Somewhat, as considering all it takes is one 1,000 gold Hunter to fill this roll in most cases. It's reliable enough to merit hiring a hunter early-game as the base stats of the background is in most cases guaranteed to roll 85 Ranged Skill or better, which is typically enough to be a good ranged unit with heavy throwing javelins or slightly more ranged skill for a solid distance archer. So the definition of a mid-tier hire in the case of an archer doesn't really apply to anything other than a hunter hire, as there is no real argument for using something lesser.
Pros & Cons of the Alternatives:
  • Fearsome Gunner (Double) vs Distance Archer: [Pros]:
    [Cons]:
♦ Backliner Build: Banner Carrier ♦
The Banner Carrier:
(Rally the Troops Unit; Supporting Utility)
Perk Order:
Student → Fortified Mind → Rally the Troops → Rotate → Pathfinder → Battle Forged → Indomitable → Colossus → Recover → Underdog → Bags & Belts
Brief Perk Reasoning: See more in the relevant perk sections.
  • Student: Similarly to other builds' reasoning, the experience gained from picking Student for your banner carrier is still valuable for establishing a perk advantage faster. With this build you do not need Student to skip past tier 4 and 5, but it is still in good practice to level your unit quicker as picking up another tier 1 perk instead of Student doesn't establish too much of an advantage for the early stages of this build.
  • Fortified Mind: The deal with Fortified Mind is that you obtain a percentage increase in the resolve stat. While using a perk point to obtain stats is not normally good, this is a percentage increase on a vital stat for a Resolve sharing & rallying-based banner carrier.
  • Rally the Troops: In the case of Rally the Troops, you will want to pick this up in order to save your units from wavering or fleeing during combat. While you typically might only waver from being surrounded in odd situations, or while against an enemy with Fearsome, the geist enemy in Battle Brothers is so impactful for demolishing a party that Rally the Troops becomes a necessary must have perk for any company. Additionally, it secretly adds a desirability to be hit for enemies by including this perk.
  • Rotate: Much like a polearm user, the banner carrier will need to provide physical support by Rotating in, and contributing in absorbing damage just like all your other melee fighters.
  • Pathfinder: The reasoning behind picking Pathfinder as a perk is because it will allow you to save AP to Rally/Rotate when traversing rough terrain during a battle and will allow you to use up less fatigue if you need to move to or retreat from your opponent. Additionally, it would be to keep up with your team of Pathfinders.
  • Battle Forged: With the banner carrier, being a heavy armour user, Battle Forged is still a quality choice in providing the top defensive value, while allowing you to pump up your Fatigue without sacrificing defensive value. A Nimble banner carrier is still valuable as a good alternative, but when it comes to absolute efficiency heavy armour will provide more value in the late-game.
  • Indomitable: The reason why you would pick up an additional active perk is, because Indomitable is still showing its value in reducing the amount of incoming damage drastically. The banner carrier should seek to absorb dangerous blows for your troops, and Indomitable will allow you to do so.
  • Colossus: When taking damage, to a degree you will still take HP damage in parallel. So just like other heavy armour users, you will want to survive just as long as your armour does. As a banner carrier, Colossus will just help with receiving armour penetration damage a little bit more, as using Indomitable in every dangerous situation isn't always possible due to 5AP cost, or the need to Rally the Troops.
  • Recover: The incorporation of Recover in your banner carrier's build is key as you will have a large amount of fatigue build up from the fatigue consuming perks available to your build, as using Recover can come in clutch when you need to be able to use Rally the Troops/Rotate/Indomitable when you are becoming maxed out on fatigue.
  • Underdog: With the role of using your Banner Carrier to Rotate out disadvantaged allies, you will need to be able to survive a few rounds of attacks from an opponent. With a small fraction of your tertiary level ups being split between MD & HP, you will gain a small accumulation of MD that you will want to protect from the negative debuffs of being surrounded, and to negate Backstabber from the enemy.
  • Bags & Belts: With Bags & Belts you will use it to hold extra valuable consumables such as: Reinforced Throwing Nets, Flash Pots, Smoke Pots, and Bandages, depending on the combat situation you are thrusted into. Additionally, you can use a spare slot to hold a MD shield in case your Banner Carrier has to endure a disadvantaged position for an extended period.

Main Stat Priority: Resolve (130+, Fortified Mind Included, Sergeant's Sash & Arena Included) → Fatigue (145+, Before Gear; 68+, After Gear; 76+ LPR Attach.) → Melee Defence (Any is a Luxury)/Hit Points (100+, Colossus Included)

Equipment: Decorated Full Helm (320D), Coat of Plates (320D), Additional Fur Padding (-33% penetration damage taken)/Light Padding Replacement (-20% fatigue, on spare body armour) attachments, Battle Standard, Sergeant Sash (+10 Resolve), Sipar/Lindwurm/Living Tree Shield (Situational), a Bandage, and Flash Pots/Smoke Pots/Reinforced Throwing Nets. All armour will become famed equivalents.

Summary: As you can expect, the banner carrier provides AoE Resolve for the company troops around him, and Rallies any troops that start to break Resolve, whether it is from fear effects, or from combat with dangerous foes. Additionally, the banner carrier plays a more non-combative role in your backline that you don't need for most fights, but as Resolve attacking enemies exist it is important to keep one banner carrier in your company rooster for when you need the extra resolve saves. One could argue that having a banner carrier in every battle is the best strategy, as it makes it easier to achieve a confident morale when obtaining kills, but if you truly want to be efficient, you are probably better off having an additional frontliner or archer in fights where punishing resolve checks are less likely.
The banner carrier should take up a single slot of your active company in the middle of your back row.
♢ Banner Carrier: Further Elaboration ♢
Composition Role:
  • Provided functions & How to use:
  • When to field:
  • When not to field:
Deeper Stat Explanations:
  • Resolve: 130+, Fortified Mind Included, Sergeant's Sash & Arena Desired: Primary Stat: High resolve for staving off morale inflicting attacks for the company such as hexe charms, and geist screams, as well as strong results with Rally the Troops, and a strong resolve buff for allies when holding the battle standard. Should result in 95% to succeed rolls with room for penalties at this resolve level.
  • Fatigue: 145+ Before Hear, 68+ After Gear; 76+ LPR attachment: Primary Stat: Frequently utilizes high fatigue intensive perks such as Rotating units into positions, shield wall and Indomitable tanking, and when called for, Rallying allies. Will have sufficient opportunities to use Recover.
  • Hit Points: 100+ with Colossus: Full leveling or Optimally split: Shared Primary: High hit points will allow for an above average sustain in Battle Forged gear versus armour penetration of all types, including potentially high enough hit points to avoid rare dangerous one-shots to the head. This is further extended with tactical Indomitable usage, Additional Fur Padding, and a semi low contact environment.
  • Melee Defence: 20+: All High Rolls taken: Shared Primary: Much like hit points, it's about extending one's survivability, except with rolling for more frequent dodges and capitalizing more fully on drawing aggro of 1 to 2 melee fighters per turn.
  • Other Stats: Does not optimally perform it's role as a hybrid perk user & melee combatant due to the battle standard being very subpar and AP being needed for Rallying. Initiative can be detrimental for Rallying units or it can be beneficial depending on the situation, otherwise does not gain much to merit leveling over other stats. The same can be applied to Ranged Skill & Ranged Defence.
Ease of Hire:
  • Does this require a special hire?: Yes (except more easily than most builds), this build does require high fatigue potential for heavy skill use, and a solid average resolve (45+). These stats can be obtained from most decent backgrounds in the game & often is found while searching for other company roles, but ought to be built only from backgrounds that roll optimally in stats & stars for at least resolve.
  • Is it worth using on Mid-Tier hires?: Yes, this build can be insufficient in most categories and still be functionally sufficient in providing resolve, AP skill support, enemy aggro, and rallying against lost resolve checks. It can be build with different perks and be substituted with a Nimble variant for decent results. Additionally, you can seek to hire this role early-game and carry the temporary banner carrier to the late-game, without needing to replace them with urgency.
Pros & Cons of the Alternatives:
  • Attack Banner Carrier vs. Defensive: [Pros]:
    [Cons]:
  • Nimble BC vs Battle Forged BC: [Pros]:
    [Cons]:
♦ Build Formations & Role Compositions: Late-Game: Part 1 ♦
This section is going to showcase how to best use the builds listed for this guide in a more specific way than just a description of use or the number of units for each build. It will cover formations and role compositions in terms of average party composition strategies and how to efficiently use each party role in combat.

Where it is efficient to place your troops by type:
Noting: This is a general use composition and that there are many factors & encounters that will require a different formation and role compositions to overcome in a more efficient way.
  • High early-game melee skill unit (65+, late-game potential): This unit is typically accompanied by your best frontliner melee weaponry (i.e. double gripping: T2/T3 one-handed flail, T2/T3 one-handed sword/warbrand, or other T2/T3 weaponry depending on your circumstance; or a Two-handed mace/hammer/sword, or even a shield/dagger). This unit is typically your most heavily armoured unit as well, as they are typically worth protecting the most & are slightly more vulnerable to attacks.
    Positioning: This unit is typically initially positioned in the back row on the edge of your formations. This is to avoid being in range of archer fire in most instances, while still being able to be in combat at the same time as your other frontliners. It is possible you may need to use rotate on a backliner or a tank to get them into optimal positioning for spending their AP. You can expect to have 2-8 of these units in the early-game depending on how lucky you are.

  • Low early-game melee skill unit (<60, temporary): This unit is given a shield and a spear, as well as leans towards playing the defensive role in early fights. This unit isn't an amazing tank unit, but they are units that contributes to Dmg output, absorbing attack rolls, and granting prime positioning to your main damage dealers, while keeping your back row from being overwhelmed.
    Positioning: This unit is positioned situationally depending on the quantity of your troops, amount of backliners, and the amount of similar shielded units to help distract enemies. When melee combat is to happen on a turn, this unit will often position themselves to give surrounding bonuses to your main damage dealers, as well as to be the most targeted units during the fight.

  • Banner Carrier (likely a trainee) & Archers: These units exist to solve niche problems in the early-game, as well as to provide either support in the case of the banner carrier or flexible damage output in the case of the archer.
    Positioning: These units will be placed in the back row of your formation near the center of it's rank. Your units may move to gain a more advantageous position during combat, or to provide support, but otherwise these units are safe from danger as long as your company is up to the fight at hand. Archers can also take advantage of positioning in the third row to avoid enemy breakthrough, attacking into the gap created by your high contact frontline units and the intentional contact of a polearm unit.

  • Polearm unit: This unit type is typically enabled in the early-game due to the strength and availability of strong early-game polearms, as well as it being a position where you could place your most promising melee fighters as a safer place to participate in combat than being in enemy contact. Additionally, this unit could just have less existing melee defence or armour than their peers and it would be more optimal to keep them in the back.
    Positioning: This unit is positioned in the backline in between your archers and your high early-game melee skill units. Polearm users can also utilize Rotate to advance their allies into range of your foe to save AP on your frontliners, when it is most efficient to do so. Otherwise, your unit may also seek to tempt foes into attacking them while keeping the amount of foes touching your polearm unit to 1, if your company actually needs help with pulling damage attention off of a unit.

While you should always run the party composition that best fits the combat ahead of you, and always heavily consider terrain advantages (such as dry ground/water in swamps, chokepoints in forests, or high ground to either gain a bonus on hit or to gate enemy movement/distance strikes), you can use a general use party composition that will be optimal for a large majority of battles:

  • Late-Game General Use Composition 1:
    Medium Spread Composition
    Row 1: Nimble Tank (1/12), AoE Two-Hander (2/12), Empty Tile, Debuff Two-Hander (3/12) Cleaver Duelist (4/12), Debuff Two-Hander (5/12), Empty Tile, AoE Two-Hander (6/12).
    Row 2: AoE Two-Hander (7/12), Heavy Polearm (8/12), Distance Archer (9/12), Banner Carrier (10/12), Distance Archer (11/12), Heavy Polearm (12/12).

    Brief Logic of Use: The idea is that you can perform high Dmg output while using your Nimble Tank to hold off foes that may pose an inconvenience to your company's battle flow (damage mitigation of heavy hitters or niche foes like champions). Your AoE Two-Handers will leave gaps for their ability to maximize 3 person AoE strikes, while your Duelist and Debuff Two-Hander units would huddle together lowering contact and taking advantage of pockets. Your Banner or Heavy Polearms sit in the back row in the gaps made by your AoE Two-Handers to be bait targets for the unit who fills the gap, while also being in prime position to strike target foes, or to provide utility. Your Distance Archers will focus on sniping priority opponents and play around safe spaces in your formation. The specialized role of the Banner Carrier is to provide the AoE resolve to your units, while also being available for a rally in-case of an emergency. With that said, the real usage you will get out of your Banner Carrier would be to Rotate around your units into optimal positions, to save their AP, as it is more valuable than the Banner Carriers, and to tempt enemies into attacking into Indomitable. Not all fights will require a Banner/Tank/More than one Archer or Polearm, in some cases an additional frontliner is more optimal.

    Of course, it is important to note that a general use composition is flexible, units will likely need to be swapped out from time to time to manage the party's mood, and that the exact variant of a unit's role can be different for different companies (aka. perhaps more debuff two-handers or more hammer users based off of unrefined hires in the middle stages of the game).

  • Late-Game General Use Composition 2:
    Tightened Composition
    Row 1: AoE Two-Hander (1/12), Debuff Two-Hander (2/12), Cleaver Duelist (3/12), Debuff Two-Hander (4/12), Cleaver Duelist (5/12), Debuff Two-Hander (6/12), AoE Two-Hander (7/12).
    Row 2: Heavy Polearm (8/12), Distance Archer (9/12), Banner Carrier (10/12), Distance Archer (11/12), Heavy Polearm (12/12).

    Brief Logic of Use: The decision to tighten up your formation might be that you have less AoE Two-Handers to play a position in the inner parts of your formation, and you want to limit contact in the front to two per person, while maximizing your focused Dps on the targets that are currently in your zone of control. This allows for the Heavy Polearms to be the bastion against flankers in the event that your not creating enough space in the frontliner for your foes, while also leaving options available for rotate users to swap out a two contact frontliner if needed for either defensive or offensive purposes. In most scenarios, a higher contact approach for your backliners is desired when facing foes that can reasonably threaten the survivability of a frontliner.
♢ Build Formations & Role Compositions: Late-Game: Part 2 ♢ [Under Construction]
  • Late-Game General Use Composition 3:
    Large Spread Composition
    Row 1: AoE Two-Hander (1/12), Empty Tile, Debuff Two-Hander/AoE Two-Hander (2/12), Cleaver Duelist (3/12), Debuff Two-Hander/AoE Two-Hander (4/12), Empty Tile, AoE Two-Hander (5/12).
    Row 2: Nimble Tank/AoE Two-Hander (6/12), Empty Tile/Heavy Polearm (7/12), melee unit/Distance Archer (8/12), Banner Carrier (9/12), melee unit/Distance Archer (10/12), Empty Tile/Heavy Polearm (11/12), Nimble Tank/AoE Two-Hander (12/12).

    Brief Logic of Use: Sometimes the amount of foes in the late-game is exceptionally large and the flanks need to have a higher prioritization for larger contact used for denying overflow. This is demonstrated by an extended rear flank of up to 4-5 contact with foes (should be supported by a polearm user if an AoE Two-Hander). That stated, it highly depends on the composition of your company to decide the fielding of AoE Two-Handers or Nimble tanks on the outer flanks, as well as Debuff Two-Handers or AoE Two-Handers on your center position flanks. Different variations have different advantages, such as more Dps, more daze debuffing, or more mitigation. But it is important to note that formations or the needs of matching enemy foe threats are not always symmetrical in unit roles, meaning you could have a Nimble Tank on one side (maybe holding off a champion or other units), while your other flank is focused on Dps with an AoE Two-Hander (at a cost of riskier higher contact). This is of course remembering that archers and polearms are interchangeable with other Dps roles depending on the exact nature of the enemy composition, which could result in more contact gaps being filled on the flanks and inner pockets.


  • Late-Game General Use Composition 4:
    Mitigation Composition
    Row 1: Nimble Tank (1/12), Empty Tile, AoE Two-Hander (2/12), Debuff Two-Hander (3/12), AoE Two-Hander (4/12), Empty Tile, Nimble Tank (5/12).
    Row 2: AoE Two_Hander (6/12), Heavy Polearm (7/12), Distance Archer (8/12), Banner Carrier (9/12), Distance Archer (10/12), Heavy Polearm (11/12), AoE Two-Hander (12/12).

    Brief Logic of Use: The largest reason to use a mitigation formation with tanks on the front flanks would be to endure enemy charges more optimally, while also prioritizing the first high contact on dangerous foes to your Nimble Tanks. This also leaves the flanks more protected for intentional enemy overflow, as certain foes will be locked onto your Nimble Tanks (can include armoured unholds with Indomitable), leaving a number of spaces denied for advancing foes, causing them to walk around your formation, while still leaving strong sections for enemy defeating in the center and flanks. Additionally, the standard of giving contact to your Heavy Polearms in a gap between your Nimble Tank and your front positioned AoE Two-Hander will allow for efficient options for damage mitigation by baiting attacks, surround bonuses, two-handed flanged mace usage, and efficient AoE swordlance reaps. This composition differs as, it typically utilizes less Debuff Two-Handers and Cleaver Duelists.


  • Situational compositions to elaborate on (necrosavants diamond, hexe positioning and equipment, Lindwurms/unholds/scrats early polearm, webknechts/ancient undead optimal positioning AI)...
♢ Build Formations & Role Compositions: Early-Game: Part 3 ♢ [Under Construction]
While it is not the goal of this guide isn't to provide strategy advice for early-game content, it can still be helpful to know a few strong formations to keep your company thriving early-on so that you can afford to create your late-game orientated company with greater ease, in the case you find yourself inconsistent in the early-game.

  • The first 25 days formations and party roles:
    With the needs of an early-game company being different from the needs of a late-game company, due to vulnerability & a number of factors regarding the types of obstacles/enemies you will encounter, so will your build formations & role compositions.
    In the early-game you will be limited on gear and quality hires, so you will want to build your units differently to cover their weaknesses, instead of purely taking advantage of their strengths, as your units will be flawed. That's not to say that you won't obtain a hire worth building into a late-game build, as if given a high quality hire you should seek to invest into their late-game success.
    That said, your company will be more vulnerable to dangerous foes at this time, and flexible build formations & role compositions will be preferable to a end-game formation.

  • Strong Early-Game Compositions:
    Polearm's Ruse (5 to 9 units)
    Row 1: Shielded Spear (1/5), Empty Tile, Empty Tile, Shielded Spear (2/5).
    Row 2: Empty Tile, Polearm (3/5), Polearm (4/5), Empty Tile.
    Row 3: Empty Tile, Empty Tile, Archer (5/5), Empty Tile, Empty Tile.
    Brief Logic of Use: The strength of this formation is behind some early-game acquisitions of high damage polearms (discounted billhook purchase, or looted tier 3 polearms) and the AI behaviors aimed at getting next to your polearm units (to some effect you can do this with non-polearm melee, or to some success Quick Hands and archer units). That said, the key to this formation is to bait your opponents into the "killing funnel" of the front two tiles, while the rest wander around your frontline spearwalls. If/when your spearwall falls and they move to the tiles in next to your spear units, you will be aided by your shield, while your backline units dish out the Dps, while also grabbing some of the aggro of the enemy units to spread the damage received more evenly. The shock of the first two units dying more often than not causes severe morale issues with your enemies, and is made much easier to do so than a standard line due to the number of attacks/surround bonuses on a smaller number of units. An archer is not needed for this strategy to work, but a backline for your backline works exceptionally well for ensuring a quick departure of the "killing funnel" foes in time for more to go into the funnel.

    In terms of expansion, you can add to your back row or have more spearwalls to hold more enemies. That said, this formation isn't for all encounters, as harder to break enemies or morales will leave more active aggro on your shielded units. Once you've obtained a more stable company, you can use the General Use Early-Game Composition until you have more defined roles and armour spread in the mid to late-game.

  • General Use Early-Game Composition:
    Dual Grip Standard (up to 12 units) dual grip on the rear flanks, shields center front, polearm/banner carrier/archers center rear...
♦ Capable Backgrounds to Hire: Part 1 ♦
Before you start leveling a character, you must be able to tell what hires are good for each character build in this guide (see the stat needs of each build listed as the Main Stat Priority).

To start off, I will say that the hiring process is the largest Rng factor in Battle Brothers, so don't beat yourself up too much if you are playing ironman mode and you aren't getting hires with the right talent stats/stars/traits. That being said, you should at least be able to hire the most valued backgrounds possible for a higher chance for optimal starting stats/stars/traits.
That said, it is important to keep in mind that for economic reasons, as well as the consistency of rolling a good hire, that the optimal backgrounds to hire in the early-game slightly differ from the list below. An example of this is how the Anatomist has a high chance at rolling good melee skill, as well as the ability to roll good ranged skill if you can find one for the right price, which makes it a flexible hire depending on where their talent stars and base rolls land. While a Farmhand as a late-game candidate can be hard to achieve consistently in the early-game where hiring is limited for economic efficiency reasons.

Starting with the core class, Standard Frontliner classes:
  • Great: Hedge Knight.
  • Good: Wildman, Lumberjack, Farmhand.
  • Acceptable: Adventurous Noble, and Barbarian.
  • Okay: Squire, Oathtaker, Sellsword, Nomad (Melee), Raider, Beast Slayer, and Gladiator.
  • Passable: Anatomist, Militia, Manhunter, Brawler, Nomad (Ranged), Disowned Noble, Converted Crusader, Hunter, Poacher, Cultist, Flagellant, Thief, Caravan Hand, Butcher, Messenger, and Gravedigger.
Reasoning:
  • Hedge Knight: (Pros): Is guaranteed very high starting stats, the ranged skill and initiative talent stars are excluded, and is the best stats for hire in the game. (Cons): They're very expensive to hire, has high-end wages, and having more than one hedge knight causes one to try to kill the other, but that can be avoided with minor event management. (Recommended Amount = 1-8)
  • Wildman: (Pros): Has amazing starting fatigue, above average hit points/resolve, and is not concerned with wages too much. (Cons): Slightly slower xp gain, stats with mediocre melee skill, and has a chance at poor to low melee defence starting stats. (Recommended Amount = 1-8)
  • Lumberjack: (Pros): A higher chance at slightly above average melee skill, a chance at great fatigue and hit points. (Cons): A high chance that resolve needs repairing (Arena needed), is slightly expensive for the stats due to starting equipment. (Recommended amount = 1-8 or replaced)
  • Farmhand: (Pros): A chance of great fatigue and hit points, the stats are trainable via events. (Cons): Has a low list of excluded traits making it harder to find a good unit, has only average peasant tier melee skill, and resolve in need of repairing (Arena needed). (Recommended amount = 1-8 or replaced)
  • Adventurous Noble: (Pros): A chance at very high base melee skill, melee defence, and resolve. (Cons): Has only average base fatigue and hit points, is better suited as a banner carrier, higher than average starting pay (less than Sellsword), and comes with a wage increase event. (Recommended Amount = 1-2)
  • Barbarian: (Pros):Barbarian: A higher chance at slightly above average starting stats overall, and some positive events. (Cons): Is only recruitable through an event. (Recommended amount = 1-4)
♢ Capable Backgrounds to Hire: Part 2 ♢
Okay hires explanation:
  • Squire: Has all around above average starting stats, notably melee skill, and their starting price & wages are less costly than it's betters, but not quite a Hedge Knight by a few level ups when comparing some of the base stats,
    Oathtaker: Has decent starting hit points, high melee skill, melee defence and resolve, and the ranged skill/hit point talent stars are excluded, while also being convenient vessels for end-game armour (pricey 300D chest piece/helmet), but only low base fatigue & cannot have the Tough trait,
    Sellsword: High-end melee skill and melee defence, and average stats, but may need resolve repaired (Arena Needed), and needs a paymaster retinue hire to avoid high risk of pay raise events/desertion,
    Nomad (Melee): Decent chance at high-end melee skill and melee defence, and average hit points, but chance at low fatigue and poor resolve (Arena Needed), and has a noble troop event that could result in a party wipe/renown hit it not prepared,
    Raider: exact same as Nomad (Melee) above, but with more events (confirmed),
    Beast Slayer: Chance at an above average melee skill/fatigue, average to above average starting stats overall, some positive events, but is expensive and outclassed for the price,
    Gladiator: Higher end melee skill and melee defence, but is overall average in other starting stats and has a high starting cost and high wages.
    (Recommended Amount = 1-2 or as few as possible, as they are outclassed by the categories above it)
Passable hires explanation:
  • Anatomist: Chance at above average melee skill, above average resolve, can roll as an archer, but poor fatigue, and hit points,
    Militia: Chance at slightly above average melee skill, resolve, and melee defence, but can be difficult to find them cheap,
    Brawler: Chance at decent starting hit points, chance at above average resolve and melee skill, is a trainer of low level backgrounds (Lumberjack, Farmhand) via events, the ranged skill talent star is excluded as an option, and is very affordable for the stats being the staple feature,
    Manhunter: Chance at above average melee skill, resolve, hit points, melee defence, and potential to come with a whip for a cheap price,
    Nomad (Ranged): Decent chance at slightly above average melee skill and melee defence, average hit points, and can double as an archer if stars roll ranged, but chance at low fatigue and poor resolve (Arena Needed), and has a noble troop event that could result in a party wipe/renown hit it not prepared,
    Disowned Noble: Chance at very high melee skill, a few self improving events improving greatly melee defence and resolve, but hit points/melee defence/resolve/fatigue are average to very low depending on the roll (Event or Arena Needed),
    Converted Crusader: High-end starting melee skill and melee defence, and all other stats are average, but can only achieve one through a late-game crisis event,
    Hunter: Chance at above average fatigue, otherwise average melee unit potential, not at all ideal, but if your hunter hire rolls into melee you can choose to make use of them if desperate,
    Poacher: Ever so slightly above average melee skill chance, otherwise average melee potential, but chance at bad resolve, if your poacher hire rolls into melee you can choose to make use of them if desperate,
    Cultist: Can be used for a couple unique events that can result in legendary armours and free perk points, and has a large stat range that could be either decent or bad (besides resolve & initiative), will try to convert your peasant backgrounds, and will conflict with a monk/historian,
    Flagellant: Chance at high fatigue and resolve, otherwise average stats, can start with low hit points, but has a good handful of events that can add hit points and melee skill for it to be worth it, but also conflicts with monk/cultist,
    Thief: Chance at high starting defence stats, decent thieving events, and average stats, but a chance for below above average melee skill, noble army event that could result in a party wipe/renown hit if not prepared,
    Caravan Hand: Higher chance at average starting stats, an equal chance at below average stats, and can permanently increase party inventory size once per playthrough via an event,
    Butcher: Potential for a slightly above average melee skill, other stats are average, and ranged skill talent star exclusion, Messenger: Good fatigue, and chance for slightly above average melee defence, but a chance for low or average melee skill, and resolve in need of fixing (Arena Needed),
    Gravedigger: Higher chance at slightly above average fatigue/hit points/resolve, other stats are average with a chance to be low,
    Graverobber: Barely above average stats overall, has an event with Historian to obtain instantly free famed items, but has a noble troop event that could result in a party wipe/renown hit if not prepared.
    (Recommended Amount = You will likely only be hiring these backgrounds in the early to early-mid-game, or if struggling to find a viable hire and should be replaced later in the game, unless used to farm events)
♢ Capable Backgrounds to Hire: Part 3 ♢
Specifying with three tile contact AoE Two-Hander classes:
  • The exact same as the Standard Frontliner class, but with a slightly heightened priority on hires with high-end hit points/fatigue (Hedge Knights, Wildmen, Lumberjacks, Farmhands, Brawlers, etc.).
(Character Build Recommended Amount = 3-4)

Additionally, you have your Heavy Polearm class:
  • The same pool of hires as your Standard Frontliner class, but with a mildly lower value on hires that were valued high because of their base melee defence (For example the Thief), the ability to make use of hit points at a lower than optimal start (such as 60 HP adventurous Nobles or lowish rolls) and a heightened priority on melee skill and fatigue. Again, the higher tiered recommendations from the Standard Frontliner category are preferred.
(Character Build Recommended Amount = 2-3)

As for your Archer class:
  • Great: Hunter.
  • Good: Ranged Nomad, Anatomist, and Poacher.
  • Passable: Witchhunter, Beast Slayer, Squire, Militia, Sellsword, Bowyer, and Shepherd.
Reasoning:
  • Hunter: (Pros): The only archer class hire worth hiring for the end game, highest starting ranged skill, comes with a tier 2 bow, and generally positive events. (Cons): Somewhat costly. (Character Build Recommended Amount = 2-3)
  • Good Hires Explanation: Ranged Nomad: A chance at exceptional ranged skill, and above average defensive skills, a good trait exclusion list, but has some negative events, including a noble army event that could result in a party wipe/renown hit if not prepared, lower fatigue and resolve than a hunter, and is expensive compared to a hunter, Anatomist: Chance at a lowish to slightly above average ranged skill, but a chance to low to average hit points and fatigue, can roll for melee in the early-game, Poacher: An overall mildly worse hunter with a good amount of positive events.
    (Recommended Amount = You will likely only be hiring these backgrounds in the early to mid-game and could be replaced later in the game)
  • Passable hires explanation: Witchhunter: Unique positive events, and similar stats to a Poacher except with more resolve, but more expensive, Beast Slayer: Chance at an average ranged skill, a chance of average to above average fatigue, high resolve, and several positive events, but costs as much or more than a Hunter, Squire: A chance at above average ranged skill and fatigue, and high resolve, Militia: Chance at a low to average ranged skill, Sellsword: A chance at above average ranged skill and resolve, high defensive skills, but requires a Paymaster to avoid wage increase events, Bowyer: Chance at a slightly above average ranged skill, but a chance for very low or below average fatigue and resolve, Shepherd: Chance at a low to average ranged skill, but a chance at low to average fatigue.
    (Recommended Amount = Only if desperate for a body, and you want to make the best out of the starting stats/talent stars the hire was given)
(Character Build Recommended Amount = 2-3)

Lastly, one mustn't neglect the Nimble Tank class:
  • Great: Hedge Knight, and Lumberjack.
  • Good: Wildman, Adventurous Noble, Squire, Brawler, Farmhand, Beast Slayer, and Manhunter.
  • Okay: Sellsword, Gladiator, Oathtaker, Thief, Messenger, Butcher, Caravan Hand, and Barbarian.
Reasoning:
  • To make an efficient tank character, there must an importance on high melee defence, fatigue, and hit points, as well as a slight attention to resolve.
(Character Build Recommended Amount = 2-3 in reserve)

Additionally, you need your Banner Carrier class:
  • Great: Adventurous Noble, Wildman, and Squire.
  • Good: Starting resolves above 45 with consideration to hit points and fatigue.
  • Passable: Starting resolves above 40 with less consideration to hit points and fatigue.
Reasoning:
  • To make an efficient banner carrier, your unit must have excellent starting resolve, and fatigue, with a slight attention for hit points and melee defence.
(Character Build Recommended Amount = 1)
♦ How to Manage Fodder & Imperfect Hires: Part 1 ♦
In your campaigns, it is without a doubt that you will hire troops without the correct talent stars, that come with harmful traits, or have mediocre base stats. These people will be leveled, stat & perk wise, according to their strengths and weaknesses.

The Value of Nimble for the Early & Mid-game:
With the survivability of your troops always being a concern throughout the entirety of one's campaign, there may be brief periods in the mid-game, where your Battle Forged troops are transitioning between mid to high-tier armour. This is where building up Nimble troops from early on in the game comes into play, as Nimble characters are easy to build to their near full potential, and at a slightly faster rate than Battle Forged.
With this in mind, you will without a doubt run into units that roll insufficient primary stats. In these cases, it is likely going to be more efficient to build them into Nimble users or settle for patchwork units, along with their intended roles in the early-game. Nimble will allow you to gain an edge against a majority of units in the mid to early-late-game until they are to be replaced with their Battle Forged counterpart if the respective role if it's more efficient as a Battle Forged build. (See the Nimble perk description for more information on the value of Nimble).

Talent Stars:
It is important to note that talent stars aren't everything, but they do ensure your units stat potential into a reliable or at least semi-reliable build direction. Without talent stars, you can build a strong & an efficient build given good base stats, but you will be at the mercy of stats rolling poorly sometimes. With this in mind, it's best to hire good units with high base stats to maximize your potential.

  • Low Fatigue Potential:
    If your frontliner unit has melee defence & melee skill potential, but is missing fatigue potential (and can't reach 135+ fat), you may have to build a suboptimal low fatigue impact build. This meaning that you ought to invest into perks that would otherwise be skippable with an efficient frontliner build (aka. Brawny, Gifted, non-ideal weapon masteries) for being able to still have enough fatigue to AoE, avoid using perks that have an added fatigue cost (aka. Adrenaline, Rotate, Indomitable, etc.), and/or use subpar weapon builds that cost very little fatigue to use effectively (aka. two-handed flanged mace with no qatal, greataxe, etc.) as a fatigue neutral build. You will miss out on builds that take advantage of high damage weapons, weapon skills, strong fatigue perks, luxury perk points to spend, and the ability to overall do more damage in battle.
    Additionally, if your unit has high hp and low-end fatigue potential for the early-game, you can choose to build a Nimble variant of your frontliner build, with only a minor caution to how you spend your fatigue. Just note the weaknesses of building a Nimble frontliner (see the Nimble perk explanation).
    If your ranged build is missing fatigue stars, you could seek to build them normally with the understanding that you ought to pick up the perk Recover, as you will actually need to use it in longer fights without a high fatigue pool.
    As for a tank unit without fatigue stars, you will struggle to use active perks effectively, so you will have to rely on your melee defence more often, and it might be better to build a Nimble Overwhelm tank that focuses their AP usage on debuffing your opponent.

  • Low Melee Skill Potential:
    If your frontliner unit has high melee defence and fatigue potential, but is missing potential in melee skill, you ought to seek to build this unit into a damage absorbing tank. Whether this unit is built Nimble or Battle Forged is dependent on if this unit has high potential for 125+ hp for Nimble, or if they don't quite have enough hp, but they have exceptional fatigue potential. While the effectiveness of Nimble versus Battle Forged can go either way, the need for a preference should be determined by how many Battle Forged or Nimble frontliner users you have in your company already. The more Battle Forged frontliners you have in your ranks, the more of a need to hold off high armour penetration damage in relevant fights, and the more Nimble frontliners you have in your ranks, the more you might need stable, high-end heavy armour protection.
    If your company already has enough damage absorbing tanks, you ought to replace this hire, unless you want to roll with a subpar build. The only real builds that thrive without melee skill, besides ranged weapon specialists, would be tanks and banner carriers.

  • Low Melee Defence Potential:
    If your frontliner unit has melee skill and fatigue potential, but is missing talent stars in melee defence, you can build this unit as a subpar low enemy contact unit. Your unit will still be able to deal damage mostly efficiently, you will just take damage much more often and be extra vulnerable in dangerous fights. An example of a low enemy contact unit would be a two-handed flanged mace user, as they would be able to daze the one of opponents they are in contact with, which helps reduce the damage threat they may receive. Alternatively, you could just put this unit in a center "pocket" in your frontline so that they are guaranteed to be limited on the amount of units next to them; However, it is important to note that you cannot employ this strategy in every battle without it being detrimental to your other units due to the large number of enemies that are present in difficult late-game battles.
    As an alternative to building a subpar frontliner, you can seek to turn this unit into an efficient polearm unit. It is largely dependent on what your company's needs are.

  • Don't be tempted by stars in: Ranged Defence, Initiative, Resolve (non-banner), Ranged Skill
    The stat known as ranged defence is a unique case, as it does not provide enough value to be worth the stat point investment. This is mainly because there are not an abundance of ranged heavy fights & threatening ranged foes in Battle Brothers. Additionally, it is because we are limited on stat points to distribute, as leveling ranged defence isn't a negative thing, it is only a bad play since there is a low stat benefit & we are limited on stat points to distribute.
    When it comes to initiative, you can use this as a side focus of certain builds for extra md, but the main issue with leveling initiative is that we are limited on how many stats we can level up. So with a melee initiative, you will be wanting melee skill, then you will want melee defence to survive, then you will want to level initiative, then you will want high fatigue to be able to even benefit from weapon skill use, and then you will want hit points for a Nimble build (Fencer or max utilization of Dodge). Often losing out on two key stats. There are other initiative based builds like Dodge tanks, or BF Dodge Fat Nuetral units that exist, but are far from the most effective when compared to their regular stat building counterparts.
    With resolve, there is only so much value you can gain from leveling resolve. Similarly to ranged defence, there are just not very many resolve punishing enemies that would merit spending a noticeable amount of points into resolve beyond a basic amount (50+), which should be attained by the arena traits, necklaces, and other buffs instead of leveling.
    As for ranged skill, one shouldn't build units with low base ranged skill into units who use ranged skill (<43) when better options exist (any base statted hunter hire).
♢ How to Manage Fodder & Imperfect Hires: Part 2 ♢
What to do with Fodder or hires without redeeming qualities:
When it comes to hires that do not meet the potential for an efficient character build, you must seek to make use out of the money that you spent, if indeed money is still a relevant issue in your campaign. Having a unit with no potential implies that your unit has talent stars in unuseful places and/or has low base stats (although, you should always hire from a good background with your potential hires).

The role of a fodder is to assist and protect your more valuable troops, and to help gain economic momentum. So, you will still want to use them effectively, as taking unnecessary damage and losing troops is usually a big net loss, and you will likely lose their armour/weapons in addition to the money spent on hiring them. The idea is that you should make the best usage out of your hires in the earlier portions of the game and train them in ways that they are still useful for your company until you get a better replacement (for each failed hire) in the late-game.

When building your fodder you will need to be flexible on how you build them, as you will level their stats accordingly to their needs.
Here are some example fodder builds that will help you build your units based of various shortcomings at the start of the game.

Semi-Important Notes:
  • You may not want to get Berserk & Killing Frenzy if you intend to funnel the kills to more valuable hires, as they will see lower usage. That said, if you have no qualms against funneling experience into your fodder units that you will eventually fire, then a handful of these suggested fodder builds would need mild revision, as Killing Frenzy & Berserk are great damage output assets.
  • While Student is a great perk that can allow you to skip past picking too many perks in the early tiers, the problem with assigning Student to a fodder hire is that they will not be having a focus on gaining experience, as you still want to funnel as much experience into your more valuable hires instead. That said, you still can pick Student without breaking too many ethical bones, you will just be depriving your company of perk advantages for early-game momentum.

Low Melee Skill (ends at about 80), Talented Hit Points Fodder Archetype: (only redeeming talented stat is hit points)
Perk Order (Nimble Duelist):
Fast Adaptation → Gifted → Dodge → Rotate → Colossus → Nimble → Duelist → Berserk → Underdog → Recover
Main Stat Priority: Melee Skill → Hit Points → Melee Defence → Fatigue (on very low rolls of other stats, if Fatigue is a max roll)
Summary: The Duelist unit will be a failure in terms of performing offensive and defensive feats that talented units can perform; However, this unit has the potential to contribute to your company's damage output in meaningful ways, as well as absorb aggro for your company to better protect the more promising units. They also typically use only Duelist weapons that reach their max potential with basic attacks, such as warhammers, maces, and axes.

Low Melee Skill (ends at about 80) Fodder Archetype: (maybe he rolled ranged defence, initiative, resolve, or ranged skill as his three talents, unlucky, may go Nimble variants involving Colossus instead of Nine Lives)
Perk Order (Forged Blunt Duelist):
Colossus → Gifted → Brawny → Hammer/Mace Mastery → Underdog → Battle Forged → Duelist → Berserk → Killing Frenzy → Recover
Blunt Main Stat Priority: Melee Skill → Melee Defence → Fatigue → Hit Points (on very low rolls of fatigue, if HP is a max roll)
Perk Order (Lower base HP/MS Forged Duelist):
Fast Adaptation → Nine Lives → Gifted → Rotate → Underdog → Battle Forged → Duelist → Berserk → Brawny → Recover
Duelist Main Stat Priority: Melee Skill → Melee Defence → Fatigue (usually only able to get around 130-135 fatigue before Brawny) → Hit Points (usually sub 60)
Perk Order (Greatsword):
Nine Lives → Gifted → Brawny → Sword Mastery → Underdog → Battle Forged → Berserk → Killing Frenzy → Reach Advantage → Fearsome → Recover
Greatsword Main Stat Priority: Melee Skill → Melee Defence → Fatigue (usually only able to get around 130-135 fatigue before Brawny) → Hit Points (usually around 80-90)
Summary: This is one of the worst outcomes you can get when rolling for talent stars. Although, good base stats can bring a build into a viable strength on the correct background, it is something one mustn't settle on if you are trying to secure the best company you can reasonably achieve. As for the chance you get no redeemable stats or talent stars, you can salvage this unit into either a Duelist or AoE Greatsword for the best results. As a Duelist, you will be protected from heavy attacks with Nine Lives/sufficient HP, while they will still be able to perform some meaningful damage output. What main factor that makes this variant of fodder different from the hit point talented fodder, is that you will be building this one Battle Forged or Nimble depending on your company's current defensive picks (too many Nimble or Battle Forged). As for the Greatsword build, you more or less are aiming to make use of the less harsh hit chance penalties to AoE, while still benefitting from high end AoE damage output (will be most effective outside of end-game heavily armoured foe fights, but still can contribute decent Dps) and added benefits of ending the fight early with Fearsome & the added survivability of Reach Advantage.

High Melee Skill (90+) Fodder Archetype: (has a star or two in Melee Skill, nothing else important)
Perk Order (Battle Forged):
Colossus → Pathfinder → Rotate → Polearm mastery → Brawny → Battle Forged → Berserk → Fearsome → Killing Frenzy → Recover
Perk Order (Nimble):
Colossus → Gifted → Rotate → Polearm mastery → Pathfinder → Nimble → Berserk → Fearsome → Killing Frenzy → Recover
Main Stat Priority: Melee Skill → Fatigue → Hit Points → Melee Defence (any on min rolls; luxury)
Summary: With a unit that has a high melee skill start or has talent stars in melee skill, but has no other valuable stat potential, you will be best off building this unit into a polearm unit if your frontline is secure enough. This unit can be either Battle Forged or Nimble depending on if you have high hit point or high fatigue potential. That said, this fodder build is one of the only fodder builds I would ethically recommend picking up both Killing Frenzy & Berserk on, as they have the potential to deal a lot of damage output and can serve in your company as a scuffed polearm unit into the late-game. With this in mind, the primary difference between this and the ♥♥♥♥♥♥♥♥ Heavy Polearm build is that the Heavy Polearm build has more expendable fatigue, high base hp (leaving a lot of room for melee defence leveling), & would typically use an AoE swordlance to maximize supporting damage output. While this build should still utilize the AoE swordlance, they will run out of fatigue, be more subject to instances where low hp & resolve matter, a lack of sidearm flexibility, and may be better off using a tier 3 polearm or two-handed mace.

Talented Hit Points & Fatigue Fodder Archetype: (only redeeming talented stats are hit points and fatigue)
Perk Order:
Colossus → Dodge → Rotate → Shield Expert → Underdog → Nimble → Indomitable → Overwhelm → Dagger Mastery → Recover
Main Stat Priority: Hit Points → Melee Defence → Fatigue
Summary: You essentially build this archetype to be a Nimble Tank, but since you cannot perform that well with low Melee Defence, then spending your AP to Dagger Mastery + Overwhelm your opponents, while having Indomitable as a tactical option is more efficient.
♦ Traits in Review: A-C: Part 1 ♦
I figured it would be good to talk about the different traits in the game, as they can either make or break certain character builds. Do note that each trait will be evaluated in relation to the context of this guide. If you are looking for an introduction to each trait and their mechanics, seek the Battle Brothers wiki or similar services.
Traits:
Much like the perks sections below I have a set of rating keys that revolve around the limited trait potential of an efficient late-game company:(0-4).
  • 0 = Complete garbage, 1 = Bad but it could be worse, 2 = Not useless but not positive, 3 = Good but usually a better option, 4 = Great if you can get it.
  • ♛ = Frontliner, ♝ = Polearm, ♞ = Banner Carrier, ♜ = Nimble Tank, ⚡ = Archer, ♟ = Fodder, ♿ = Reserve, ☸ = Core Trait for Alternate Meta/Memeable Builds.
Starting off with:
  • Addict: (Terrible:0): The trait Addict can be obtained by an event after your unit becomes drunk or consumes potions/drugs at least 4 times in your unit's lifetime, with the condition that the event that causes the trait to be added has to happen within 3 days of becoming drunk or consuming a potion/drug. As for the trait's effects, you are looking at some serious debuffs to your units combat potential, as well as some very bad events tied to the trait. Starting with the combat debuff, it is a loss of -10% to melee skill, -10% to ranged skill, -10% to melee defence, -10% to ranged defence, and -10% to resolve. As for the events tied to the trait, there are only negative events, and one of them involves the chance of the death of your unit if you are unaware, or the loss of items. With that said, the trait is removable via a random event if you cease for 14 or more days to give your addict troop any drinks that cause him to become drunk or a potion/drug. While tavern drinks are necessary, and potions/drugs are very helpful in riskier fights, the chance of your unit gaining the Addict trait is present, which leads to a loss of combat stats and potentially irreplaceable/valuable items.
  • Ailing: (Bad:1): With the trait Ailing, you will see the effects of poison last an additional turn. This meaning that you will be under the effects of poison for longer when hit by goblin ambushers in goblin fights, and you will take additional tick of poison damage when up against webknechts. Other than those niche situations, you will not see any other poisons in the game, besides perhaps friendly firing upon an ally while you use a poison vial. That said, this trait is removable with a monk or beast slayer background related event, and there are worse traits that your unit could have.
  • Asthmatic: (Terrible:0): With -3 fatigue recovery per turn, the trait negates any tolerance to be had with a recruit that is Asthmatic. Fatigue recovery will always be a priority for a unit that intends to make themselves useful in combat, and Asthmatic is the antithesis of this.
  • Athletic: (Good:3,♛,♝,♞,⚡,♜,♟): The trait Athletic will reduce the fatigue drain from traversing a tile by 2, which can add up if you need to charge, retreat or reposition in a fight. Otherwise, it is a pretty alright trait to have on just about any class, but it isn't crucial to the success of any build.
  • Bleeder: (Bad:1): There is not an advantage to have an ally bleed during combat, and with Bleeder you will receive bleeding damage for one additional turn, on top of the normal 2. Bleeding naturally does 5 damage per turn, but when facing enemies with cleaver mastery you will take 10 damage per turn. So, you will essentially take 15 to 60 damage with the Bleeder trait, instead of 10 to 40 damage (without an enemy with cleaver mastery). Ultimately, having Bleeder on a troop won't completely ruin a hire, but it is best to avoid having the trait on anyone. This is thanks to the late-game dangers of orc, barbarian, human, necrosavant, and ancient undead cleavers.
  • Bloodthirsty: (Poor:2,♛,♝,♟): With Bloodthirsty your slashing and crushing units will be able to decapitate/brutalize all enemies you kill, which is pretty powerful against the undead. This is because decapitating wiedergangers, or any unit that can turn into a zombie will stop the unit from resurrecting (except for fallen heroes). This can be triggered from swords, axes, and cleavers (bludgeons can also bash open opponents). Additionally, there is a negative event when near a town that causes your troop to go on a rampage, costing you some reputation and/or gold. Otherwise, the trait is fairly specialized for wiederganger fights, and the decapitations are mostly aesthetic, for those who are into that...
  • Brave: (Poor:2,♛,♝,♞,⚡,♜,♟): The trait Brave is very much a okay trait to have on any character, as +5 free resolve doesn't hurt anyone. There may be an event or few that benefits from your character being brave, which can be nice. Otherwise, there are better traits for your characters to have, including the more impactful Fearless, in which provides a +10 resolve boost, or earning Arena Veteran for the free +10 resolve.
  • Bright: (Good:3,♛,♝,♞,⚡,♜,♿,☸): The permanent 10% experience buff that Bright has to offer for your troop is strong, as the buff will last with you throughout the entirety of your run with that character until max level. More experience will always result in the bettering of your troop's stats, which will allow you to be successful. Once your stats start to soft cap, it may lose some of its value, but overall it will serve your troop well. Additionally, for most builds, obtaining late-game perks faster is greatly beneficial for survivability and damage output.
  • Brute: (Poor:2,♛,♝,♞,☸): The trait Brute can be classified as a give and take trait, as you receive +15% damage upon hitting the head with a melee weapon, but you sacrifice 5 melee skill. In the long run, this trait can be alright for dealing Dps once you've made up for the loss in melee skill; However, you will likely notice the lack of melee skill during the early leveling of the character. In a build of efficiency geared towards a late-game, this isn't something that you need to worry about too much, but it is still bad when your unit doesn't deal their Dps due to a lower hit chance. This trait will work out okay for a unit running Head Hunter, but that isn't really a perk that can fit into every build. Additionally, there is also a negative town event that can occur with having Brute, which can cost you a bit of gold and relations with the town. In addition, it's possible that the damage calculation of brute only applies to hit point damage.
  • Clubfooted: (Bad:1): With Clubfooted, your unit will build up 2 fatigue for each tile traveled, which is an unnecessary crutch to have on any troop that wants to move about the combat map. Although, you can have a playstyle where you don't move around as much, unless you want to reposition to a more advantageous location. The trait will make the unit heavily fatigued very quickly if you are intending to retreat from a fight and could put the unit in danger if he falls behind. Otherwise, there are worse traits out there to have, but for certain, having a unit be Clubfooted will not help you win any battles, especially on bad terrain.
♢ Traits in Review: C-E: Part 2 ♢
  • Clumsy: (Bad:1): A trait that's sole purpose is to reduce the efficiency of your melee skill can understandably be determined to be a bad trait. While this may only apply to melee troops, if you happen upon a ranged unit with Clumsy, you can afford to be indifferent about the trait. Otherwise, there is no benefit to the -5 melee skill trait, but there are harsher traits to have on your troops. Additionally, your brother will have the chance to injure himself in a couple of negative events.
  • Cocky: (Terrible:0): With Cocky being a give and take trait, you will have to value how much losing 5 melee and ranged defence in exchange for only 5 resolve is worth to you. I would argue that there is no build that could benefit from losing melee defence. The +5 to resolve is not worth the trade off, and there are other traits that give you additional resolve with no downside, including free Arena Veteran resolve.
  • Craven: (Terrible:0,♿): The trait Craven is not worth having on any brother you want to keep in the long-term, as a -10 to resolve is very damaging in keeping your brother steady during combat. The only bonus to having Craven is that your troop will be forever content in reserve, which is valuable for a meme background that you just want to keep around for the events.
  • Dastard: (Poor:2,♿): The trait Dastard is commonly used to allow some troops, mainly meme backgrounds, to stay in reserve without taking hits to morale. The downside is that your troop will always start with a wavering morale. In terms of traits used for reserve sitting, this is a better deal than the -10 resolve loss from Craven. Additionally, you will be able to remove this trait via a couple different events if you have the right backgrounds.
  • Deathwish: (Good:3,♛,♝,♞,♜,♟,☸): With the ability to not take a morale hit from taking damage to your hit points, you will be able to avoid the debuffs associated with a wavering morale. While it is likely that with a strong resolve, and a good defence, you will not take morale hits too frequently, the Deathwish trait simply makes it so that morale hits happen less often, generally speaking. This makes Deathwish a generally good trait to have on any member of your company that intends to absorb damage and is especially key for HP Nimble builds.
  • Determined: (Good:3,♛,♝,♞,♜,⚡,♟): The trait Determined is largely undervalued. This is because starting with a confident morale every battle (if your mood is content and above), gives you a +10% buff to melee/ranged skill, and melee/ranged defence. This could happen in every battle if you can manage your troops' mood properly. The only downside is you may lose your confident status over the course of a battle, and one can normally achieve a confident status without the trait. Otherwise, it is a solid trait for any role to gain the edge in the start of a fight.
  • Dexterous: (Good:3,♛,♝,♞,♟): The deal with the trait Dexterous is that you will be receiving a +5 to your melee skill, which is pretty solid for any melee fighter. While you will soft cap on melee skill eventually in the long run, you will always have the +5 to melee skill to help you out in the short term, and in the case that you are being debuffed. Otherwise, there are better traits that a melee fighter could have, despite melee skill being a highly valued stat.
  • Disloyal: (Terrible:0,♿): With the trait Disloyal you will be able to keep one of your troops in reserve without them naturally falling below content, but you run the risk of your troop abandoning your company if your mood, money or food runs low. Otherwise, it is important to compare Disloyal to the Craven and Dastard traits for their ability to hold people in reserve.
  • Drunkard: (Poor:2,♛,♝,♟): When it comes to the trait Drunkard, it is difficult to put an accurate value on the trait that pleases everyone. On one hand, the trait is loved for its +10% bonus damage, in which can impact various battles over the course of a campaign and works well with other bonus damage sources. In addition to the bonus damage you gain +5 resolve, which works well against resolve checking enemies. On the other hand, your hire will lose -5 melee skill, and -10 ranged skill, which is fairly annoying, but a worthwhile trade off in the long run. The main problem with the trait that makes it difficult to put a value on is the random events where your Drunkard hire will have a chance to discard a random item equipped on him or in your company's wagon inventory. The reason why this makes Drunkard a poor trait is because it makes carrying valuable or famed items in your inventory very problematic, and weapons on that character will have to be ones you are okay with losing. In other words, no famed item for that guy, which can result in missing out on bonus damage from the famed items. The trade off with this event is that you have the option to scold your Drunkard, which can result in him losing the trait. There are some minor factors to consider such as the chance that your Drunkard becomes drunk after a single tavern visit, and other events. In the end, it comes down to how attached you are to your famed greatsword, and how much you value a +10% damage buff.
  • Dumb: (Bad:1): The trait Dumb is simply put a negative trait, as a -15% debuff to experience gain will not benefit any campaign intended for this guide. That being said, the trait can be removed if you have a Historian or Monk background via a series of random events, and will wear off once you reach max level.
  • Eagle Eyes: (Poor:2,⚡): With the trait Eagle Eyes, your mercenary will be able to see one additional tile range of vision. This is helpful when one's vision is penalized at night time, from a vision impairing injury, or when your unit is poisoned by goblins. With the introduction of a -1 vision penalty helmet, in most standard daytime fights, you archer's bow range will not be harshly limited thanks to increase in max vision from the Eagle Eyes trait; However, with the archer being able to utilize the 120 sallet helmet without any vision penalties, there is no reason to utilize the opportunity to wear a -1 vision penalty helmet, unless it is a famed armour. In conclusion, the trait is beneficial to have, but not very impactful compared to other traits.
♢ Traits in Review: F-I: Part 3 ♢
  • Fainthearted: (Bad:1): The trait Fainthearted should be judged in the context of how much does this trait take away from your hire. If we are looking at it from that perspective, we see that the trait causes the troop to receive -5 resolve, in which we can sum up to about a max roll of a resolve level up, or a patch up via arena trait. With resolve being a good stat to have a decent base of for frontline troops, you definitely do not want this trait, but on a troop in the backline this trait could be almost negligible. In the long run, there are worse traits to have on your hire, but one should still avoid obtaining this trait.
  • Fat: (Bad:1): The Fat trait should be avoided for all troops, but if your mercenary has the trait it isn't the worst trait to have. This is because a +10 to HP is pretty decent, but it comes at the cost of -10 to fatigue, in which is not an acceptable exchange. With the effects of the trait out of the way, it is important to note that the Fat trait can be achieved by troops with the Gluttonous trait, but also the Fat trait can be removed via a random event. Additionally, there is the trait Tough, in which grants a no-nonsense +10 bonus to HP, making the Fat trait shrink in value even further.
  • Fearless: (Good:3,♛,♝,♞,♜,⚡,♟): The trait Fearless adds to your hire a +10 bonus to the resolve stat, in which is helpful for securing a solid base resolve to work with. Having to spend less level ups, if any at all, into resolve for an ideal candidate that is to be for an efficient character build is less efficient than spending your level ups in other more important stats (with the only exception being a banner carrier build). Even if you hire comes with an ideal amount of resolve, additional resolve is still very valuable for taking on hexes, alps, geists, ancient undead, large swarms of enemies, and even becoming confident easier. Fearless is rated as good, because of the positive value you will get out of a +10 bonus to resolve; However, it is important to keep in mind that every hire's individual base stats will determine the ideal traits that are best for that particular hire & that the arena traits can be a fix for resolve instead.
  • Fragile: (Terrible:0): With the trait Fragile, you will gain nothing of positive value, as a -10 to your total hit points provides no benefit. With the current list of possible backgrounds to hire, obtaining Fragile cannot be ignored, as there is no background that is capable of obtaining the trait Fragile that can afford to lose 10 hit points, without ruining the future potential of an efficient character build candidate.
  • Gluttonous: (Poor:2): When considering the value of the trait Gluttonous, you must consider the role of the character build in your company. If it is a Nimble build, you can utilize the event that can occur to make the unit obtain the Fat trait for the bonus hit points. Otherwise, having to spend more on food, running the risk of your unit abandoning you during times of low provisions, and the chance of a couple primarily negative events occurring is not a valuable exchange for the trait slot. To clarify, this trait is bad on most builds, but won't ruin your build. This is because the Fat trait can be trained off of your unit, and the trait Gluttonous does not affect the stats of one's unit until they become Fat.
  • Greedy: (Terrible:0): The problem with the trait Greedy is not necessarily the 15% increased daily wages for that hire, but more so the events & effects that come with it. Your unit will be quick to leave the company if your gold totals drop too low, which shouldn't really ever happen, but there are situations where you are cashing out for a famed item. The main issue with the Greedy trait is that a unit with Greedy will eventually demand for raises in pay and will continue to repeat that event indefinitely. With Greedy being a trait that can be obtained by most backgrounds through other company events, it is a trait that is sometimes hard to avoid, but one that one should seek to avoid by hiring the Paymaster for your retinue. Additionally, your Greedy units will gain a bad mood if you stop a hedge knight fight by spending gold, which could result in your unit abandoning the company.
  • Hesitant: (Poor:2): The trait Hesitant is simple in its debuff as it solely removes 10 initiative from its bearer. There are some minor, hyper specific event interactions that can be affected by the trait, but all is negligible. With that said, having -10 initiative is not a big deal, even on an archer.
  • Huge: (Good:3,♛,♝): With the trait Huge you will gain the all valuable bonus damage for melee attacks. It comes down to a +10% increase in damage dealt, which would stack nicely with other bonus damage sources such as the perks Killing Frenzy & Executioner. While 10% isn't going to matter all the time, but it will have an impact on the amount of hits to kill an enemy throughout your many battles. With this in mind, you will be sacrificing -5 to your defences, most notably you will be losing -5 to your melee defence. It is a more valuable trait for polearm units, as they can spare the loss of melee defence for the extra damage output, but don't shy away from obtaining Huge for one of your duelists or two-handers.
  • Impatient: (Good:3,♛,♝,♞,♜,⚡): Having Impatient on any of your hires is fairly valuable, as there are a number of situations where being able to act first at the start of the round is beneficial. Some situations would include but are not limited to are: being able to instantly call a working retreat at the start of the fight, setting up your units to defend against ranged units, and being able to out initiative high initiative units such as: hexes and direwolves. With that said, there are stronger traits to have on most of your units, and you can achieve this effect with the deserters alternate start.
  • Insecure: (Bad:1): With the negative effect of the trait Insecure being that your unit will never reach a confident morale, it is safe to say that Insecure is a bad trait to have. This is mainly because you will be missing out on the 10% bonus to melee skill/def and ranged skill/def that you can obtain easily at the start of or in battle. It isn’t the worst trait to have, but it does lower the combat potential of your unit.
  • Iron Lungs: (Great:4,♛,♝,♞,♜,⚡,♟): The trait iron lungs is generally regarded as one of the best traits to have on your hires due to the extra 3 fatigue that you regenerate per turn. This regeneration allows you to use your fatigue heavy abilities more freely, take less turns where you are using the perk Recover, and allows for niche builds to exist where you are able to have exactly the amount of fatigue in order to use a combination of abilities every turn. Whatever the reason you use Iron Lungs, it is simply a great trait to have on any build.
  • Iron Jaw: (Good:3,♛,♝,♞,♜,⚡,♟): By lowering the threshold of receiving an injury upon taking a hit to your life points it makes Iron Jaw a valuable trait to have for a Nimble build, with Battle Forged units when being attacked by armour penetration, or any unit in the early-game when armour is low. With that said, there are better traits that do more for your late-game units, as the value of lowering the threshold of receiving injuries really only matters if you are taking hp damage, which isn’t typical of a late-game Battle Forged unit. Of course, there will still be encounters where your unit will take hp damage, but it isn’t going to be a trait that is valuable for every battle.
♢ Traits in Review: I-Q: Part 4 ♢
  • Irrational: (Bad:1): With the trait Irrational you receive either a -10 or +10 on morale checks while in combat. This meaning that your unit can either increase his morale insignificantly (you will almost always end up at confident in the late-game without this trait), or your unit will lower his morale irrationally (knowing dice rolls, there will be times of unfortunate failures in morale, while the good streaks remain insignificant). That said, in the long run the trait Irrational will not benefit you enough to merit taking up a trait slot, as the impact of this trait is poor.
  • Loyal: (Poor:2,♿): The trait Loyal is very much a neutral trait, as it doesn’t provide any noticeable effects when a unit has this trait. The idea of this trait is to allow for a unit to resist desertion if they are unhappy. With that said, you should not ever be at the risk of a unit deserting your company, as it is relatively easy to manage the moods of your company with the occasional tavern visit. An added benefit of this trait is that it allows for your unit to have a barrier in between the company daily wage increase event failure and gaining the Greedy trait. In other words, your unit will lose his Loyal trait instead of becoming Greedy on the first time this event procs. In the end, the impact of Loyal will not be noticed, but at least the effect is not negative, other than taking up a trait slot.
  • Lucky: (Poor:2,♛,♝,♞,⚡,♟,♿): With the trait Lucky you will slightly increase the odds of dodging an attack by having a 10% chance for the attacker to have to make two attack rolls on your Lucky unit. To be more specific on the gains received, you will gain at most 2.5 melee defence, as that is only if the enemy has about a 50% chance to hit you. The trait is next to worthless if the enemy has a really good chance to hit you, but the perk does have it’s highest value when the enemy has a 5% chance to hit. This is because it surpasses the cap of 5% to be hit to be much closer to 4.5%, which isn’t much, but it is essentially almost a 10% increase in avoiding being hit on an already very low hit chance. With that said, there are better traits to have on the majority of your builds; Although, it can be particularly good for a tank unit with exceptional melee defence.
  • Mad: (Bad:1,♿): The trait Mad will be used in three aspects: an unnoticed boost to resolve of +15 or a damaging -15 resolve when up against a morale check, immunity to fear and mind control abilities (Ancient Priest and Hexe resolve attacks), and the ability to trade The Black Book gained from the Sunken Library in exchange for a good famed shield (with daze foe upon block), two mysterious jugs that grant one free perk point each, or 50k gold. As a trait all together it is not worth having on your unit, as it really isn't that great to fail resolve checks, and the immunity to fear and mind control abilities isn't very impactful. With that said, it's primarily bad in the sense that it can only be gained on non-efficient backgrounds, as you will need either a level 2+ Historian or a level 9+ Cultist to claim the trait via an event. Just use the trait as the one time opportunity to gain two additional perk points with the mysterious jugs to put one or two units above the perk cap (see the section "Miscellaneous: Answered Questions & Helpful Comments: Part 5" on how to spend those perk points the most efficiently).
  • Night Blind: (Bad:1): When it comes to losing -1 vision at night from Night Blind, there isn’t much of a burden on your combat efficiency as any unit other than a long distance archer who wants to snipe a high priority target such as: necromancers, hexe, enemy archers, goblin shamans, etcetra. other than that situation there isn’t any real situation where having -1 vision is bad on a melee build, besides the loss of a trait slot, unless you are wearing a heavy helmet and are inflicted with a vision penalty from poison, in which you may not be able to perform two tile distance strikes.
  • Night Owl: (Bad:1,⚡): With the trait Night Owl you will regain +1 vision on your unit during nighttime, which the normal vision penalty at night is -2. This does make nighttime fights slightly more viable for an archer build or for scouting your enemies without a falcon; However, this trait does nothing to stop the -30% to ranged skill, which greatly inhibits one’s ability to use archery during the night, despite the -30% lost to ranged defence that occurs as well. While this trait isn’t negative in value and there are worst traits to have, it does attempt to aid an inefficient strategy in only a very small way.
  • Old: (Terrible:0): To start, it is pretty safe to say that the Old trait is an extremely negative trait to have. While it is a trait that is essentially exclusively received by the Swordmaster background, it is a trait that I wanted to discuss, as a minus to core stats on an already stat punished background is unforgivable. Almost as fast as it is achieved, it can be removed with a limited supply of water skins filled with the waters of life. The trait provides no real value other than a token 10 to resolve and the ability for the Swordmaster to be content with sitting in reserve. For more information on the Swordmaster background visit the Backgrounds to Consider section.
  • Optimist: (Poor:2,♛,♝,♞,♜,⚡,♟,♿): The trait Optimist is in general a positive trait. With that said there isn’t a lot of value to be had with a +5 bonus to resolve upon receiving a positive morale check. This is because both in and out of battle it is fairly easy to maintain mood and morale without the need for a trait. Overall it can be a helpful trait to have in getting to those better morale/moods, but it will cost you a very limited trait slot.
  • Paranoid: (Good:3,♛,♝,♞,♟): The main benefit of Paranoid is that it gives an increase of +5 to melee defence (also +5 ranged defence), which more melee defence is always of high value on any build for shortening the gap of times hit per battles and times dodged. There is a major initiative penalty of -30 for having the trait, but for most builds there is debatably no downside to having lowered initiative, as going later in the turn order can synergize well with certain perks like Reach Advantage and Indomitable. That said, you wouldn't want this trait on a Nimble user with the perk Dodge, or on an archer as turn order can matter for sniping opponents. While this trait isn't as universally good as Sure Footing, it is still a very strong trade off to gain melee defence in exchange for initiative, and a few possible mood related events.
  • Pessimist: (Terrible:0): With the trait Pessimist you will receive a -5 to negative morale checks, in which simply makes the negative rolls very punishing. It is all the bed effects of irrational and the opposite of Optimist. In addition, your positive moods will go away quicker than default, which is not good for maintaining your chances of a confident morale buff at the start of a fight. Overall, the trait provides no value to your unit, and will only eat away your morale, unnecessarily.
  • Quick: (Poor:2,⚡,☸): While an extra +10 initiative isn’t usually that helpful for most completed character builds, a small boost to initiative does provide value to some. Some builds that would benefit the most from this trait would be builds that use Dodge as a means of defence, a fencer who uses initiative for extra damage, and other builds that benefit from having a small boost in turn order such as archers trying to get the edge on an enemy crossbowmen. Other than those scenarios most builds don’t see much benefit from receiving the trait, even though the value is not negative.
♢ Traits in Review: S-W: Part 5 ♢
  • Short Sighted: (Bad:1): With the trait Short Sighted it isn’t always a deal breaker when having this trait on one of your troops, as frontline units will not be overly impacted by a -1 to vision. Although, it is important to note that archers and polearm users will be negatively impacted by a penalty to vision. This is because an archers max range will be limited during night fights, as well as If you are trying to take advantage of high ground snipes, or as a polearm user you might be limited by a heavy vision penalty from wearing a helmet, rendering you unable to attack the two tile distance of a polearm. Otherwise, it is a trait best avoided on most, but it is not always a deal breaker.
  • Spartan: (Poor:2): The trait Spartan is an okay trait to benefit from as eating food at half the rate as a typical troop is pretty nice in terms of maintaining your food economy. Additionally, your Spartan unit will be less likely to leave if you run out of food, which can be valuable for extended wilderness runs in the late-game. With this in mind, you are giving up a trait slot for a non-combat trait, as well as this trait clogging up your events with a repetitive event that can result in exclusively neutral or negative outcomes.
  • Strong: (Great:4,♛,♝,♞,♜,⚡,♟,♿): Arguably, the trait Strong is one of the best traits you can have on any unit in your company, as the extra +10 to fatigue is welcomed in by any role in your company. The trait is important for Nimble builds who can’t afford to put stat points into fatigue over their other core stats, heavy armoured units will almost always benefit from additional fatigue, and it can push certain low fatigue backgrounds into end-game unit hiring territory (name titles such as The Bear, Big, Bull, Ox, & Strong can lead to getting the trait). The trait also comes with a few positive events to help strengthen the value of having the trait on members in your party. All in all Strong is a great trait to have and there is usually not limit to how much fatigue you can utilize.
  • Superstitious: (Terrible:0): With the trait Superstitious you will be at a -10 disadvantage against resolve punishing enemies that make a roll against your resolve. This would make it harder to face off against such foes throughout your campaign, and hurt your performance with that unit. Circumstantially, that isn’t the worst part of the trait, as there are a few harshly punishing events that can occur on a unit with Superstitious. This would include events resulting in a bad mood for the unit, applying a -50% resolve debuff for a few days, and the chance to lose some gold. Overall, this trait is not beneficial to have on a unit in your company.
  • Sure Footing: (Great:4,♛,♝,♞,♜,⚡,♟,♿): The trait Sure Footing is an all around good trait to have on any unit, as a +5 to melee defence can be useful on any efficient character build. The extra +5 to melee defence is always static despite any possible debuffs and is a strong base to work with from start to finish of your build.
  • Survivor: (Poor:2,♟,♿): With the ability to survive with a 90% chance when hit points are reduced to 0, one may consider this trait to have value in the long run; However, you are better off not getting your troop into a situation to where his hp would be reduced to 0. By not putting your troops in an incredibly disadvantageous position you are negating the chance of your unit’s hp from reaching 0, in which makes the trait Survivor never become valuable. While it is easy to say that you won’t put your troops into a disadvantageous fight, but if you are skilled at Battle Brothers and have reached an end game company, you really shouldn’t be at a large disadvantage in any fight. In addition, the main reason why this trait is rated as poor is because you will be revived with a permanent injury debuff, in which can be removed by limited use water skins, but are otherwise typically greatly negative.
  • Swift: (Poor:2,♛,♝,♞,⚡,♟): With the trait Swift, you will be gaining +5 to ranged defence, which on it's own as a trait is very negligible, but there is nothing too wrong with the trait, other than it taking up a trait slot. More ranged defence will allow your unit to dodge slightly more against ranged attacks, but only really matters if the AI desires to shoot at that unit (typically a backliner unit or the unit's in front of them).
  • Team Player: (Poor:2,♛,♝,⚡): The trait Team Player is allows you to lower the chances of hitting your ally in an AoE attack or friendly fire situation by 50%. This meaning if you were to swing your weapon for a 80% chance to hit, and your ally has 40 melee defence, the attack would have about a 20% chance to hit your ally instead of a 40% chance. With this in mind, you do not want to be making attempts at friendly firing at your allies. It encourages bad actions that you should not attempt to risk, and these situations that may be more efficient to perform that involve the chance of friendly fire are very rare. That said, the worse harm this trait causes is the filling up of a trait slot, and there are much worse traits to have on your units. This one just doesn't see much efficient use.
  • Tiny: (Poor:2,♜,⚡): When it comes to the trait Tiny, you are trading 15% melee damage in exchange for a bonus of 5 melee and ranged defence, which can be useful for non-melee attacking builds such as banner carriers, archers and tanks. Looking at this trait from an efficiency-based perspective, it is only really a bonus to melee defence, as ranges defence is negligible in a late-game company, and with it only being a plus 5 to melee defence, you will notice there are better traits for achieving a bonus to melee defence that do not come with a harsh negative.
  • Tough: (Great:4,♛,♝,♞,♜,⚡,♟,♿): The trait Tough will provide your unit with a bonus 10 hit points. While hit points are not the most important stat, it does provide value to a unit whom’s base hit point roll is less than the ideal starting amount, which can save you on future stat rolls or at best remove the need for Colossus altogether if you can roll high enough base hp. Overall, more hit points is always useful for any build; However, it is only the case as long as it isn’t in sacrifice for more important stats. Notably it can turn certain lower tier backgrounds who lack high base hp into preferred end-game units (Fisherman, Gravedigger, Militia, Nomad (melee), Thief, etc.), given other good rolls/stars.
  • Weasel: (Poor:2,♛,♝,♞,♜,⚡,♟): When talking about the trait Weasel we are talking about an incredible increase in melee defence; However, this +25 melee defence gained is only applied when you are in a fleeing state in terms of morale. With this in mind, it is seemingly hyper situational, but it can provide some value to a unit fleeing from a geist scream, and needs to avoid taking attacks of opportunities. With this mind, avoiding a fleeing state in a late-game company is commonplace. One will also avoid reaching such a state in the first place with the use of a banner carrier and 50+ resolve on one’s melee units. Additionally, it is worth mentioning that one cannot obtain the Hate for Undead or Hate for Greenskins traits. That said, there are worse traits to have and having Weasel is fine, just not the best use of your trait slot.
♢ Traits In Review: Grouped Traits: Part 6 ♢
  • Pit Fighter: (Good:3): The trait Pit Fighter is the promise of a bonus 5 to 10 resolve in the future (other bonuses included), despite this tier of the trait providing no actual value yet. In order to obtain Pit Fighter you will have to earn it by gaining victories in the Southern city arena. Since this trait is obtained, it will be added to your current unit’s trait bar, even if they already have multiple traits. It is important to note that some backgrounds with low resolve will benefit/rely on gaining arena victories to improve one’s resolve without the investment of character level ups or perks. With this in mind, there is no efficiency-based reason not to try to obtain the arena traits for the extra resolve.
  • Arena Fighter: (Great:4,♛,♝,♞,⚡,♜,☸): With Arena Fighter replacing the trait Pit Fighter after gaining 5 arena victories, you will gain +5 resolve to any build that meets the arena victory requirements. An extra +5 to one’s resolve is welcome on any efficient character build, and should be worked towards when convenient or when there is less of a demand for being efficient with your time for economic gains. With this said, it will be replaced by the next arena trait, Arena Veteran for an even larger bonus.
  • Arena Veteran: (Great:4,♛,♝,♞,⚡,♜,☸): The trait Arena Veteran is a free obtainable trait that replaces Arena Fighter after you reach 12 wins in the arena with your unit. The trait provides a bonus +10 resolve, and the added 50% chance to survive with a permanent injury if killed by a non fatality attack. With this in mind, obtaining Arena Veteran is extraordinarily worth obtaining on every active company member, as it typically comes with very little risk to obtain with a leveled unit. As mentioned in the Pit Fighter trait explanation, this tier of the trait will bring more value to low resolve backgrounds, and it will allow you to patch up their resolve to 45-55 without spending any level up points on resolve. In terms of the +50% chance to survive a non fatality if killed, it isn’t something you should aim to ever use, as risk management and proper tactics will be able to prevent from reaching 0 hp (see the trait Survivor for more information).
  • Fear of Beasts: (Bad:1): The Fear of Beasts trait is one of the more impactful fear themed traits as the -10 to resolve is particularly impactful when trying to resist charms from hexes. The resolve loss will also make it so you take more damage from alp encounters and is generally not positive to have on any build. Overall, there are worse traits to have on your units, but with that said, you can remove this trait via an event, as well as gain it after a tough loss against beasts.
  • Fear of Greenskins: (Bad:1): With the Fear of Greenskins trait you will gain nothing of tangible value from having a -10 to resolve against orcs and goblins. This trait can be gained through big losses against greenskins, as well as lost through events. Otherwise, lowered resolve is never great, but there are worse traits to have, as long as you are not a Fearsome user.
  • Fear of Undead: (Bad:1): When talking about Fear of Undead, the trait will impact your fights with a -10 to resolve when it comes to succeeding resolve checks against the ancient undead’s Fearsome and the geist’s screams. This could result in morale panics, but it is not terrible compared to some other negative traits, and much like the other fear traits it can be removed or gained.
  • Hate for Beasts: (Poor:2,♞): With the trait Hate for Beasts you will have a bonus +10 resolve when fighting against beasts, which can be particularly valuable when facing against hexe and alps, whose abilities revolve around resolve. Much like the fear themed traits, this can be gained by losing units to beasts; However, it may be not very worthwhile to attempt to gain said trait, unless you can prevent bad moods easily and conduct the loss of troops safely. Units who have this trait cannot become fearful against beasts, which is a small plus.
  • Hate for Greenskins: (Poor:2): The trait Hate for Greenskins will give you the added +10 resolve in fights against orcs and goblins. That said, the bonus resolve against greenskins is not particularly useful, as it isn’t usually resolve that is tested against these units. Like the other “Hate for” traits, this can be gained through heavy losses when against the associated units; However, it is not worthwhile to attempt to farm this additional trait, as it isn’t worth the bad mood management or time investment.
  • Hate for Undead: (Poor:2,♞): When talking about the Hate for Undead trait in comparison to the other “Hate for” traits, the +10 bonus resolve against ancient undead and geists can be fairly decent have. That said, there are better starting traits to obtain in an efficiency-based campaign, but if you happen to come across or obtain this trait through the loss of sacrificial units, it would not be put to bad use.
♦ Perks: Tier 1: A Min-Max POV: Part 1 ♦
While perks deserve in-depth explanations of how they function and how they could be used in all scenarios/builds, this portion of this guide is going to be focused on the strengths and weaknesses of each perk in relation to an efficiency based playstyle/builds relative to this guides parameters of an efficient late-game company (See disclaimers section). Additionally, each perk will be valued and rated based off of their value to an efficient late-game build, in which is limited on perks, instead of seeking value out of usable perks that do not excel in their category of use. If you need an introduction or in-depth data presentation of each perk with a neutral evaluation and equal consideration for early-game use, I would suggest you go to the resources section at the bottom of this guide.
Perks:
For the sake of simplicity, I made a couple of sorting keys:(1-5)
  • 0 = Avoid using, 1 = Not efficient to use, 2 = Usable but not recommended, 3 = Okay but possibly a better option, 4 = Good but not absolute, 5 = Absolutely top tier.
  • ♛ = Frontliner, ♝ = Polearm, ♞ = Banner Carrier, ♜ = Nimble Tank, ⚡ = Archer, ♟ = Fodder, ☸ = Core Perk for Alternate Meta/Memeable Builds.
Starting off with:
    Tier: 1
  • Fast Adaptation: (Bad:1,♟): Fast Adaptation is a perk that only hires with low Melee/Ranged Skill, that you intend to use for attacking, benefit decently from, which typically only applies for poorly rolled peasant hires, and not hiring from optimal backgrounds early & late-game. Fast Adaptation is really only meant for the short term as hit percentages eventually start to come close to 80-95% with strong units against most late-game foes. You should not need to worry about low hit chances unless you are up against very rare high melee defence units or if you are still in the construction phases of your company, in which the extra fail-safe of the perk does come into some value if your hit chances are less than 40% chance to hit; Otherwise, the gains for each stack is too small to be worth the perk investment. The common problem with this perk is that you are relying on failing to do something that should happen on the first go around, and while it can make a bad outcome better, it typically takes too long to kick in & only applies for one hit. In addition, most of the time there are better ways to increase your chance to hit besides Fast Adaptation (weapons, good backgrounds, high ground, etc.). This perk is not entirely useless as it can be very useful for trying to make bad fodder troops useful for the duration of their stay in your company, but more often than not, you don't typically want to hire from low melee skill backgrounds for melee roles at any point in the game.

  • Crippling Strikes: (Poor: 2,⚡,♟): From what is understood about Crippling Strikes is that it will allow you to increase the odds of you inflicting an injury on an opponent. That said, with most high damage weapons you will already inflict injuries without the perk investment, but having Crippling Strikes can make a difference with lower-end damage attacks or when against enemies with high HP pools. Another factor to consider is how the value of injuries vary, and they are randomly pulled from pools of injuries dependent on the weapon type. Injuries can be good, by hindering a difficult opponent, or increasing your chances in defeating your foe. They also synergize with builds or ally units that have the Executioner perk, as it can allow you to set up enemies to die in moderately less hits. Sometimes injuries can be inferior, and not affect the effectiveness of an opponent, or an injury could also come too late in the damage order, as if they've gotten to the point where they are injured, it is possible they will die very soon anyways. Overall, most builds will not need the 33% injury threshold boost, but there are some builds that can take advantage of it to score injuries on important late-game foes, like barbarian chosen.

  • Colossus: (Okay:3,♛,♝,♞,♜): The most important thing to note about Colossus is that additional Hit Points are always welcomed, as long as they are not taking away from your build potential. The reason why Colossus may be picked for non-Nimble builds would be largely because of armour penetration damage. As when taking damage, depending on the weapon and perks, you will likely take hit point damage as well as armour damage, especially so when hit in the head. And with good armour and the Battle Forged/Additional Fur Padding attachment (Indomitable optional) damage reduction combo you are going to be able to take more hits in battle against armour penetrating foes than without the added hit points. As we know, more hits means taking more hits to your hit points, and the little ticks add up over the course of a battle, especially with bleed and other DoT damage effects. So, taking Colossus allows you to boost your HP roughly by 16 to 20 stat points on an efficient hire (25% of 65-73), without having to invest hardly any rolls, if at all into the Hit Point stat. In return you allow yourself to save 4 to 6 max rolls into HP and get your HP to a healthy 85 to 95+ to help avoid a majority of the risks of being killed in one turn of attacks, and also to avoid a majority of the more dangerous armour penetration strikes in the game (40 Dmg strikes to the head from barbarian chosen maces), in which some can reach well into the 90's or more (.01% of the .1% of enemy spawns, primarily champion enemies with famed two-handed weapons). In a scenario where you run out of armour, the bonus from Colossus to your HP will likely not matter much, but like other perks in this scenario, you are very likely to die that same round of attacks anyways. In the end, the strength of Colossus comes from having a higher HP pool for armour penetration, bleeds, HP based attacks, and some ultra high armour penetration attacks (given that ultra rare famed 2h weapon champion headshots can exceed 100+hp damage), where competing perks only cover one or two of those weaknesses. Additionally, this perk reduces the chance of receiving injuries by increasing your HP, in which injuries can prevent you from taking consecutive fights in a row and can force you to be extra vulnerable in combat. While Colossus is a valued perk, it isn't a must have perk for all frontliners, as some builds can get away with using only Nine Lives if their HP is too low to desire Colossus, or a select few could avoid contact entirely for situational periods.
    That all being said, Colossus is a must have perk for HP Nimble builds to greatly increase the suvivability of one's Nimble hire, unless they aren't typically targeted in most fights, such as archers.
♢ Perks: Tier 1: A Min-Max POV: Part 2 ♢
  • Nine Lives: (Bad:1,♟): Upon first time inspection, Nine Lives sounds like it would be useful for keeping your characters alive in dire situations, but in actuality this perk does not really help you survive battles throughout the game. As you go further into a campaign as a prepared company, you will not likely get low enough to where Nine Lives will proc, aside from .1% headshot armour penetration damage Rng. In general, if you get low once, it is likely you are going to die within the same round or the following turn from any attack landing on your unit. Most enemies strike more than once, they may go before you in the turn order for the next turn, and of course there is likely more than one enemy trying to kill your fighter. Additionally, if you are getting that low in the first place it is a good sign that the fight was a little too difficult to take on at your current level, and/or you may have misplayed on your positioning/strategy. The main reason why this perk is not deemed useless is because it can be used to heighten your chances of surviving against high armour penetration two-handed weaponry headshots, typically on builds where your hp is low or below a 1 to 2 shot threshold, despite the main flaw being that one more attack will be enough to take you out, even with the small boost to stats and the bleed/poison recovery you gain for the turn the perk is triggered. With this in mind, there are better perks, such as: Colossus, or even Steel Brow to help protect against unlucky headshot, armour penetration damage Rng, while Nine Lives will only really be effective in the rare cases of being damaged heavily with armour ignoring damage, in the early-game where armour levels are low or while also being affected by several bleeds or poisons. (See Colossus & Steel Brow for extended reasoning on defensive perk values).

  • Bags & Belts: (Bad:1,♞,☸): The function of Bags & Belts is to allow you to carry two extra items in your inventory without being fatigued by their existence, not counting two-handed weapons or shields. While the perk provides nothing but positives, it lacks in actual value, considering you are spending an entire perk point to acquire it. The reason why Bags & Belts lacks in value is because you really do not need anything in your inventory slots other than perhaps a throwable (pots/nets), a polearm, a dagger, in which a dagger is already weightless, or perhaps a backup weapon/whip. Before you go into a battle you must always consider the enemy type you are going to be fighting against and arm your company accordingly. Let's say you are to fight ancient undead, you ought to arm your men with blunt weapons. If you are to fight beasts, you would arm your company with high base damage weapons. Typically, in the late-game you will not need to worry about weapon choices too much, as you will most likely have specialized your weapon build, while only switching weapons/specialist units out in rare encounters. The only time you need more than one weapon in a fight is if you are concerned about the durability of your weapon, or with special niche builds. The perk is a positive perk, but there are much stronger perks to award your late-game orientated crew.
    One added use for this perk, and it is for your troops in permanent reserve. This would be, so they could hold a couple more special items in their inventory and allow for slightly more space in your company inventory for carrying loot during wilderness runs.

  • Pathfinder: (Okay:3,♛,♝,♞,♜,♟): Pathfinder is valuable for positioning your melee troops, using less fatigue when traversing around/retreating from fights, and for allowing you to conserve action points to move and attack with a 6 AP strike on unfavorable terrains. Pathfinder may not seem to directly impact the outcome of your fights, but it will allow you to be more tactically efficient with your movements. The reason why Pathfinder is valued high is due to its use on saving AP on efficient, melee builds, and because you will see the perk shine if you are in hilly terrain, swamp, forest, snow or sand battle maps. It is important to note that you can often decide whether or not you want to fight on that terrain, but you will sometimes be pressured into a fight in a location with bad terrain, in which Pathfinder will give your company a good advantage. Such fights would include, fights against orcs & ancient undead in forests, fights against the ijirok & barbarian chosen in the snow, fights against goblins & kraken enemies in the swamps, and fights against nomads or the city states in the deserts. In a case like these just remember that there are sometimes terrain spots to use in each punishing biome that allow you to move more advantageously. It is a useful perk to have on your troops, but again you will have to decide if it is worth not getting another potentially more valuable perk in exchange.
♢ Perks: Tier 1: A Min-Max POV: Part 3 ♢
  • Adrenaline: (Poor:2,♛,♟,☸): Adrenaline is a perk that is situationally employed to gain a minor advantage in turn order against your non-Adrenaline opponents. It is important to note that using Adrenaline costs 20 fatigue & 1 AP just to go first in the turn order of the next turn, which can help in situations where you can afford to exchange fatigue for dealing damage before an opponent gets a chance the following turn. Let's start by saying that, in Battle Brothers, the most efficient form of survivability is stacking armour, obtaining Battle Forged, and running Indomitable/Colossus on your melee fighters (noting Nimble has a good place on mitigation roles due to a high fatigue utility). Wearing heavy armour will decrease your working initiative in battle so that you will likely go last in the turn order. This can allow you to attack an opponent twice in a row, which is valuable if you damage their formation strength in those turns. This can be powerful for builds that don't use high fatigue cost perks & abilities, but by doing this you will be taking out a large pool of your working fatigue and making it so that you can't afford to use weapon abilities or other fatigue perks as the constant fatigue build up is costly. Using Adrenaline will force you to take your Recover turn much quicker than what is good to do during a fight, as your first handful of rounds of actual fighting are crucial for gaining the upper hand. Otherwise, the perk can be used in rare situations to make the first move in order to save a struggling troop, or to make a more impactful follow up turn of attacks at a heavy cost to fatigue. In the end, Adrenaline is a perk that is viably impactful in certain sections of the game, but is outclassed by other high value fatigue intensive perks or abilities.

  • Recover: (Okay:3,♛,♝,♞,♜,♟): This is the perk that allows you to use fatigue heavy perks & abilities with more freedom during a fight. With the ability to regain 50% of your working fatigue, you're able to run heavy armour and/or at the same time be generous with your fatigue heavy skill & perk usage. Recover is useful on just about every long-term, late-game build, due to large fights, rough terrain & elongated encounters. That being said, it isn't always a perk that will fit into every build, as not every efficient build will have enough of a high fatigue drain to merit spending a perk point for recovering fatigue. The main downside to Recover is that you will have to spend a full turn of AP for recovering your fatigue, but It is important to note that Recover can be comboed with Berserk procs when wielding a 4 AP cost weapon for an efficient Recovery turn. That said, Recover won't see use in every battle, but will be crucial to the success of many fatigue guzzling builds in fights that would merit the need for a late-game build.

  • Student: (Good:4,♛,♝,♞,♜,⚡): When determining the value of Student on your character build, you must confirm a few reasons why you would desire Student. The first reason being, that if you've planned out your builds beforehand, you will be able to determine if you need to pick up Student to skip past any tiers of perks. By planning out your perk build you can pick Student early in the game and use the bonus perk point later to skip having to pick from the lower tiered perks early on. This meaning you can go straight to the late-game perks without picking any unnecessary perks along the way. Most of the time you do want to skip over your weapon mastery perk, until you have your end-game weapon type available to use, and the ability to utilize the fatigue reduction from using those weapon skills. That said, not every build will need to skip past the lower half of the perks. The second reason being, the obvious that when you pick this perk you get a 20% bonus to your experience gain, in which can greatly help your unit gain valuable stats, and better perks at a faster rate for your later levels, and/or for targeted unit xp funneling. The gaining of high-end defensive/offensive perks & stats will serve as a tremendous help in allowing you to take on end-game content earlier with that unit, if your unit has good stat gains. Of course, the experience boost doesn't last into your veteran levels, but it does still serve as a means to obtain a level advantage quickly. You of course don't want to power level units with low potential, as you likely aren't getting good stats for your level ups or perks to greatly enhance the value of the unit enough to merit the investment, as keeping a lesser unit will take away combat experience from better hires, who will make better use of the boost in the long-term. Not to forget to mention, that it may be worth picking up ability boost perks early on instead (Dodge, Colossus, Gifted, etc.), in order to benefit the short term, until you have gear & unit stability to afford better hires.
♢ Perks: Tier 2: A Min-Max POV: Part 1 ♢
    Tier: 2
  • Executioner: (Okay:3,♛,⚡): With the perk Executioner, you will be gaining 20% more damage against enemies that have sustained an injury. With a more armour penetration centered company, you will often inflict injuries on your opponents upon the first or second hit, or perhaps with the help of an ally with Crippling Strikes. It is important to note that it would be far more useful to rely on bonuses that happen before you first strike an opponent, rather than once he is already injured and doomed to die within the following strike or two; However, with certain late-game enemies such as barbarian chosen, you will benefit a great deal from the bonus damage to help finish off an opponent a potential strike sooner depending on the weapon. This is not always the case with all weapons as you will not likely have inflicted an injury on your opponent, or only need to attack them once more. In the end, it comes down to how much one values a slight to moderate increase in hits to kill in comparison to other next in line perks such as ones that focus on niche survivability scenarios.

  • Bullseye: (Poor:2,⚡): Bullseye can be seen as a regrettable pick up for an archer in your company, as it primarily just improves your percentage hit chance for hitting targets hiding behind terrain or bodies, which doesn't usually provide value in fights without distance priority targets. The distance priority targets that Bullseye seeks to gain value from are: necromancers, goblin shamans, hexes, marksmen and any other targets who like to hide in the back ranks or behind obstacles, in which are fights where bringing archers is favorable. The perk pretty much provides an all-around bonus towards hit chance against targets that are sometimes the only reason why you would bring along archers in the first place. It is known that hit chances are not a large problem for an efficient late-game build, but enemies behind cover reduce your chance to hit by 75%, which would usually be roughly a 25% chance to hit. With Bullseye your chance to hit would only be reduced by 50%, making your odds to hit your opponent closer to the behind cover max of 47.5% (having your total combat Ranged Skill be larger than 100-110+ after combat buffs helps achieve this), which can make a difference when dealing with distant high priority foes with a good ranged unit (Not an ideal strategy with inefficient builds). With Bullseye being a percentage increase, it is something that a simple stat buff can't fix. It is also worth recognizing that in a non-niche encounter it is better to attack the unit in front of your desired targets or to help in the downing of immediate foes instead; However, this is not the likely case with distance priority targets, and can lead to your high priority targets lasting a lot longer than they should, and in some fights hindering your unit's potential in a fight effectively (mainly hexe & goblin shamans). With that said, this perk usually will not be as valuable as the other perks available to a ranged build, but it can make its way into builds that specialize with a warbow utilizing sufficient Ranged Skill for those niche fights.

  • Dodge: (Okay:3,♜,♟,☸): When talking about the perk Dodge, you have to look into the context in which the perk can be used. With Dodge, to get the most value out of the perk, you would have to run a build centered around Initiative. The only builds that are somewhat viable that revolve around Initiative are Nimble fencers or low fatigue usage Nimble builds. This is because they will likely not be tested by needing to dodge hits every round; However, these builds are not considered an efficient usage of your party composition. That said, the more Initiative you have the more you benefit from this perk, and you can synergize it with different perks accordingly. There are issues with this, as Initiative is not favored by the player throughout a battle or against certain high Initiative foes/high fatigue recovery enemies, as when performing high value attacks/skills you will become fatigued and your Initiative will fall as well. Initiative is also tricky to fit into a stat build, as there is usually too large of a spread in stat distribution to merit leveling Initiative over other higher priority stats such as: Melee Defence, Melee/Ranged Skill, Fatigue, Hit Points (Nimble), and possibly even Resolve. In addition, no matter how high your dodge chance is, you will be hit eventually, and so it is not good to rely heavily on Dodge for your main defence. With this in mind, you do not have to use Dodge as your main defence in an efficient character build, but you can use it as an added bonus to Melee Defence with your base Initiative (Nimble), in which could grant your build an added 10 Melee Defence for the early sections of your fight (lasts longer with the more Fatigue you have, possible to be kept high on fatigue neutral). That being said, the perk can also be picked up for fodder/fatigue neutral builds to some effect for the added Melee Defence advantage. With all that considered, this perk isn't a must have for lightly armoured troops, but on the right build it can add onto the potential of one's important Melee Defence to some minor success; However, when compared to better stat allocation/fatigue guzzling builds, Dodge/Initiative reliant builds often are lesser in strength and a different perk is typically desired.

  • Fortified Mind: (Poor:2,♞): The perk Fortified Mind is a pretty self-explanatory pick up for any build focused on rallying troops or carrying the company's battle standard. You will most definitely pick this up for your banner carrier for the significant percentage-based Resolve boost, as this will make rallying your troops more reliable, while passively increasing the Resolve shared from your battle standard to speed up your allies gaining of a confident status, boosting one's combat related stats, as well as the banner simply increasing your odds at succeeding a Resolve check against: enemy resolve attacks such as Hexe charms/Geist screams, HP damaging attacks causing a morale check, enemies of various sizes causing a morale check upon entering your ZoC, and further aiding your units against static resolve debuffs like being surrounded. That being said, the perk is primarily limited to builds that utilize the Rally the Troops perk, but that said Fortified Mind is not a negative perk, it just doesn't typically fit into efficient build due to limited perk points and the idea that Resolve is perfectly fine with a base of 40-55+, but boosted to about 65-75+ by the arena traits, necklaces, and the battle standard buff from a well leveled banner carrier that don't require leveling for. Either way, this perk is essentially a Resolve stat boost for 20-25+ Resolve on one's banner carrier, as there is no truly efficient build that is a late-game ideal that needs excessive resolve.
♢ Perks: Tier 2: A Min-Max POV: Part 2 ♢
  • Resilient: (Bad:1,☸): The perk Resilient provides a general service against negative status effects, but otherwise, doesn't see very much value on an efficient character build. With the rarity of negative status effects being accounted for, the ability to reduce the duration by one turn to a minimum of one turn of those status effects is minute, as status effects actually applying to your Battle Forged end-game troops is not very often, and cutting their duration by one is not powerful enough to merit the perk point investment. That said, this perk is a partially viable solution to bleed damage, and goblin poison for HP Nimble builds. Otherwise, on a build that revolves around using heavy armour, you are not likely to be affected by bleed, or poisons, as you will not likely receive the damage to your HP required to trigger those status effects, and if they did, they would be met with a high base Hit Point reserve. When it comes to staggers, stuns and dazes, you are likely not going to endure the two turn variants very often in the game, and they will not likely make too much of an impact on your fight to wish for Resilient. With that said, there are tactics that can be employed by Resilient users that trivialize said status effects, involving waiting on your turns, being hit by a status effect, and then wearing off the status effect at the end of your waited turn. This is mainly used as a partial counter to hexe charms, but you are better off saving yourself the perk point and employing better tactics.

  • Steel Brow: (Okay:3,♛,♞,♜): Steel Brow is one of those perks that aren't really worth picking up due to the general superiority of other defensive perks, but it's still good on builds that specialize in defence, or in frontline melee builds that can afford to fit it in. While Steel Brow provides your unit with the ability to negate critical hits to the head, and lowers the chance of receiving a head injury, the perk doesn't really show its usefulness often enough to be a stronger pick than using Colossus to reach a sufficient hp threshold on an efficient hire. This is because it only works if you are struck in the head, while other perks like Colossus or Indomitable provide additional value against hp related attacks, while also protecting against head hits in their own ways. With this in mind, Steel Brow can somewhat exceed the value of other perks in it's genre when it comes to the rare, exceptionally high damage, armour penetration damage headshots. This would mainly be in fights against barbarian chosen, orc berserker flails or when against exceedingly high damage champion headshots among the top 1% of famed weaponry attacks. In terms of defensive builds, the perk is an option to mitigate the hyper rare repeated headshot critical damage by extending your chance to live by sometimes an extra hit but is not an ideal usage of your perk point on efficient hires, when there are other defensive options that cover a majority of headshot dangers, while Steel Brow mainly caters to the ultra rare (that is largely disabled before they can become an issue). If you can fit this into your character build, it is of course a welcome addition for defensive purposes, but it is often that units are very durable without the need for Steel Brow, and it's only desired for select defence orientated builds.

  • Quick Hands: (Okay:3,♛,♝,⚡,☸): The perk Quick Hands allows you to save 4 AP when swapping to an item in your inventory, and saving AP during combat can open up possibilities in efficient AP usage for increasing damage output. With low AP melee units, you can use Quick Hands for special weapon combinations, like swapping to a whip to disarm an opponent, builds that utilize Head Hunter to set up damaging headshots, or for niche situations where using a polearm over your primary on a frontliner is slightly more efficient. The use of Quick Hands on an archer would be to swap to your next set of projectiles/throwing weapons to maximize damage output, but it does come down to spending an entire perk point to avoid spending 4 AP, in which it depends on competing perks on whether or not Quick Hands is picked up. While it opens up the possibilities for weapon swapping combinations, it typically isn't a good use of your limited perk points, nor is it often the most efficient strategy to employ, when preparing yourself for a different action may be simply better. For more elaboration on using Quick Hands with polearms seek the Q&A section on "Popular Meta Builds" or builds that feature Quick Hands. Additionally, you can use Quick Hands for preparing throwables, while sometimes still being able to perform an action in the same turn, but again it is usually better to save the perk point in these cases. In terms of deciding what weapon to use, one should determine this before combat is initiated from the safety of a paused world map. So there is no real benefit from carrying the same function weapons in your inventory that will only weigh you down, and without the additional investment in Bags & Belts, you won't benefit from the carry weight.

  • Gifted: (Okay:3,♛,♟): Simply put, Gifted is a minor boost in three self-selected stats typically invested in Melee Defence (3), Melee/Ranged Skill (3,4), Fatigue (4), or Hit Points (4). It is safe to say that a customized stat boost is going to have value, but with the investment of an entire perk point, it is usually not worth giving to anyone who you intend to have any sort of permanence in your company, as most efficient end-game builds will be great without the distributed limited boost of typically 10 to 11 total stat points between three stats. That said, there are efficient character builds that will use Gifted to further their primary stats, due to the value of stat distribution being unique to the needs of a build. Other than that, the boost of a few dispersed max rolls isn't going to build too much momentum for your end-game company, and in most cases it does not merit the spending an entire perk point to gain. I would heavily recommend this perk for unideal hires or for fodder troops who are trying to make themselves useful before they are replaced in your min-max company.
♢ Perks: Tier 3: A Min-Max POV: Part 1 ♢
    Tier: 3
  • Backstabber: (Poor:2,♟): When considering if Backstabber is worth picking up on your troops, you have to consider that the perk is only really effective for inefficient or early-game builds. This meaning that Backstabber is meant for aiding your low Melee Skill mercenaries in hitting an already surrounded target. In the late-game, once you are surrounding an opponent you are likely not really going to need the bonus hit chance, as your troops should already be able to hit enemy units with their high Melee Skill. Additionally, with a high number of foes you typically are going to be the ones that are surrounded, in which wouldn't yield very much value from only two or at best three units surrounding a foe.

  • Anticipation: (Terrible:0): The perk Anticipation is mainly used for baiting enemy archers by knowing what the AI desires to target. Anticipation also scales with the leveling up of your Ranged Defence, but it is also notable that the perk will always provide a minimum of 10 Ranged Defence. While extra Ranged Defence is technically not bad, many issues with leveling Ranged Defence will limit the value of doing so. First off, leveling Ranged Defence takes away from leveling up better, more relevant stats, in which there are more enemies that punish you for having low stats of other categories. Additionally, by leveling up Ranged Defence, you are only going to change the target your opponent will target, without proper positioning and equipment meant to bait out ranged attacks, as well as Ranged Defence not actually providing very much value in terms of ranged hit chances in general. Lastly, with good armour and defensive perks you will not have to worry too much about taking damage from archers (see the Q&A section at the bottom of the guide). As for an archer, your defence against ranged will come from leveling up your Hit Points for the use of the perk Nimble. This perk does have the potential to make a moderate difference against mass archer fire, but otherwise it should be ignored entirely due to higher build priorities.

  • Shield Expert: (Poor:2,♜): The main problem with picking Shield Expert on one of your characters is that you would have to be wielding a shield to benefit from this perk. This means that you will go without using a two-handed weapon, or gaining the Duelist buff, which would severely limit your damage output. This is because when leveling your melee defence, using the perks Colossus, Battle Forged, Indomitable, and/or with/without Reach Advantage (combined with heavy armour & attachments), your defensive needs will be more than fortified for a melee Dps role. The purpose of a shield is to provide extra Melee/Ranged Defence. With an efficient base unit, after a certain amount of leveling up of your Melee Defence, and by using alternative perks your dodge chance will eventually cap near 95% against most enemies. While more defence is always good, the added defence of a shield will not be a sufficient replacement for sacrificing significant damage output. Additionally, you lose the benefits of Shield Expert when your shield is broken. It is acknowledged that a tank build will benefit greatly from Shield Expert, but for the reasons above you will not benefit in combat efficiency for other units. If you do want to utilize a famed shield in your build, this would be a perk to increase the durability of the shield in a fight, and the Blacksmith in your retinue can save them if they were to be broken. That said, Nimble Tank users with Shield Expert can be helpful in distracting large numbers of schrats, unholds, barbarian chosen, lindwurms, and other difficult opponents, making Shield Expert a situationally efficient perk.

  • Brawny: (Poor:2,♟): With the perk Brawny, you will obtain a moderate percentage-based boost to fatigue and initiative that was taken away from you by wearing armour. This will allow you to wear heavy armour on units with low Fatigue and still be able to maintain a working amount of fatigue. It is preferable to skip over Brawny, as with efficient character builds with high base fatigue, you will not struggle with fatigue as much, especially with certain famed heavy armours providing a reduction in fatigue loss. In the end, this perk is still considered a good usage of a perk point for most heavy armour users, as it does provide +19 working fatigue when wearing 320/320 armour, but, again, it will fall off in value on an end-game ready build, and it is preferred to be skipped, due to the high cost of a valuable perk point.
♢ Perks: Tier 3: A Min-Max POV: Part 2 ♢
  • Relentless: (Bad:1,⚡,☸): With the perk Relentless, we do not see very much value come out of reducing the loss of initiative when using fatigue by half, as usually having the potential to go before your opponents does not provide too much value overall. There may be niche situations where going before an opponent can allow you to finish them off before they may get a hit in, or to be able to use turn order to lessen debuff durations, but it is situational in value. Typically tho with Relentless, you will be using it on a Nimble build, as heavy armour units will have extraordinarily low working Initiative compared to their opponents, which either lowers the value gained from high Initiative very quickly, or gets refreshed immediately with Fatigue recovery.
    With viable builds that can make use of Initiative, there are perks that benefit from your Initiative staying high such as: Dodge, Overwhelm, and situationally Rotate; However, those are perks that are not made that much stronger by using Relentless. Some efficient build uses of Relentless would be for a unit to more reliably apply Overwhelm, or maintain turn order against high Initiative enemies like hexes. Otherwise, Relentless can be ignored on all non-initiative heavy builds (even often skipped on those), and your perk points can be spent elsewhere.

  • Rotation: (Okay:3,♝,♞,♜,♟): In the case of Rotation, you typically want this perk for your supporting characters to help in alleviating disadvantaged company members. This role is generally given to the more flexible back row units as they aren't always taking on full aggro from melee units, but it is also commonly used on tanks who do the opposite. The perk inherently, is a neutral perk that will take away from damage efficiency and will not always serve as a blanket defensive perk. That being said, being able to rotate a damaged troop into a safer position is a pretty valuable tool and shouldn't be passed up on your less damage-oriented positions such as the Banner Carrier and Nimble Tank builds. The perk also synergizes with Indomitable and a good defence with Battle Forged as you can bulk up after swapping a unit out that was in a bad position. Alternatively, you can use this perk aggressively to move a damage orientated unit into a valuable position; However, you do not want to build your main Dps units with this perk, as you will be burning a large amount of valuable Fatigue and AP that could be better used elsewhere, as well as the fact that you will be sacrificing a perk point on a perk hungry position.

  • Rally the Troops: (Good:4,♞): The usage of the perk Rally the Troops is specific, and you should only be used on your banner carrier. This is because you will require a heavy focus on leveling up your Resolve stat for the perk to reliably rally your wavering troops. Additionally, your troops should not really panic all that much as you should have secured a 50+ resolve on your hire with one or no level ups into Resolve, as well as exceeding that amount with arena traits and the AoE of the battle standard. This will mean that the only time your troops will actually flee in a late-game battle is if you made miscalculations on the difficulty of the fight you wanted to take, or perhaps some positioning misplays that caused them to waver. Your troops may waver when surrounded by enemy troops but that is not particularly avoidable other than: keeping your company in a good morale, becoming confident, good supportive positioning, and the correct enemy to party strength matchups. This being said, the main reason why you want to be able to rally your troops is because of the geist enemy. You will want to avoid fighting this foe often until your company's banner carrier can effectively rally your troops in a fight. All in all, it is a specialized perk that will carry you in tough situations where your troops do end up wavering, but can still be useful in difficult fights, as Resolve checks always have a minimum of 5% chance to fail.

  • Taunt: (Bad:1,♜): When talking about picking Taunt, the idea is great as grabbing aggro from enemy units is ideal, but in actuality the perk falls flat in effectiveness as the single target distraction perk has too many downsides. The first downside of using Taunt is the AP & Fatigue drain, and while other perks also have a similar Fatigue drain problem, the ability to draw the attention of a single target is lackluster compared to other active perks, as it is not naturally difficult to draw the attention of a unit. This is because when you are in a fight you should always consider positioning so that the troops in your company with the lowest Melee Defence (or is the more desirable target to hit) is either protected or diverting the attention away from your allies. This is very easy to tell which ally your opponent will target and thus expert positioning will allow you to direct the flow of damage in combat. Only very situationally you want to make use of Taunt to catch the attention of a nearby unit that is motivated to attack an ally instead. On top of all this, the perk can be inconsistent, which is the opposite of what makes this perk gain value. That said, the one ability that is keeping Taunt from being nearly useless is its ability to keep necrosavants from teleporting to more vulnerable targets, unless the necrosavant becomes surrounded or is right next to a more vulnerable target. Inherently it isn't a bad concept for a perk, but a reworking of the perk's mechanics would make it a more worthwhile defensive perk to use on your tanks.
♢ Perks: Tier 4: A Min-Max POV: Part 1 ♢
    Tier: 4
  • General Weapon Masteries: (Okay:3,♛,♝,⚡,☸): When talking about if a weapon mastery is worth picking up, you must first look at the value of the weapon in terms of: damage output, utility contribution, and additional applied effects/statuses. If the weapon is deemed valuable, then seeking information on if the weapon mastery provides: valuable fatigue reductions, exclusive abilities, or other bonuses that might make it worth the perk point investment.

  • Mace Mastery: (Bad:1): While the two-handed flanged mace doesn't seem like the obvious choice for a primary weapon, it's damage is largely competitive, and the dazed effect is very useful for debuffing dangerous foes. When it comes to the fatigue reduction of the perk, it is helpful, but only if you are utilizing the stun ability often, which you should not be doing, due to stunning being largely ineffective in the late-game, with the exception of situational stuns against barbarian chosen/champions. The late-game foes such as orc warriors/warlords, lindwurms, ifrits, unholds, and schrats that are dangerous in large quantities are unaffected by stuns and in general usually it is better to just deal damage or control with tanks instead of trying to stun. With the focus on using primarily basic attacks, you will not need to pick Mace Mastery on most units using a mace, as their low fatigue, basic attacks are the ideal usages of the weapon and the mastery doesn't provide a very noticeable fatigue reduction. Notably mace Duelists can be competitive Dps units, but are mathematically subpar to the warhammer in terms of Dps (and a great deal more subpar to qatals and cleavers).

  • Flail Mastery: (Poor:2): The problem with committing a unit to using a flail is that there is not currently a flail that is efficient enough to be worth building for with an efficient late-game company in mind, as the one-handed variants are the weakest & most unreliable, tier 3 damage dealing weapons currently in the late-game. Additionally, the ability to ignore the defensive bonuses of a shield is minimal with high melee skill and with the low amount of actually dangerous foes that wield high melee defence shields. The two-handed variant has subpar damage output when compared to their AoE two-handed competitors, as it has an AoE skill set that is nearly unusable, and utilizes an unreliable stun chance, in which is non-effective on a majority of late-game foes. That being said, one-handed flails are easy to obtain from raiders and are great for taking advantage of unhelmeted melee troops in the early to mid-game & the two-handed flail will still make for a decent headshot build. If your opponent does end up having armour, you are going to end up doing subpar damage with non-headshots or with the one-handed variants. The mastery doesn't really provide enough benefits to merit committing a perk point unless you are doing a niche armour penetration, headshot build with the two-handed flail or berserk chain, despite the general lack of damage output you will be doing.

  • Hammer Mastery: (Okay:3,♛): Hammer Mastery is a surprisingly usable perk to pick up if you are going to run a hammer user in your company. The reason being is that in the late-game, a good portion of the enemies you are going to be fighting are going to have large amounts of armour that you will have to go through. With Hammer Mastery, you will be able to do additional armour damage with the one-handed hammer and the polehammer with the situational secondary attack; However, if you are a hammer Duelist you would be exclusively using the basic attack due to the higher armour penetration. Unfortunately, the two-handed hammer does not benefit from the mastery in terms of bonus armour damage; However, for a two-handed user you will still benefit from the large fatigue reduction and +5% extra chance to hit for your AoE shatter skill, in which makes it worth picking it up, especially considering it is currently the strongest practical Dps in the game, with added survivability synergy benefits.

  • Axe Mastery: (Bad:1): The reason why Axe Mastery is rated as bad is, because the two-handed axe move set, damage output, and utility is obsoleted/doesn't have a place when compared to the two-handed hammer (efficient AoE beats single target, as well as on par single target), and the two-handed mace (similar Dps, except with the Daze powerful debuff, and added qatal build options for amplifying Dps). That said, the only way the axe could compete (when talking about maxing min-maxing) would be the use of their round swing AoE attack that hits everyone around them, with the exception of the low damage bardiche which uses a two target line attack. In concept, round swing might mathematically be good, but in practice you are likely going to need to at least have one ally next to your axe wielder, and specialized stats taking away from other categories if you do not want to suffer major issues of defence debuffs & morale checks. As for the one-handed axe and the longaxe you will not be dealing top Dps when compared to their potential counterparts. Additionally, splitting shields isn't a good use of your attacks (besides when fighting schrats), as dealing damage to your opponent is better than attempting to shatter a shield that they may waste a turn using shieldwall with (as well as avoiding giving your opponent the double grip Dmg buff). Other than the poor move set, a weakness with axes is that they distribute damage evenly between head and body upon hitting the head, in which is an inefficient way to take down an opponent, that said they can provide a double proc of Fearsome with a singular hit, which isn't particularly good considering many weapons can already apply 2 or more Fearsome procs via multiple strikes.

  • Cleaver Mastery: (Good:4,♛): Using a tier 3 cleaver is a decent way to deal raw damage with Duelist, and there are large upgrades in damage with a famed orc cleaver for a late-game Duelist build. Other than one-handed cleavers, you can find success with using the barbarian two-handed cleaver, which is a two-hander that can allow you to reliably use Indomitable/Recover with AP flexibility, but you just won't be running at maximum efficiency for a damage dealer. In addition, you will be able to make use of the reduced hit chance penalty & fatigue reduction of disarm skill uses when using the whip. With the full utilization of cleaver weapon skills and orc cleavers being used, the fatigue reduction is a strong point of the Mastery. In addition, you will gain bonus bleed damage output, but it is important to note that not all enemies will bleed, primarily the undead faction, as well as a fair amount of foes possessing the perk Resilient to reduce the duration. Overall, you will gain a good deal of value out of Cleaver Mastery for a one-handed cleaver build.

  • Sword Mastery: (Poor:2,♛): To start off, the greatsword does have the most versatile move set, based on AoE attacks (higher-end damage output, with a large fatigue cost). This being said, with the greatsword you will be spamming your AoE attacks to get the benefits of Reach Advantage and deal damage to multiple targets in an efficient manner. You will greatly benefit from the fatigue reduction for when you do spam those attacks, but not so much for one-handed swords. With this in mind, one-handed swords simply do not compete with other late-game weaponry due to their low damage output against late-game foes. Additionally, you do gain a +10% percentage buff to accuracy for AoE two-handed sword weapon skills (base is -5% for AoE, making a +5% gain), which adds to the value of using a greatsword on melee units that aren't very melee skill proficient. That stated, the greatsword as a primary weapon does not fill a niche for a min maxed build in a late-game composition, aside from the less melee skill demanding AoE.
♢ Perks: Tier 4: A Min-Max POV: Part 2 ♢
  • Dagger Mastery: (Good:4,♛,☸): With the Qatal Dagger, you can dish out very strong damage with deathblow, but it does require a debuff setup to initiate the needed skill bonus, which is best paired with build in applications of daze with a two-handed flanged mace. That said, it is best used to efficiently spend excess 3 AP for dealing extra damage when paired with a two-handed flanged mace 6 AP and can be very strong with 3 debuffed + Duelist aided deathblow skill strikes (benefitted AP/ fatigue reduction from mastery). On the other side of the mastery, the functionality of a build centered around puncturing an opponent requires a highly specialized build. Using a one-handed dagger to puncture your opponent, you will build up a large amount of fatigue for somewhat subpar single target damage, when compared to Duelists or two-handers. With the puncture weapon being one-handed, you would think Duelist would be a good perk to use, but the skill puncture will not benefit from it as you are already doing exclusively HP damage. It is also viable to have a dagger master in your company for the Overwhelm effect to help with champion swordmasters, but it is not the most efficient use of your party member or active AP.

  • Polearm Mastery: (Okay:3,♝,☸): With Polearm Mastery, you will reduce the amount of fatigue build up for your back row polearm users, lower your AP usage with polearms from 6 to 5, and negate the one-tile attacking debuff when using certain polearms against adjacent enemies. While the fatigue reduction from Polearm Mastery isn't impressive on basic attacks, it can be very powerful on weapons like the warscythe/swordlance for it's frequently used AoE, which depending on the number of user per fight can add up fatigue savings. That said, you should consider Polearm Mastery primarily for the AP reduction for synergy with Berserk, Quick Hands, and movement. Noting that the main effects of Polearm Mastery or Quick Hands can be used on a perk budget with the jagged pike, at lower a Dps.

  • Spear Mastery: (Bad:1,☸): The Spear Mastery perk is actually alright when it comes to what functionality you gain from picking up the perk. As being able to spearwall and continue to have an effective spearwall when an enemy breaks into your zone of control is pretty valuable as a fail-safe. That being said, you will not want to use spears in the late-game or on troops that have 60+ melee skill, as the spear doesn't do very much damage to foes, especially opponents with armour and enemies do become easy enough to hit without the spear bonus hit chance. With this in mind, if you do use a spear focused build, you will want the Spear Mastery for the fatigue reduction & associated mastery abilities.

  • Crossbow & Firearms Mastery: (Okay:3,☸): When understanding the value of this mastery you must understand the value of crossbows and firearms as weapons. To start, a crossbow you will not be able to: snipe down high priority targets at the most optimal distance or consistently deal more damage overall than a multi-shot warbow or heavy throwing weapon user. With a crossbow, you will be able to wear a slightly heavier helmet without sacrificing noticeable vision penalties, but in doing so you are put at a middle ground armour level, which doesn't always benefit from Nimble or Battle Forged in the most efficient way. Additionally, you do not efficiently benefit from the mandatory damage dealing perk Berserk when compared to a bow, as you are forced to reload every other turn beyond the first procing of the perk. Some would argue that crossbows are better than bows against goblins, due to the crossbows ability to kill a goblin in one shot (most of the time with perk help), but in reality, a skilled bow user can mildly outperform the crossbow with goblins killed per round (same perk help). By picking Crossbow Mastery you will be able to do some extra puncture damage, and by using a crossbow you will have a higher chance to hit your target with a lower ranged skill; However, you still are going to be stuck in an awkward area in between the optimal range of a bow and the penetration damage of heavy throwing javelins, while still lacking in the max efficiency of your damage output. With that lengthy, but necessary talk about crossbows, there is a second part to this perk, and that is the multiclass of firearms. The primary firearm is the handgonne, a rival archer build strategy that would involve enmasse Fearsome & Overwhelm procing onto your opponents. With the mastery reducing the 9 AP cost to 6 AP, you will make the handgonne a viable ranged weapon that can shoot every turn without moving by walking. In terms of raw damage, the handgonne will still be outclassed by the crossbow, warbow, and heavy throwing weaponry in practical scenarios; However, it is worth it for the debuff potential involving additional perks. Handgonne users can also switch to a crossbow out of combat for fights where a crossbow will be more efficient, allowing for a flexible ranged build. Overall, this mastery is worthwhile on the applicable builds, but the weapons themselves are slightly subpar compared to the leading damage dealers for ranged.

  • Bow Mastery: (Good:4,⚡): With Bow Mastery you are receiving solid value out of your weapon mastery perk. This is because the bow will allow you to take out high priority targets from a longer distance, such as hexes, necromancers, barbarian beastmasters, goblin shamans, goblin overseers, ancient undead priests, enemy archers, and other vulnerable targets with ease. With Bow Mastery you will be able to do that with an additional tile distance. Additionally, the fatigue usage reduction is valuable for any archer build as it will allow you to be greedy with spending your fatigue for rapid fire shots, especially regarding the usage of the perk Berserk. For more information regarding bow usage, seek the archer build section, and Bullseye/Crossbow perks in review sections.

  • Throwing Mastery: (Okay:3,⚡): At end the weapon masteries, we have the Throwing Mastery, in which it is important to establish that normal throwing weapons are a largely inefficient weapon group in Battle Brothers when compared to its peers, with the strong exception of heavy throwing javelins (heavy throwing axes are subpar, but still strong). The reason why a normal throwing weapon is an ineffective ranged weapon is because you will not have any distance advantage over your foes, nor a real damage output advantage either. You will not be able to take out high priority targets before they get into melee range with your company, and you will not be doing more damage than a bow, or a crossbow with normal throwing weapons. Using normal throwing weapons in any way besides establishing a fake ranged advantage, in order to trick the AI into advancing would be pretty inefficient. This being said, the heavy throwing javelin weapon has a very high damage output against heavily armoured opponents thanks to the focus on armour penetration. The use of heavy throwing javelins is made possible thanks to the tile thrown distance to damage ratio bonus that Throwing Mastery provides. Additionally, if you are going to incorporate heavy throwing weapons into your build, you should be using the perk Duelist for the additional armour penetration.
♢ Perks: Tier 5: A Min-Max POV ♢
    Tier: 5
  • Reach Advantage: (Great:5,♛,☸): With the perk Reach Advantage in your perk build, your two-handed melee fighters will be able to receive a flat buff of 5 melee defence per hit landed, with up to 5 stacks. Reach Advantage essentially makes AoE two-hander units able to reliably dodge incoming attacks while being partially surrounded. The perk mainly synergizes heavily with the top dmg output in the game, AoE strikes from the two-handed hammer, and even the greatsword AoEs, as well as a perk synergy with Berserk refunded AP. With the need for a strong defensive perk for two-handers, Reach Advantage fills the gap and increases your dodge chance by an average of 10 to 20 Melee Defence when wielding a good two-handed, AoE hitting weapon. There are very few reasons to not build an efficient end-game, two-handed unit that isn't AoE orientated, with the exception of utility such as utilizing Daze from the two-handed flanged mace.

  • Overwhelm: (Okay:3,☸): The perk Overwhelm is to be primarily used by light armoured builds, due to the nature of light armour leading to a larger pool of available Initiative. By using Overwhelm, you will be able to apply the overwhelm debuff with your attacks that apply -10% to an opponent's Melee/Ranged Skill, in which is valuable when it comes to suppressing the hit chances of heavy hitting targets. Applying the overwhelm debuff is particularly useful against: unholds, schrats, ancient undead pikemen, champions, arbalesters, other archers, orcs, hammer users, two-handed weapon foes, and pretty much anyone you don't want to be hit by. This essentially gifts you an extra 6 to 16 dodge bonus when the overwhelmed opponent attempts to hit you. There are some flaws when it comes to relying on Overwhelm such as: you aren't always before your opponent in the turn order for applying Overwhelm, works poorly with fatigue heavy builds due to stamina and Initiative being tied together, some ideal targets for Overwhelm will have a higher working Initiative/Fatigue recovery than you, and leveling up Initiative being a poor use of stat points (armour attachment is also weaker than other options). It's important to note that Overwhelm also is dependent on your opponents Melee Skill, which really makes a very large difference against highly skilled Champions. You can gain value out of Overwhelm on dagger tanks, AoE polearms and multi-hit ranged weapons, but you will lose out on Overwhelm value after you run low on fatigue or there might be better usages of your AP than applying Overwhelm, not to forget to mention that there are, in most cases, stronger perks to utilize instead.

  • Lone Wolf: (Bad:1,☸): When talking about the perk Lone Wolf, you would automatically think that this perk is really good, because having a percentage buff to your combat stats is pretty great. The problem with that is in reality, when using Lone Wolf, you have to be three tiles or more away from any ally. This will lead to your unit being surrounded and without direct combat support. Your troop will most likely get surrounded, take on too many surrounding debuffs, and then start to fatigue out or route without anyone to help them. With this being the case, Lone Wolf will never be picked up on an efficient meta build, as the three tile distance requirement is too detrimental to the safety of your fighter; However, there is some value in the perk for semi-sacrificial tank units that hold off a group of units at a distance.

  • Underdog: (Good:4:♛,♞,♜): One of the core perks for making a good frontliner is the perk Underdog. This is because you will inevitably be overwhelmed by large numbers in the late-game as enemy parties become larger, and due to being surrounded you will suffer a hefty loss in your chance to dodge. Additionally, being partially surrounded isn't actually the worst thing to happen to your tanks and AoE two-handers, as you want to have three or more enemy units in an arc around your AoE two-handers in order to get enough targets to deal efficient damage and still get the full benefits of the perk Reach Advantage, while a tank mitigating the damage of more than one enemy is great. As for units that may only see contact with a minimum of two units at a time, you will still gain valuable artificial Melee Defence to help keep your units thriving in combat. With that in mind, Underdog will remove any debuffs your troop will receive from being surrounded, with the exclusion of the morale checks from enemies entering your zone of control; However, if your opponent has Backstabber, the two perks cancel each other out for an even fight, instead of being highly disadvantaged against the Backstabber opponent.

  • Footwork: (Bad:1,☸): With the perk Footwork, you can use it to move around the zone of control of an enemy unit by spending 20 fatigue and 3 AP. While the value of this is good, the perk Rotation also allows you to move around the zone of control of an enemy and more with the cooperation of an ally; However, with Footwork all you need is an empty tile. This makes Footwork more ideal for units with room behind them to move back to, and nobody nearby to use Rotation. That said, Rotation provides more tactical value for supporting units to spend their AP and Fatigue, rather than your damage dealing units spending their more valuable AP and Fatigue, as well as taking up a valuable perk point. For an archer Footwork can help you with orc warriors pushing past your armoured frontline, and when large quantities of troops slip in between or around your fighters, and everyone is locked in zones of control. Some players have found success using Footwork on melee users in their companies, but when compared to Rotation it is a rather selfish perk.
♢ Perks: Tier 6: A Min-Max POV ♢
    Tier: 6
  • Berserk: (Great:5,♛,♝,⚡): The perk Berserk, in almost any situation, is going to be worth picking up on most of your damage focused character builds. This is because Berserk refunds you AP for successful kills, which allows you to deal additional damage, move around, or use additional items & skills. The perk synergizes the most with attacks that cost 4 AP to strike, due to the Recover perk's 9 AP cost, but it can still be heavily utilized by weapons that cost more than 4 AP, as you can still chain attacks for added value. Another damage build, utilized perk that synergizes is Indomitable, as you can attack multiple times and get a kill, and use Indomitable if the situation calls for it. With all this being said, Berserk is an all-around solid perk to pick on any build in order to deal additional damage, and utilize item & perk synergies, as additional AP to spend freely upon meeting a condition that will happen anyways is always going to be good.

  • Head Hunter: (Poor:2,♛): When considering taking Head Hunter, you have to remember that headshots are nice for dealing additional damage, but sometimes they can make it take longer to kill an enemy. This is because when you are fighting an opponent, you want to take them out by using the quickest route through one area of armour. This meaning that if you hit them in the body, you are going to want to continue hitting them in the body as that would likely be the weaker armour durability of the two. The more you hit the other areas of one's armour, the more your damage is spread out, and the longer it will take to kill an opponent. That said, being able to consistently hit the head two times in a row is a valuable ability to have if your killing power is efficient enough. In most cases, your unit dealing more damage is very strong, but it does need to be reliable in order to overcome Head Hunter's damage spread weakness against highly armoured opponents. One way to do this is to make it so that the damage you deal is primarily armour penetration damage. This would be good because you are always dealing a good amount of damage to an opponent's hit points. A specific viable implementation of Head Hunter units is to guarantee headshots with the initial setup of a one-handed flail; However, it is a subpar usage of your AP and perks in most cases. Additionally, you can stack this perk with the brute trait for added success and various factors that result in a higher chance to hit the head. With that said, additional damage is always good, as long as it is reliably substantial, in which Head Hunter is not consistently so, and is typically passed up in favor of more reliable damage dealing or niche defensive perks due to the limit of how many perks a unit can have.

  • Nimble: (Great:5,♛,♜,♝,♞,⚡): With the perk Nimble, you will be able to have a character build that revolves around low armour and high Hit Points. With Nimble relying on how much your equipped armour weighs, you will want to plan to have enough armour to protect your mercenary from DoT affects & strikes, as well as keeping your armour Fatigue total low in order to keep your Nimble HP damage received at around 40% to 45% depending on the build & encounter. This is most effective with an archer build as you will not likely be hit too much over the course of a battle, and with the damage reduction at a decent percentage, it will have been worth picking up to save your unit from ranged and melee attacks. For an archer wielding a warbow, you will be able to wear a 115 mail shirt and a 120 sallet helm, and still be at an ideal Nimble percentage. You will be able to increase your Nimble builds survivability by wearing famed armour that weighs less, and provides more armour that the enemy has to get through before they can get to your HP. With a Nimble build, one gains a large advantage against unholds, schrats, high damage headshots, and most armour penetrating focused attacks aimed at the head. The problem with choosing this perk for melee fighters is that you will be hit a decent amount throughout a fight, and you will be at a disadvantage when fighting some of the common late-game bleed or poison focused enemy types such as: goblins, necrosavants, orcs, ancient undead, or anyone with cleavers due to the extreme weakness to bleed, poison, other HP pure damage attacks, and as well as Fearsome resolve checks. In comparison, wearing heavy armour and the appropriate perks/armour attachments will be a more reliable defence against frequent hits received, rather than relying on HP as armour, as Nimble will cost you more in tools for repairing, as your armour will constantly be zeroed out against any meaningful opponent, while armour can be swapped out and be ready to go immediately; However, Nimble will carry you through tough situations against high armour penetrating attacks and be easier to build for in the early-game. In full recognition of the value that the perk provides mid to late-game, it falls off further into the late-game when you are properly equipped with Battle Forged & heavy armour. Despite this drop in value, Nimble is a valuable perk that allows for an efficient tank build that one can utilize along with your Battle Forged frontline to lessen the impact of high armour penetrating attacks, as well as backline builds that aren't attacked as often.

  • Battle Forged: (Great:5,♛,♝,♞): The perk Battle Forged is one of the best defensive perks in Battle Brothers for any character that can afford to wear heavy armour. This is due to the percentage scaling, armour damage reduction of 5% of your combined current armour value, as well as the inherent bonuses to damage reduction while wearing heavy armour. Not counting the usage of unique armours, you should be utilizing a 320 decorated full helm (or a 300 full helm), and a 320 coat of plates for your frontliner, banner carrier, and other heavy armour builds. This should net your unit about a 30-33% damage reduction at a full armour durability, as well as the reduction of damage in the formula that is based on total armour remaining. Additionally, Colossus should be taken for additional Hit Points to extend your life against armour penetration, and the armour attachment Additional Fur Padding (-33% penetration damage taken) to cover the armour penetration weakness of Battle Forged for body hits. Indomitable is notably strong with Battle Forged, but often doesn't make it's way into damage dealing builds; However, most utility and company compositions allow for dangerous rare 2h headshot capable enemies to be properly managed without the need for Indomitable on all of your Battle Forged units. Over the course of a battle, the damage reduction of Battle Forged does lessen as your troop takes damage, but it should carry you through in reducing damage for a large portion of your fights. Additionally, Battle Forged will scale with armour attachments and famed armour, which can net you nearly a 40% to 45% damage reduction. In terms of practicality, Battle Forged units also benefit from most of the sustained damage being armour damage, which can be readily swapped out post fight, where HP reliant builds will need time to recover, as well as still be burdened by repairing a large armour amount.
♢ Perks: Tier 7: A Min-Max POV ♢
    Tier: 7
  • Fearsome: (Okay:3,♛,♝,☸): When considering using Fearsome, you may think that it would be a powerful perk pick up, as making your opponents route is strong for ending fights early; However, the impact of the perk is somewhat lesser than it may appear. If we briefly & generally overview the mathematics of the added Resolve morale drop chance on a 50ish Resolve unit, we are only looking at an added 10% increase chance to cause an enemy to fail a morale check, which can turn a barbarian chosen from a 12% on the first hit to HP (roughly 10 damage) into a 21%, or greater increases as the enemy loses more HP. With AoE strikes allowing for multiple hits, you are more likely to inflict morale penalties on your opponents, even if it seems like 10% isn't a lot, it will greatly impact the overall times you break an opponent's morale, applying those nice negative combat debuffs of a -10% to -30% in Resolve (easier to break further), Melee/Ranged Skill (a stronger Overwhelm effect), Melee/Ranged Defence (easier targets). With the right combination of perks and weapons, Fearsome will allow you to cause an extra bit of disarray amongst the ranks of humans, beasts, and greenskins, but it is important to note that you will not be able to route any of the undead units. With this in mind, some of the more worrisome opponents like orc warriors, and barbarian chosen are affected by the morale checks of Fearsome. With Fearsome being utilized on a build that takes advantage of hitting multiple opponents at once, as well as a standard late-game Resolve amount of 65+ (resolve necklaces, banner carrier buff & arena included), you can noticeably increase the odds of an orc warrior or barbarian chosen failing one of their morale checks. As for the ability to make a morale check with attacks below 15 damage to Hit Points, most late-game weapons that one would consider using do more than the minimum damage to Hit Points, in which a morale check would be proced. In the long run, there are usually better perks to pick for your hires, especially considering that you are at the top of the perk tier list which allows you to pick freely any perk one may require.

  • Duelist: (Good:4,♛,⚡,☸): With the perk Duelist, you will be able to have an added 25% of your one-handed weapon damage become armour penetrating damage, if your offhand is free (not counting nets or throwables). An AoE two-handed frontliner build will outclass your Duelist build in terms of damage output; However, a Duelist will hold a high ranking in terms of whip disarm utility to damage output, due to partial AP synergy with disarming a threat with a battle whip, using Indomitable & the flexibility of the offhand for throwables. That being said, Duelist make excellent builds that dish out high armour penetration damage (with the correct weapons), that are nearly on par with AoE two-handers, while keeping your defensive tactical options available to use when needed (disarm, consumables, Indomitable, Recover synergy). There are some downsides with the perk, as you will have to spend a perk point to enable the extra armour penetration damage with Duelist, while other Dps builds may not have to spend a perk point to enable their damage potential. Additionally, Duelist does nothing against opponents with no armour, such as high tiered beasts; However, builds are typically built around the strongest threats, and the heavily armoured barbarian chosen & orc warriors are very weak against armour penetration. Melee aside, when using Duelist in combination with heavy throwing javelins, you will be able to deal more armour penetration effectively against heavily armoured foes. Thus, making it a fairly important perk for a build that uses heavy throwing weapons and ranged skill.

  • Killing Frenzy: (Good:4,♛,♝,⚡): The perk Killing Frenzy is simply a great perk for any efficient damage dealing build. Once you kill a single unit you will be able to deal 25% additional damage for two turns (turn of kill is counted as one turn), with a resetting timer for each kill. To put it simply, more damage is always good for any unit that is able to deal damage efficiently. Killing Frenzy will come into use the most when entering the late-game, as you will be taking out large amounts of enemies at a time. The only time when Killing Frenzy is not very useful is when you are facing enemies that are low in numbers, and are very difficult to kill, such as lindwurms or schrats. The value of Killing Frenzy will be similar to the value of Executioner, as they are both close in frequency with conditional bonus damage gains, but there is usually little reason to not have both perks for increasing your damage output. On a side note, when leveling up your characters, it is sometimes better to pick Killing Frenzy before you pick up Berserk, if you are having problems with early fatigue management.

  • Indomitable: (Good:4,♛,♞,♜): Last, but definitely not the least important, we get to Indomitable, which is typically one of the more undervalued perks in the Battle Brothers community. With Indomitable, you gain a 50% reduction in damage received, immunity to being stunned, knocked back, and grabbed until your next turn. This all costs 5 AP, and 25 fatigue, which is a bit demanding, especially so for 5-6 AP two-handed weapons. But for 5 AP, you will be able to use Indomitable in combination with 4 AP weapons, Berserk AP refunds, and on turns where defence is prioritized. With the 50% damage reduction you will be able to be a little bolder when facing up against notoriously heavy damage dealing opponents. The 50% damage reduction, in combination with heavy armour, and Battle Forged will reduce some of the strongest attacks into needle prick damage, and will often give you much more damage reduction than 50% due to how the mathematics is calculated. Additionally, this defensive combo helps take away themild risk of fighting end-game enemy archers as you will be able to confidently ignore incoming archer fire. Additionally, Indomitable has become very valuable against deadly barbarian weapons making you last a lot longer when being hit by their strongest attacks, and as well as the armour penetrating attacks from champion units, unholds, schrats & other sources of high armour penetration damage. Not only is Indomitable good for your frontline troops, but you can also use it on your Nimble tanks to greatly increase their survivability & tanking effectiveness. With the 50% damage reduction you will be able to save on tools in the late-game, as reducing damage also means reduced durability loss that you would have had to repair. Other than being able to last longer in fights with the survivability aspect of Indomitable, you will be able to fight orcs without stuns or pushes, stop unholds from stunning/pushing/tossing your units, other various displacement immunities, and all with the main bonus of greatly reduced damage. With all this in mind, you will be building up a decent amount of fatigue if you spam Indomitable every turn, so you will likely be using it situationally, yet still in every battle. Some ways to mitigate the fatigue costs of Indomitable are: to use the perk Recover as a way to regain efficiency after a few heavy rounds of fighting, have an intimate understanding of how enemies target your troops, and determine what attacks are going to be the most damaging so that you can use the perk accordingly. Additionally, Indomitable reduces damage before any other damage reductions, which allows for the perk to gain maximum value in reducing the incoming damage, unlike other damage calculations. That being said, Indomitable is the most valuable defensive perk in the game, and is almost a must have for anyone who is going to be subjected to receiving damage often (if they are able to manage the 5 AP & fatigue cost), especially so when talking about high damage encounters.
♦ High Damage Ranged Attacks: Answered Questions & Helpful Comments: Part 1 ♦
This section is here to highlight some questions that I've answered that might be helpful for understanding this guide. You are free to leave comments and constructive criticism in the comment section and I will gladly take into consideration your logic and reason-based responses.
Additionally, if you are looking to do a full peer review for this guide, I am sure it will only make the contents of this guide stronger and potentially more accurate. As, if possible, the guide will be consistently maintained as efficiency metas, and game mechanics change over time, including DLC.

Answered questions so far:
  • How does one avoid high damage crossbow shots?
The best way to briefly talk about avoiding high incoming archer damage is: avoidance, positioning, hit points, armour, and perks.
So, starting with avoidance, it is easy to tell if a fight on the world map will include a ranged unit of any caliber. The game allows you to hover over an enemy unit, or visible camp to tell you what the unit types are. I can get into a lot of detail about what fights to take at certain points of the game, but for the sake of keeping it short, you really shouldn't face off against tier 2 ranged opponents until your party has either ranged superiority and/or is at least equipped with 105 to 110 head and body armour. If you are experienced with the risk taking aspects of choosing your fights, it is definitely okay to gamble on if the tier 2 ranged units are going to be using tier 2 ranges weapons or if they will still have tier 1 ranged weapons. Of course, the larger the number of opponents is going to determine the difficulty of the fight to get to the archers.

In the case of positioning, if you really need to fight sharpshooters, and marksmen before you are ready, you should position your troops in a formation to where the shield-less, or range vulnerable troops are behind your shielded troops (In the later game, shield users may not be a troop in your party to reliably hide behind, but good hit points, perks and armour should get you through those fights with no problem). Additionally, if there is a wounded ally, or extra vulnerable brother you can retreat him out of harm's way by moving him further back in the battlefield or into a bush (without performing further actions to reveal your location).

When talking about armour, you should have gone the route of heavy armour and Battle Forged for your frontline (archers and other secondary units may use Nimble) in order to mitigate damage. So, the more amour you have the less you will be affected by enemy blows. While Battle Forged is not an early-game perk, good armour and a good base HP can prevent a good amount of damage, in which would put you at risk of archer damage. Additionally, the armour attachment "Additional Fur Padding", Reduces damage ignoring armour by 33% for body hits. As said though, avoidance is the best strategy for avoiding taking on ranged foes before you are ready in terms of hit points, armour, party composition, and perks.

Which brings me to some perks that definitely make high damage ranged opponents easier to face. Once you make it to the mid game you should, thanks to the experience buff of Student, have obtained Battle Forged for your melee folks, and Indomitable to mitigate nearly all types of ranged damage (including arbalesters). With 320/320 armour, and Battle Forged you will take as little as 16 damage to hit points from a hit to the head from a tier 3 crossbow shot due to the improved mitigation formula of armour remaining, and that is not including the 50% damage reduction you can take while using Indomitable, or the Additional Fur Padding attachment on a body hit. Now, for Nimble, you will want to go for building up your hit points to 125+ and choosing the perk Nimble to deal with high armour penetration (not recommended for frontline melee troops, for reference see Perks: Tier 6: A Min-Max POV). That being said, you really should avoid fights your party cannot take, and that learning what your party strength is will come with time.

As for leveling up your ranged defence, you really should avoid spending any points into the ranged defence stat on any build. Besides the obvious of spending points that would be best spent elsewhere, spending points in ranged defence is not actually going to make much of a difference in hit chances unless you actually spend a good amount of points into the stat, and that isn't wise due to the low amount of ranged units that are typically fought in the game, as well as there being significantly stronger melee units that are better to be prepared against, rather than prepping for the occasional high damage ranged attack that can be mitigated with other means of protection. Not to mention that if they don't desire to attack your high ranged defence unit, it may just target a different unit (largely predictable, but not consistent enough). With that said, a strategy that could be employed is having a couple of units that run Battle Forged or Nimble, and perhaps Indomitable in front of another unit with a polearm or bow for a couple turns as a way to draw out archer fire.

One should also hire from backgrounds that are well suited with a decent base hit points. These backgrounds would include Brawlers, Lumberjacks, Hedgeknights, Wildmen, and Farmhands. If the build calls for it, one might even add on Colossus to protect one's troop against higher-end armour piercing damage, or repeated attacks. This will typically net you around 95+ hit points with perhaps a couple max roll investments into hit points, 85+ without the stat investment.

So, in conclusion, leveling your troops with the right stats & perks, equipping the best gear you can obtain, positioning your men in such a way that the desired targets for archers are harder to hit, and straight up avoiding risky confrontations is a path you can take to avoid unfortunate losses. It is still possible to lose troops early to mid-game, even if you are sure of the battle outcome, but in the case that you are at a major disadvantage before your battle lines clash you can always hit the retreat button or move your troops to the edge of the map to reset or retreat from the fight.
♢ Armour Attachments: Answered Questions & Helpful Comments: Part 2 ♢
  • ”What is the reasoning behind your armour attachment priorities?”

In brief, here is a short list of armour attachments utilized.

Battle Forged Frontliner & Backliner: Additional Fur Padding (-33% penetration damage taken, for fights against armour penetration like barbarians, unholds, schrats, pikes, and crossbows) attachments. This is primarily to extend the life of your Battle Forged units to be able to use the full extent of their armour without dying to HP related attacks to the body, as well as the mathematical superiority of extending your units average lifespan.

Banner Carrier: Additional Fur Padding (-33% penetration damage taken, for fights against armour penetration like barbarians, pikes, and crossbows) or Light Padding Replacement (-20% fatigue on body armour; for more fatigue for more perk spamming) attachments. It's the same case for Frontliners with Additional Fur Padding, with the added option for increasing fatigue pools with Light Padding Replacement in fights not involving heavy/risk involved banner carrier tanking.

Nimble Tank & Nimble builds: Bone Platings (absorbs first hit, good for pre-end game Nimble armours), Horn Plate (-10% melee damage on hits to the body, best for famed end-game armours) or Unhold Fur Cloak (-20% ranged damage received & +10 durability, good in fights against mass goblin archers).

Archer: Bone Platings (absorbs first hit, good for Nimble armours & most fights as the backline doesn't get hit too often), Light Padding Replacement (-20% fatigue on body armour, can be used on famed armour that goes over 15 fatigue to get a better Nimble percentage, very situational), Unhold Fur Cloak (-20% ranged damage to body & +10 durability, for goblin ambusher heavy fights to help stay off the goblin poison) attachments.

The 10-40 durability armour attachments are solid for the early & mid game on medium armours (especially for economical purchases), or Noble mail/assassin gear until you get max durability/famed armour/better attachments.
♢ Backgrounds to Consider: Answered Questions & Helpful Comments: Part 3♢
While every hire should be able to field themselves in battle, there are some backgrounds that are worth hiring to keep in your reserve simply for their events. Depending on the level requirement of the events, you should limit the amount of experience these hires receive, in order to keep daily wages efficient.

Event Meme Hires:
  • Worthwhile Constant Value: Historian, and Monk.
  • Mainly For A One Time Event: Bowyer, Witchhunter, Caravan Hand, Graverobber, and Swordmaster.
Reasoning:
  • WCV Event Explanations:
    Historian (level 2-3+): Can trade away the black book for mysterious juggs (perk points) or legendary daze shield, Graverobber event synergy, some generally positive/mood boosting events, and can read the map purchased via another event leading to treasure.
    Monk (level 0-4+): Very positive interactions in background/general events, crafts blessed water, and stops conflicts via event options, including preventing Hedge Knight conflict.
  • MFAOTE Event Explanations: Bowyer (level 6+): Can make a single masterwork bow, or a wonky bow via a rare event, Witchhunter (any level): Specific event for unique famed greatsword with Rebuilding a Company origin, Caravan Hand (level 6+): Good for the inventory expanding event, Graverobber (any level): Event with Historian to obtain event-based free famed shield, and another graverobbing event for a chance at some decayed armour or gold, and can score some valuables in the hidden cache event, but has a noble troop event that could result in a party wipe/renown hit if not prepared, Swordmaster (level 4+): Event with Squire/Adventurous Noble to gain about a level ups worth of melee defence (once per Squire/Adventurous Noble), but will have a high upkeep.

Honorable Mention: The Swordmaster class:
  • The Swordmaster is categorized here as an honorable mention instead of being distributed into the background sections due to an abnormal abundance of key base stats, an extraordinary low amount of a primary & secondary base stats, and the ability to lose some of those base stats via a one time event.
Reasoning:
  • Pros: The stats that the Swordmaster excels in is a range of: 72-77 melee skill, a range of 10-20 melee defence, and a slightly worth mentionable 42-50 resolve. Has an event that cuts his wages in half and the Old trait can be removed by using 1 of your extremely limited Water Skin consumables, in which are gained by encountering the Grotesque Tree legendary location.
  • Cons: The stats that the Swordmaster is held back by is a range of: 38-48 hit points, and a range of 75-90 fatigue. That said, he will get worse with the Old trait (+10 resolve, -10 hit points, -10 fatigue, -10 initiative, -1 vision), in which he gains through an event. The Swordmaster also cannot gain key combat traits like Strong, Tough, Iron Lungs, or Huge.
  • Conclusion: While the Swordmaster's melee skill & melee defence are beyond desirable, but the base hit points and fatigue can completely ruin the build for any efficient Battle Forged (fatigue & armour penetration) or Nimble build (low effective hit points value). Not to mention you will not be able to regain hit points or fatigue value back from good starting traits. Additionally, you will eventually gain the Old trait event and lose even more stats out of your Swordmaster's hit points and fatigue. Although, you can remove the Old trait and make the Swordmaster viable again for a non-efficient campaign that, again, suffers from the severely low hit points and fatigue. So instead of being a background that is suggested for an efficient playstyle, the Swordmaster remains an inefficient hire that can, with preventative measures, can be a mediocre dagger tank, a fatigue neutral Dps unit, or just be used for training each Squire/Adventurous Noble for an extra 1-4 melee defence.

Honorable Mention: Event-based Stat Building:
  • With Battle Brothers being a limitless experience, it's important to understand your parameters for how long of a campaign you want to play. With time comes events, and with the existence of repeatable events that benefit the player's units with permanent improvements, there is a viable strategy to improve your units beyond the standard leveling formulas.
    Reasoning:
  • Pros: Given that you want to allow enough days to build up a few or more units via events, there is the melee fighter Farmhand event farming, which involves the following events: Brawler Teaches (1 time per unit: One mid tier level up for either fatigue, hit points, or melee skill & melee defence), Farmer Old Tricks (Repeatable: +2-4 melee skill), Combat Drill (Repeatable: +0-2 melee skill & melee defence, can choose ranged skill or fatigue & initiative, but those are lesser options for this background), and other minor events for stats. With already high starting hit points & fatigue potential with this background, melee skill & defence can be the focus of improvement with these events. You can choose to use other backgrounds that have the potential to improve from events such as Apprentices or Lumberjacks, but with the ability to trigger the Farmer Old Tricks event, the Farmhand has a significant advantage.
  • Cons: The most punishing downside of this strategy is that it requires for your Farmhand to be level 2 or lower in order to be eligible for the 3 main events. This results in the Farmhand needing to stay in reserve for the duration of their stat gaining, until you wish to use them costing you hundreds of days. This opens up a handful of efficiency issues.
    The first issue is that they will be in your reserve taking up a slot per unit that could be used for reserve units (tactical flexibility). While that on it's own isn't too terrible, you will need to manage their resolve without putting them into combat (likely attempting many tavern visits), as well as feed & pay them, and also deal with the results of your contracts accounting for an additional level 1-2 unit in your company strength calculation, for better or for worse (mainly an issue early-game).
    The next issue involving their stay in the reserve is that they will be in there for a long time (many hundred days per unit based on procing of event Rng & Rng of the Combat Drill event). This time is mostly undetermined, as it is a lengthy & unreliable testing process, but it is generally perceived as 350-450 days per unit until they have gained a strong melee skill & melee defence advantage over the higher end options for a lot less pay (can take a lot longer due to event hunting being VERY Rng).
    Essentially, you will want to be building your Farmhands as early as possible to maximize the event cooldowns, but for it to be worthwhile you will want to also find a Farmhand with decent stats, talent stars and maybe even traits, in which would be a strong addition to the rooster in the crucial stages of the game.
    Going back to the roots of the events involved, each event has their requirements that make the event eligible to proc. Starting with the Brawler Teaches event requires a new level 3 or higher Brawler & student for each teaching session with a cooldown of 70 days with a low end chance to proc. Next we have the Combat Drill event that requires you to have 3 or more level 3 or lower units (level 2 or lower is needed for the other 2 events) with a cooldown of 60 days. Lastly, we have the Farmer Old Tricks event which has a lengthy cooldown of 100 days and a very low event chance.
  • In the End: This strategy is valid if you intend to play a very long campaign (750+), but otherwise not worthwhile in a more common sub 400 day campaign where you will not likely see the units at full strength or be able to use them for a reasonable amount of days.
    It is noteworthy that it's likely an unintended exploit.
[Under Construction] ♢ Popular Meta Builds: Answered Questions & Helpful Comments: Part 4 ♢
Is this Meta Build strong & efficient? Yes. Is it the best use of one's company and/or build potential? No.
  • It is important to acknowledge that no matter the build, any attempt at using viable battle tactics can net you victories in late-game encounters. Also, if you make a build that uses high value perks/stats for the correct roles (melee/ranged damage dealers, banner carriers, tanks, etc.), you will no doubt see success in many encounters in the game of Battle Brothers. With that said, in the field of min-maxing, there is always a more efficient strategy or way to complete things. The goal of this guide is to showcase the absolute best meta builds and party composition strategies, but that doesn't mean that every other build isn't any good, as like many have said, there is no one way to play and succeed at Battle Brothers. These sections address several popular meta discussions that are still very efficient, strong and fun to use, as well as to explain their relative efficiency level.
    For Meta Builds or Ideas closely relating to a specific build featured in this guide, seek the "Further Elaboration" sections below each featured build.

Planned Further Elaborations:
  • Debuff Handgonners and their strength…
  • Why Crossbows are not used in finalized builds: In Brief: While crossbows are powerful ranged weapons, they are not the most Dps efficient when compared to heavy throwing javelin builds, as well as they do not fill the role of high priority target sniper that bow users have (hexe, necromancers, beastmasters, goblin shamans, etc.), despite having more damage output than bows versus armoured foes. There are additional minor reasons, such as weapon swapping, and less shots per turn (Dps contested here).
  • Melee & Ranged Hybrids... In Brief: The main issue ranged + melee hybrids is easily the stat allocation, as a good ranged unit is to level ranged skill, fatigue, and hit points (occasionally some melee defence max rolls), while a ranged + melee hybrid levels melee skill likely instead of hit points. This would result in a glass cannon build (will very likely die to any repeated Dmg source) that doesn't improve upon the roll of the ranged Dmg output, but adds a slight versatility for situations where melee is preferable; However, in a situation where melee is preferable, it would be better to just have a properly built melee unit instead (this guide's evaluations do not account for limited company sizes resulting in the desire for hybridization, as the reserve is a valuable tool). There are more reasons such as: bag slots being more valuable for heavy throwing weapons, more valuable perk priorities than polearm mastery/other, etc.
  • Pathfinder or Taunt instead of Gifted on a Nimble Tank... In Brief: Pathfinder on a Nimble Tank is less valuable because the tank is meant to hold a position where many enemies will pass around you, and will not often move around all the much. Additionally, they have Rotate as a additional tool to move around your battle line if need be, on top of the typical uses of Rotate. It may make retreating a tad bit awkward, but otherwise you will be fine spending the perk point on more valuable defensive options.
    As for Taunt, there is the perk section to describe Taunts low value, but in short, you will be better off not spending action points and valuable fatigue on an semi-inconsistent perk that doesn't work in the situations it would be most valued. A damage reducing defensive perk, and good positioning is always more desired for this version of a tank build.
  • Battle Forged Tank:
    In Brief: When comparing a BF tank compared to a Nimble tank, the key distinction between the two is that in general the Battle Forged Tank has more passive durability against a majority of foes in the game, while the Nimble tank has more fatigue to use defensive actions like Indomitable/shieldwall for a significantly increased durability, or Rotate for securing units/positions. Additionally, with Nimble you will be better at tanking the attacks that can be more damaging to an efficient BF than an efficient Nimble (2h very high ignore damage attacks, and ignore armour headshots). That said Nimble is more vulnerable to Fearsome and Bleeds, and repeated high medium damage attacks (orc weapons, goblin wofriders, repeated ranged attacks).
    A good reason why Nimble works well with a tank build compared to other builds is because when leveling tanks, they focus on only three stats: melee defence, fatigue, and hit points, whereas frontliners and other melee contact fighters need to level: melee skill, melee defence, fatigue, and if Nimble, hit points as well. Additionally, Nimble also give you access to using the Dodge perk for the extra reliable +10 melee defence, where a BF tank seek out a perk like Nine Lives, Brawny, or an extra active utility perk.
    Another benefit to Nimble tanks is that a non-shielded user can't reach as high melee defence as a shielded tank, which means that the Nimble tank will overall be hit much less than the average unit in melee contact. This meaning that it's usually better to prepare for the worst hits in Battle Brothers (high armour penetration attacks/headshots) in the case you do get hit.
    That said, a BF tank will still be very strong and in a lot of general use situations, will be more durable than a Nimble tank, but for this party composition chosen for this guide (based on the strongest party composition, poised at defeating the strongest enemies in the game), a Nimble tank covers the needs of the defence against high ignore damage headshots more so than a BF tank. Otherwise, a tank unit isn't efficient to bring to every fight, as more frontline Dps is often way more efficient against standard enemies.
[Under Construction] ♢ Popular Meta Builds: Answered Questions & Helpful Comments: Part 5 ♢
  • Initiative Based Tanks & the Dagger Overwhelm Nimble Tank:
    In Brief: When it comes to tanks your stat line is fairly flexible, as you really only need melee defence and fatigue. That said, extra survivability is a key staple for any tank build, and with Nimble you take hit points as your main survivability, with Battle Forged you can take hit points to extend your life against armour penetrating attacks, as well as heavy damage headshots, given enough hit points. That said, you can put points into initiative to go before enemies and apply the Overwhelm debuff on a target or few, which is undoubtedly valuable. In the process you can also gain some Dodge value (7-12 melee defence), to help with survivability by utilizing the perk.
    That all said, it is a trade off that is calculable for each type of tank build. For (md/fat/hp) Nimble Tanks your main advantage as a tank will be your protection against high ignore armour damage, while also having a very large fatigue pool with light armour. As a (md/fat/hp) Battle Forged Tank, your main advantage will be very high survivability against being hit repeatedly, and other protections against what makes Nimble weak, with only a low fatigue pool due to heavy armour. With a (md/hp/ini) Nimble Initiative Tank, your main advantage will be that you can go before a number of foes and apply Overwhelm, as well as hope to gain an small supply of melee defence, while only having a low fatigue pool due to not leveling fatigue at all (since out initiativing chosen and other enemies requires a good amount of initiative) or only partially (resulting in still a much lesser fatigue & Dodge gain).
    What you may notice is that a standard Nimble Tank will have the extra fatigue to use valuable perks such as: Indomitable (high damage prevention, and extending your survivability by a significant amount), and shieldwall (a significant boost to melee defence to put your chances to dodge to 5% against a vast majority of foes). While a Nimble Initiative Tank will have low fatigue, which to start, it is important to note that it is counterintuitive to have an initiative focus, as the lower your fatigue goes, the faster your initiative drops, which makes your build partially non-functional. That said, there are compromises, like partially leveling both stats (fat/ini) but what you will be left with is a lower initiative, which makes it so that you won't be able to surpass high initiative enemies in the turn order with full reliability. That said, you will be able to Overwhelm enemies, and you will get massive value out of a Dagger Mastery's 3 AP attacks (keeping in mind, that leveling melee skill to hit those attacks is not the purpose, nor an efficient means). With this in mind, you'll have to compare the values of lowering your opponents melee skill by 10% on multiple enemies to 30% on one enemy per turn, or spending your turn using Indomitable, or shieldwall for the reliably boost to defence. In most cases, you will benefit more from a higher fatigue pool and the ability to use Indomitable or shieldwall. That said, Overwhelm will come in handy against foes with absurdly high melee skill (some champions, swordmasters, etc.). In addition to the stat split being unideal for Initiative Tanks, you will also being investing in a few different perks (Relentless, Dagger Mastery, Overwhelm) instead of being able to go with extra bonus survivability perks such as (Rotate, Steel Brow, Gifted, Nine Lives, etc.) as there simply wouldn't be more room from the standard (Colossus, Indomitable, Nimble, Recover, Shield Expert, Underdog). There are more niche uses and arguments that can be made for every tank build that makes them specialized, but with this guide's parameters of narrowing down the best tank for the most efficient late-game party composition, an initiative based tank, doesn't fit the role the best.
  • Quick Hands on Two-handed Frontliners (Polearms): In Brief: For the main positives, you gain the ability to finish off near death enemies at a distance, moving a tile to strike a foe farther away and help with enemy defeat set up for nearby allies under threat. This can help proc Berserk and Killing Frenzy if the targets nearby are not able to be killed immediately. Additionally, it will help with saving AP to disarm foes using the whip, despite still not much synergy with 6 AP weapons.
    As for why it is listed here, is because utilizing AoE and setting up for future AoE strikes is going to be more efficient than moving to strike with a single target attack, or spending excess fatigue on subpar Dps when compared to the main role of your frontliner. That said, it is good to attack priority targets or to proc Berserk/Killing Frenzy if desired, but it comes down to spending a limited perk point, which you would likely be sacrificing Dmg output or survivability as a trade off on perk starved builds. Additionally, with certain two-handers they have additional options for dealing damage to distanced opponents such as the greatsword split, or the low AP costs of Duelists. In the event you can't fit Quick Hands on your two-handed frontliner, you can always use a jagged pike for the built in lower AP costs to take advantage of rare instances where it is more efficient to strike at a distance, even if it is for lower Dps (that said, famed goblin pikes are reliably easy to come by).
  • Dagger Puncture Specialist...
  • Stun Tank Specialist (late-game)...
  • Nimble Polearm...
  • Nimble & Attack Banner Carriers...
  • Nimble-Forged...
  • 2h Cleaver vs. Duelist Cleaver + Reach Advantage with 2h Cleaver...
  • AoE of the Greatsword (moved to momentum early-late game builds, due to no longer seeing the flexibility/utility/lower requirements value for an end-game build over using the AoE of the Two-handed Hammer, despite the still strong Dps value)...
♢Miscellaneous: Answered Questions & Helpful Comments: Part 6 ♢
  • "You mentioned you had played a lot of map seeds. But I noticed you didn't list any. Was curious do you have any nice seeds you can share with the masses?"
Hey, thank you for checking out my guide!
In the past, I've crusaded map seeds and posted them to a user made website; However, that was pre-DLC and they are no longer valid seeds. That said, if you are looking for a more customized experience you can use this seed filter created by Wlira: https://old.reddit.com/r/BattleBrothers/comments/eftwiy/new_tool_perfect_seed_finder/
In my playthroughs I tend to focus on having good Ports, Fortress Cities, Blast Furnaces and locations to purchase armour, but 95% of the time I play randomized seeds.

  • "Generally, how should one go about haggling contracts?"
When generally talking about haggling contracts, you can always ask for a singular increase in price every time (Perhaps avoiding doing so on caravan contracts, as they are usually not worth taking if you aim to play efficiently, or optionally with towns that have cheap premium gear that you intend to raise relations with greatly to purchase from now or the near future). The reason why you will want to ask for a price increase once per contract is because you will not suffer any meaningful consequences (only a 1-3% hit to relations (about 2.5%) or less, which is nothing) if you only make a single haggle attempt once per contract. Whether it is a successful attempt or not, you will agree on the terms and move to the next step. At this point, you will decide whether the contract risk (based primarily on the type of contract, and your current party strength) is worth its weight in gold and if so then you should accept it. If you are unsure, without any consequences, you can tell them that you will think about it, and you can always pick up the contract anytime if it is still there, with perhaps a similarly small 1-3% penalty for letting the contract disappear some time later after having left it. It is best to avoid declining a contract, as it will disappear on its own naturally, without much consequence.

I remember reading from a reliable source that it is mathematically better to ask for more pay, instead of going for the "in advance", "when it is done", or "per head options".

With the negotiator retinue hire you can avoid the relations hit when haggling and you will have 3 safe price increase asks (third ask is a 99% to succeed (if they say no at any point, you must stop there), while also having a greater chance to get a better haggle for better pay on haggle attempts beyond 3 attempts.
♦ Links to other helpful guides & Credits ♦
Guides:
  • https://gtm.you1.cn/sharedfiles/filedetails/?id=2001196860
    For learning more about the technical side of the perks and nuanced mechanics of Battle Brothers, In-Depth Perks Guide (Of Flesh and Faith Updated) written by Turtle225 & Abel, will provide you with knowledge needed to make your own decisions regarding perks & builds. It is important to note, there are some generalizations/biases displayed in the tone of their perk guide as incorrect information, and doesn't always align with the playstyle intended for this guide, which would call for a elongated campaign and a mind for min-maxing for the most optimal builds for defeating end-game content the most effectively; However, it is still a very helpful source of information for all Battle Brothers players alike, due to the emphasis on explaining mechanical functions and strong/proven data.
    As a side note, Turtle225 does feature an up to date damage calculator for understanding the best offensive and defensive options in terms of measuring damage. There are additional options for damage calculators that are out of date with specific information (perks, & weapon information presets & missing defensive options), but I would recommend Turtle225's calculator for measuring attacks against or from singular foes, despite it's lacking user friendliness. If not LordMidas's damage calculator works as a partial substitute with the acknowledgement that perks like: Nine Lives, Nimble, Weapon Masteries and Head Hunter are out of date, as well as the problem of having to manually input correct weapon preset information.

  • https://gtm.you1.cn/sharedfiles/filedetails/?id=1630767682
  • https://gtm.you1.cn/sharedfiles/filedetails/?id=959002432
    Seemingly, the information age of Battle Brothers has arrived thanks to the creation of modding tools from the guide "modding game scripts" by Adam & "Modding, Crafting, Customization, Inventory Decoding, Legendarys, Quests, DLC" by Chief & The Psijik. With the ability to view game files, there will be answers to the many inconclusive questions in Battle Brothers such as: character backgrounds, difficulty scaling, and much more //: Avoiding taking information from reddit or a streamer for factual information without evidence. I am not sure how this effort is viewed by the developers of Battle Brothers, but from what I've gathered it is seemingly acceptable to support this cause. If it is something that is not acceptable to promote, do contact me and I can remove this information from my guide. With that said, any modifications to one's game is not supported by the contents of this guide.
Credits:
  • All visual aids contain either screenshots, manipulation of, or direct game asset artwork from Battle Brothers. I do not claim ownership over any of the visual aids I've created for the purpose of this guide, and I do not benefit financially from the creation of this guide. All visual aids collaged belong to Overhype Studios and their creators, if that is preferred. If there is any problem with the usage of any of these screenshots, or artworks contact me, and I will be in full cooperation in their removal.

  • Congratulations! You have made it to the end of the guide. I just wanted to say that I've cherished slaving away over the creation of this guide and the many additional years since then that I've spent refining the guide after release & game content updates. I've had the pleasure to have logged a great deal of hours to my Battle Brothers play time thanks to this guide and it's testing needs. Anyways, I hope that my guide can help promote additional thoughts on, or future incorporation of efficiency-based playthroughs, as this project is more of a love letter to Battle Brothers than it is a shortcut cheat sheet for exclusively playing the game in a singular way. In any case, thank you for your time.~
446 Komentar
Medork 25 Nov 2024 @ 1:07pm 
great job boy
[TDS] Bigboy0007 4 Nov 2024 @ 5:07am 
(without even thinking about also rolling the other required stats and stars for the build)
[TDS] Bigboy0007 4 Nov 2024 @ 5:06am 
@NM9G Is it at all realistic to aim for the stats you've quoted? This is sort of piggy backing on what @men said not long ago, but for example you've quoted 95+ ranged skill for the archer build. Even a max starting RS hunter with 3 stars will on average only manage to hit 94 RS. Do you reliably manage to get this, particularly on ironman where you are limited to the number of hires you can scout?
Spaninq 22 Sep 2024 @ 7:44am 
I have not tested vs Southern enemies (because my forever file that I love dearly was built before I bought the DLC, and interestingly, I can occasionally pickup famed DLC weapons in random loot or blacksmiths, but nothing else shows up), but from what I've seen from streamers, they should work well against most enemies there as well.

Also, apologies for the multiple comments, 1000 character limit is pretty annoying.
Spaninq 22 Sep 2024 @ 7:44am 
I know I was skeptical of it, but I've found that quick hands frontliners with pocket jagged pikes/reach weapons last quite a while longer with Fat, simply due to them spreading their attacks over multiple turns, rather than positioning for one great turn of up to 5 attacks while taking a bunch of attacks in the meantime. And since I build most frontliners with Berserk+Killing Frenzy, having fatigue neutral turns interspersed really prolongs how long they can go before needing to Recover.

Oh, and I should point out that this build is for medium-very late game, since fatigue neutral turns start becoming relevant the second you pick up underdog and nimble/BF.

Weakness: Lindwurms (but Lindwurms are a weakness for every build, honestly) and goblins (because goblin poison ranged attacks + nets + magic in a fort (especially with high ground or a swamp) is BS)
Spaninq 22 Sep 2024 @ 7:43am 
If you're wondering where I slot it in to my perks list, I consider Reach Advantage and Executioner "luxury" perks, and will absolutely take Quick Hands over those (again, except for sword-lancers, fencers, and tanks). And since it's a tier 2 perk, you can wait to decide which weapon skill you want your bro to pick until much later, like when you find a god-tier famed weapon.

My banner build is also considerably different. I ignore MD (because they should never be on the front line anyway), don't take Indomitable (because they should never be on the front line), Nimble over Colossus, don't take Rotate (Footwork instead!), take Cleaver mastery (to disarm more often and cheaper), and Gifted over Bags & Belts (I suppose I could be persuaded towards bags and belts, honestly).

Feel free to test the idea out yourself.
Spaninq 22 Sep 2024 @ 7:43am 
A. bringing in another frontliner that finished their job on the front to stop the "uncontrolled" enemy,
B. building footwork on my backliners (I only use rotate on my tank, yes, that's right, I only use one, and he is BF, not nimble) so they can back away when rushed (Yes, smoke grenades are better, but also annoying to resupply), and
C. using whips to disarm and walk away.
Even so, my backliners will occasionally take a few hits, but that's why I build them nimble with bone plate armor.

6. It works particularly well against Undead, where geists and necromancers and priests try to hide exactly one tile behind a tanky enemy. Ignore the beefcake, swap to a polearm and poke/Longaxe/Polehammer/Polemace/whip the real annoyance instead.
Spaninq 22 Sep 2024 @ 7:43am 
The only real cost is the max fatigue lost for carrying a jagged pike in your pocket (but, they're relatively light, so definitely worth consideration).
Using this strat, I can usually kill 1-2 enemies (non-unhold enemies, anyway) before their melee units even engage, and that's on top of the 2-4 enemies my 2 berserker+Killing Frenzy archers can snipe (unless skeletons or goblins, of course)
How's *that* for efficiency?

5. Quick Hands also enables another strategy: Frontliners can start as "backliners" just fine (well, the 2-handed frontliners more so than duelists), so you can start with a compact formation to protect 2 archer/throwers + banner against orc charges.
This bring up a small quibble I have against 2Hammer AoE (I use a mix of 2Handers instead): the ability to push enemies back is *bad* because it enables enemies to refocus their movement towards your archers/banner, who have much lower MD. My ways around this particular issue are
Spaninq 22 Sep 2024 @ 7:42am 
4. With Jagged Pikes in particular, I've found it enables a silly strat that works surprisingly well. Some background: I've personally found waiting for the enemy to come to you while peppering them with arrows from my two archers usually works in non-fortress battles. When that happens (semi-frequently), the enemies tend to approach and stop about 3 spaces away from your bros before the turn before they actually engage.
Rather than waiting one more turn, a quick swap frontline bro with a jagged pike in their pocket can quick swap to it (0AP), step one tile forwards (2 AP, 0 Fat with Pathfinder on normal terrain, 1 or 2 otherwise), swing that possibly inflicts a bleed (5 AP, 12 Fat), then step back in formation (again, 0 Fat with.
Considering a bro regains 15 Fat/turn, that is fatigue neutral on most terrain, and only a small amount of Fat gain in bad terrain.
Spaninq 22 Sep 2024 @ 7:42am 
2. If your bro is three-four spaces away from the closest enemy /high priority enemy, having the flexibility to swap to a polearm/ jagged pike for free, take a step (or two, jagged pike is really good), then swing should not be scoffed at.

3. If you *do* kill all 3 enemies adjacent with an AoE (unlikely, I know), or another bro is in danger of dying to a tanky enemy (think orcs, undead heroes, swordmasters, honor guards, knights, champions, etc.), sometimes it is better to use your 6 remaining AP to swap to a pole hammer and either batter/demolish armor the scary enemy so they die faster over damaging the chaff in front of you.